【SpringBoot底层原理】SpringBoot底层原理实践(一)——手撕SpringBoot容器(幼儿园版)
最佳答案 问答题库578位专家为你答疑解惑
Spring底层原理实践(一)——手撕Spring容器(幼儿园版)
- 0. 前言
- 1. 依赖
- 2. 注解
- 3. Bean定义类
- 4. 容器接口
- 5. 配置类
- 6. 测试Bean
- 7. 启动类
- 8. 容器实现类
- 8.1 容器初始化
- 8.2 获取Bean
- 8.3 创建Bean
- 9. 测试
0. 前言
SpringBoot项目创建一个helloworld的web项目非常快速且方便,然后内部的流程实际上非常复杂。很多像我一样的小白,想通过阅读源码方式来了解SpringBoot的运行流程和机制,会发现根本无从入手!!,想要先了解一个点,却发现一个点涉及的类和接口实在太多,难以梳理这个流程。
本文主要是对SpringBoot的其中一个核心功能进行探索:容器加载和获取Bean的基本方式。需要对SpringBoot稍微有一点基础理论,需要知道容器的概念,Bean的概念等。
全文主要内容有以下几个方面:
- 自定义注解@Component 和 @ComponentScan 来模拟SpringBoot的容器扫描的注解
- @Scope注解来标注一个Bean是否单例模式
- 通过一个接口
ApplicationContext来模拟SpringBoot的ApplicationContext,以及它的实现类WhutApplicationContext完成Bean的加载和获取。 - 创建一个
App类当做SpringBoot的启动类, - 创建一个
UserService类并添加上相应注解,来测试是否能成功注入到容器中。
整个项目的目录结构如下:
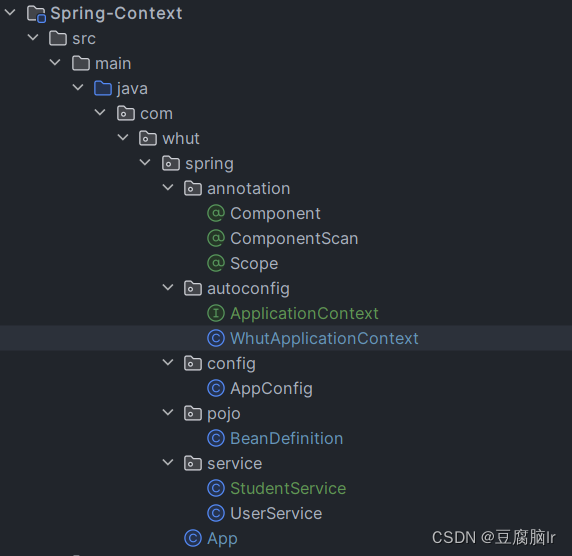
由于本文的很多类和注解跟SpringBoot框架自带的一样,所以在使用的时候注意一下,不要引用成框架的类了,如@Component,@ComponentScan、@Scope、BeanDefinition!!!!!!!!
`
本文内容主要参考自:Spring底层之bean底层原理,spring容器底层原理
1. 依赖
<dependency><groupId>org.springframework.boot</groupId><artifactId>spring-boot-starter-web</artifactId></dependency><dependency><groupId>org.projectlombok</groupId><artifactId>lombok</artifactId><optional>true</optional></dependency><dependency><groupId>org.springframework.boot</groupId><artifactId>spring-boot-starter-test</artifactId><scope>test</scope></dependency>
2. 注解
@Component
@Retention(RetentionPolicy.RUNTIME)
@Target(ElementType.TYPE)
public @interface Component {String value() default ""; // 给当前Bean起一个名字
}
@ComponentScan
@Retention(RetentionPolicy.RUNTIME)
@Target(ElementType.TYPE)
public @interface ComponentScan {String value() default  ""; // 扫描的路径
}
@Scope
@Retention(RetentionPolicy.RUNTIME)
@Target(ElementType.TYPE)
public @interface Scope {String value() default ""; // 设置单例 或者 原型模式
}
3. Bean定义类
package com.whut.spring.pojo;/*** bean的定义*/
public class BeanDefinition {private Class type; //类型private String scope; //单例,多例//懒加载,非懒加载public Class getType() {return type;}public void setType(Class type) {this.type = type;}public String getScope() {return scope;}public void setScope(String scope) {this.scope = scope;}
}
4. 容器接口
ApplicationContext 接口
public interface ApplicationContext {Object getBean(String beanName);Object createBean(String beanName, BeanDefinition beanDefinition);}
5. 配置类
@ComponentScan("com.whut.spring.service")
public class AppConfig {
}
6. 测试Bean
UserService
@Component("userService")
@Scope("prototype")
public class UserService {
}
StudentService
@Component
public class StudentService {
}
7. 启动类
在这个启动类中我们
/*** 模拟Spring的启动类**/
public class App
{public static void main( String[] args ){ApplicationContext context = new WhutApplicationContext(AppConfig.class);UserService userService = (UserService) context.getBean("userService");System.out.println(userService);System.out.println();StudentService studentService = (StudentService) context.getBean("studentService");System.out.println(studentService);}
}
至此本文项目的框架已经搭建完毕,只剩下最后一件也是最为重要的一件事,就是ApplicationContext 的实现类。
8. 容器实现类
在实现类中,主要有以下3个方法。
public class WhutApplicationContext implements ApplicationContext{/*静态常量*/private static final String SINGLETON = "singleton";/*存放Bean的Map*/private static ConcurrentHashMap<String, Object> beanMap = new ConcurrentHashMap<>();/*存放Bean的定义信息的Map*/private static ConcurrentHashMap<String, BeanDefinition> beanDefinitionHashMap = new ConcurrentHashMap<>();/*** 容器构造方法* @param configClass 配置类的Class*/public WhutApplicationContext(Class<?> configClass) {}/*** 获取Bean* @param beanName* @return Bean的实例*/@Overridepublic Object getBean(String beanName) {}/*** 创建一个 bean (反转控制法)* @param beanName* @param beanDefinition* @return*/@Overridepublic Object createBean(String beanName,BeanDefinition beanDefinition){}
8.1 容器初始化
首先最为重要的就是容器的构造方法,在这个方法中,我们将完成Bean的扫描和Bean的加载。通过传入一个带有@ComponentScan注解的类的class来确认扫描包的路径,从而完成Bean的扫描与加载。主要步骤如下:
/*1. 传入的 configClass 类中有我们需要加入spring容器包的地址2. 通过这个地址,获取到该地址下的所有文件3. 遍历这些文件,并筛选出.class文件4. 通过这些.class文件的地址获取到他的类(控制反转)5. 判断类上面是否有@Component注解,并解析其名字,如名字为空,者以该类类名首字母小写设置为该类的名称。6. 创建一个bean的定义类(beanDefinition),用于包容放入容器的对象和它的一些配置(如:是否是单例,是否为懒加载),将对象和它的配置放入该类中。7. 创建一个总的bean容器,以对象名(或者Component注解中的value属性)作为key,存储beanDefinition。*/
具体代码如下:
/*** 容器构造方法* @param configClass 配置类的Class*/public WhutApplicationContext(Class<?> configClass) {/*1. 传入的 configClass 类中有我们需要加入spring容器包的地址2. 通过这个地址,获取到该地址下的所有文件3. 遍历这些文件,并筛选出.class文件4. 通过这些.class文件的地址获取到他的类(控制反转)5. 判断类上面是否有@Component注解,并解析其名字,如名字为空,者以该类类名首字母小写设置为该类的名称。6. 创建一个bean的定义类(beanDefinition),用于包容放入容器的对象和它的一些配置(如:是否是单例,是否为懒加载),将对象和它的配置放入该类中。7. 创建一个总的bean容器,以对象名(或者Component注解中的value属性)作为key,存储beanDefinition。*/if ((configClass).isAnnotationPresent(ComponentScan.class)) {// 1. 传入的 configClass 类中有我们需要加入spring容器包的地址ComponentScan componentScan = configClass.getAnnotation(ComponentScan.class);String path = componentScan.value();path = path.replace(".", "/"); // 转为目录格式ClassLoader classLoader = WhutApplicationContext.class.getClassLoader();URL resource = classLoader.getResource(path); // 获取绝对路径assert resource != null;File file = new File(resource.getFile());System.out.println("扫描到的资源路径为:" + file.getAbsolutePath());if (file.isDirectory()) {/*2. 通过这个地址,获取到该地址下的所有文件*/File[] files = file.listFiles();assert files == null;for (File f : files) {// 文件的绝对路径String tempPath = f.getAbsolutePath();/*3. 遍历这些文件,并筛选出.class文件*/if (tempPath.endsWith(".class")) {// 获取 com/whut/spring/service/UserService.javaString className = tempPath.substring(tempPath.indexOf("com"), tempPath.indexOf(".class"));// 转成 com.whut.spring.service.UserServiceclassName = className.replace("\\",".");/*4. 判断类上面是否有@Component注解,并解析其名字,如名字为空,者以该类类名首字母小写设置为该类的名称。*/try {Class<?> aClass = classLoader.loadClass(className);if (aClass.isAnnotationPresent(Component.class)) {System.out.println("扫描到Component ==> " + className);Component component = aClass.getAnnotation(Component.class);/*5. 判断类上面是否有@Component注解,并解析其名字,如名字为空,者以该类类名首字母小写设置为该类的名称。*/String beanName = component.value();if ("".equals(beanName)) {beanName = Introspector.decapitalize(aClass.getSimpleName());}/*6. 创建一个bean的定义类(beanDefinition),用于包容放入容器的对象和它的一些配置(如:是否是单例,是否为懒加载),将对象和它的配置放入该类中。*/BeanDefinition beanDefinition = new BeanDefinition();beanDefinition.setType(aClass);if (aClass.isAnnotationPresent(Scope.class)) {Scope scope = aClass.getAnnotation(Scope.class);beanDefinition.setScope(scope.value());}else{beanDefinition.setScope(SINGLETON);}/*7. 创建一个总的bean容器,以对象名(或者Component注解中的value属性)作为key,存储beanDefinition。*/beanDefinitionHashMap.put(beanName, beanDefinition);}} catch (ClassNotFoundException e) {e.printStackTrace();}}}}/*8. 实例化单例模式的Bean*///实例化单例beanfor (String beanName : beanDefinitionHashMap.keySet()) {BeanDefinition beanDefinition = beanDefinitionHashMap.get(beanName);if (beanDefinition.getScope().equals("singleton")) {// 判断是否为单例Object bean = createBean(beanName,beanDefinition);assert bean != null;beanMap.put(beanName,bean);}}}}
8.2 获取Bean
在这个方法中,我们需要判断Bean是否为单例,如果是就直接返回(保证只有一个),如果不是,就新创建一个。
/*** 获取Bean* @param beanName* @return Bean的实例*/@Overridepublic Object getBean(String beanName) {BeanDefinition beanDefinition = beanDefinitionHashMap.get(beanName);if (beanDefinition == null) {throw new NullPointerException();}else{String scope = beanDefinition.getScope();if (scope.equals(SINGLETON)) {//单例System.out.println("获取到一个 单例模式的Bean ==> " + beanName);Object bean = beanMap.get(beanName);if (bean == null){Object tempBean = createBean(beanName, beanDefinition);if (tempBean == null) throw new NullPointerException("创建Bean失败...");beanMap.put(beanName, tempBean);}return bean;}else {//多例System.out.println("创建了一个非单例模式的Bean ==> " + beanName);return createBean(beanName,beanDefinition);}}}
8.3 创建Bean
/*** 创建一个 bean (反转控制法)* @param beanName* @param beanDefinition* @return*/@Overridepublic Object createBean(String beanName,BeanDefinition beanDefinition){Class clazz = beanDefinition.getType();//通过类的构造器 生成一个类的对象try {return clazz.getConstructor().newInstance();} catch (InstantiationException e) {e.printStackTrace();} catch (IllegalAccessException e) {e.printStackTrace();} catch (InvocationTargetException e) {e.printStackTrace();} catch (NoSuchMethodException e) {e.printStackTrace();}return null;}
9. 测试
如果没有书写错误,支持,我们可以启动测试类了。启动后,控制台会打印如下信息:
扫描到Component ==> com.whut.spring.service.StudentService
扫描到Component ==> com.whut.spring.service.UserService
创建了一个非单例模式的Bean ==> userService
com.whut.spring.service.UserService@4ec6a292获取到一个 单例模式的Bean ==> studentService
com.whut.spring.service.StudentService@1b40d5f0
99%的人还看了
相似问题
猜你感兴趣
版权申明
本文"【SpringBoot底层原理】SpringBoot底层原理实践(一)——手撕SpringBoot容器(幼儿园版)":http://eshow365.cn/6-23790-0.html 内容来自互联网,请自行判断内容的正确性。如有侵权请联系我们,立即删除!