faster python之ctypes调用so/dll
最佳答案 问答题库778位专家为你答疑解惑
目录
- .so和.dll文件
- 将go代码编译为动态链接库
- 将C代码编译成动态链接库
- ctypes库
- 基础数据类型
- 使用方法
- 基本数据类型
- 数组类型
- 指针类型
- 结构体类型
- 嵌套结构体
- 结构体数组
- 结构体指针
- 结构体指针数组
- ctypes加载DLL的方式
- 1. 使用 `CDLL` 类
- 2. 使用 `WinDLL` 类(Windows特定)
- 3. 使用 `cdll.LoadLibrary` 方法
- 4. 使用绝对路径
- 5. 使用 `os.add_dll_directory`(Python 3.8+)
- 编译属于自己的python解释器
.so和.dll文件
.dll(动态链接库)和.so(共享对象文件)是两种不同操作系统上使用的动态链接库格式。
-
.dll文件:
- Windows系统上使用的动态链接库文件格式。
- 通常用C/C++编写,并由编译器生成。
- 可以被多个程序共享,并在运行时动态加载到内存中。
- 允许不同程序之间共享代码和数据,有助于节省内存。
- 在Python中可以使用
ctypes库或者其他扩展库来调用.dll文件中的函数。
-
.so文件:
- 类Unix系统(如Linux)上使用的动态链接库文件格式。
- 通常用C/C++编写,并由编译器生成。
- 也可以被多个程序共享,并在运行时动态加载到内存中。
- 与
.dll类似,允许不同程序之间共享代码和数据。
为什么Go和C文件都可以编译成.dll和.so文件呢?
这是因为编译器(如GCC、Clang)和构建工具(如Go的工具链)支持将源代码编译成多种目标格式,包括可执行文件、静态库和动态链接库。
Go编译器支持将Go代码编译成可执行文件,静态库(.a文件)和共享对象文件(.so文件或.dll文件),这使得Go可以用于构建独立的应用程序,也可以用于构建共享库,供其他程序使用。
C编译器同样也可以将C代码编译成可执行文件,静态库(.a文件)和共享对象文件(.so文件或.dll文件),这使得C语言也具有相似的灵活性。
总的来说,.dll和.so文件是为了方便代码的共享和重用,使得多个程序可以共享一组函数或者代码库。这对于在不同程序之间共享代码是非常有用的,特别是当你想要避免在每个程序中都复制相同的代码时。
将go代码编译为动态链接库
-
准备xxx.go文件(必须要有一个main包才可以编译)
package mainimport "C"//export Add func Add(a, b int) int {return a + b }func main() {} -
执行命令编译:
go build -buildmode=c-shared -o tool.so tool.go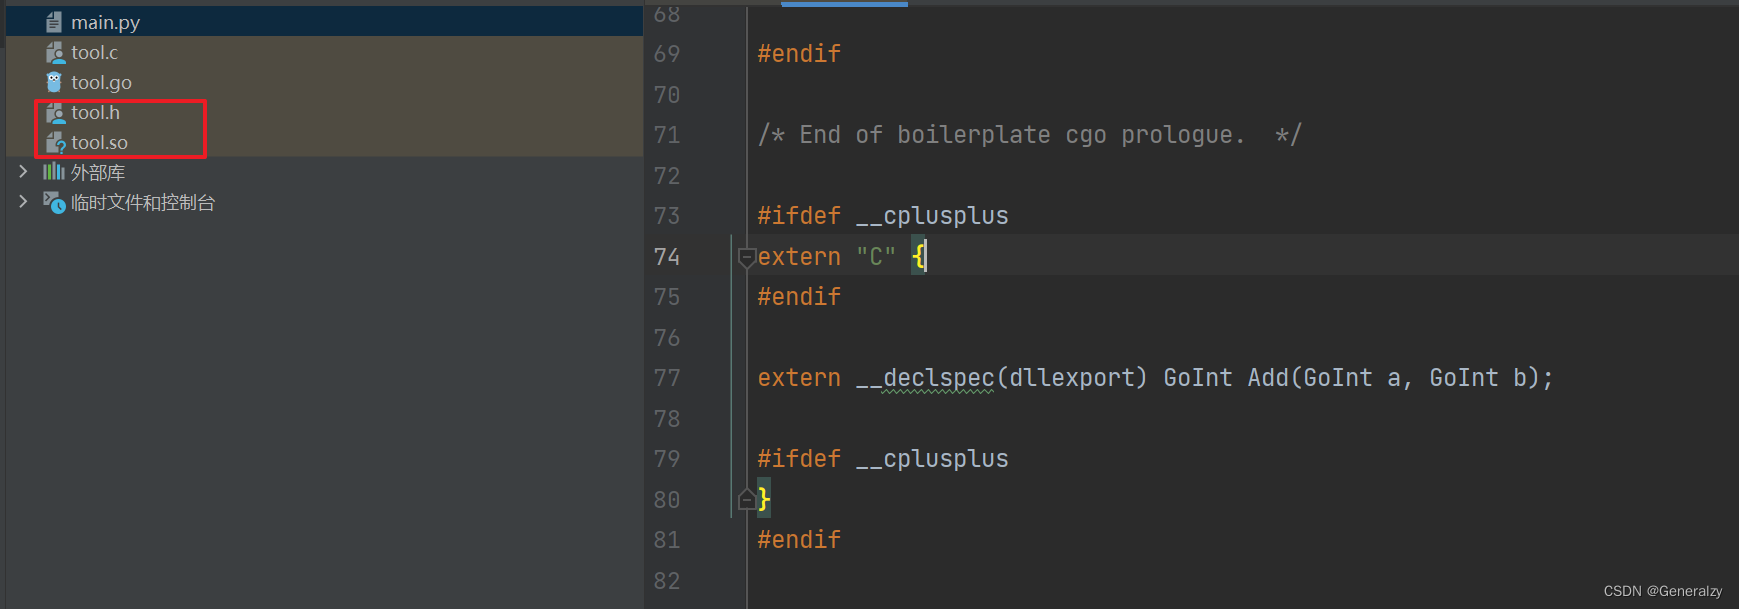
-
python调用
import ctypesmylibrary = ctypes.CDLL('./tool.so')result = mylibrary.Add(3, 4)
print(result)  # 这将打印出 7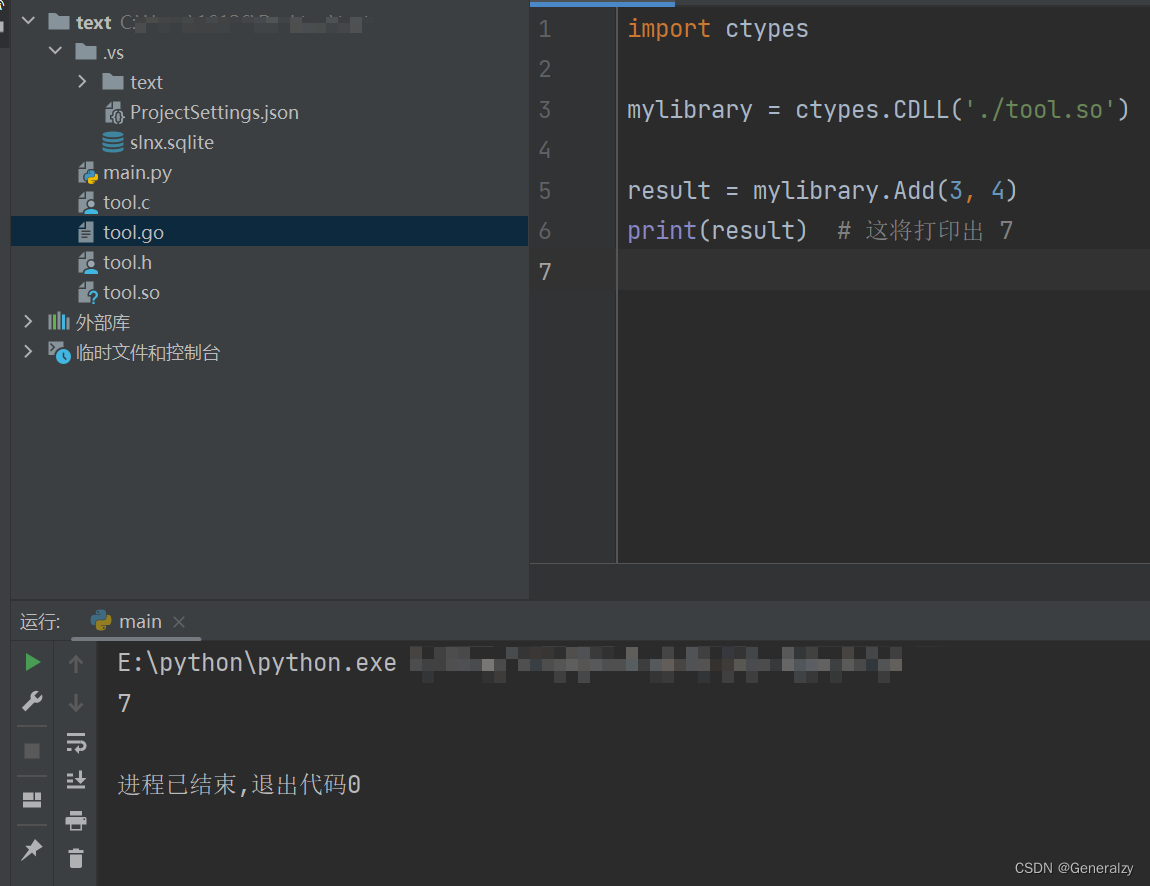
将C代码编译成动态链接库
-
准备xxx.c文件
int add(int a, int b) {return a + b; } -
执行命令编译
gcc tool.c -fPIC -shared -o ctool.so* -shared 为链接库 让编译器知道是要编译一个共享库 * -fPIC(Position Independent Code) 编译生成代码与位置无关 * 如果想能够调试可加上-g -Wall等参数 -
python调用
import ctypesmylibrary = ctypes.CDLL('./ctool.so')result = mylibrary.add(3, 4)
print(result)  # 这将打印出 7
ctypes库
附:3.7文档:https://docs.python.org/zh-cn/3.7/library/ctypes.html
ctypes是Python标准库中的一个模块,它提供了一种与C语言兼容的外部函数库接口,允许Python程序调用动态链接库(DLL或.so文件)中的C函数。这使得Python可以与C语言编写的库或者其他外部库进行交互。
以下是ctypes库的一些主要概念和用法:
-
加载共享库:
使用
ctypes.CDLL()来加载共享库。例如:import ctypesmylibrary = ctypes.CDLL('./mylibrary.so')这将加载名为
mylibrary.so的共享对象文件。 -
调用C函数:
一旦共享库被加载,你可以使用Python来调用其中的C函数。例如:
result = mylibrary.Add(3, 4)这将调用名为
Add的C函数,并将参数3和4传递给它。 -
指定参数和返回类型:
在调用C函数之前,你应该确保使用
ctypes正确地指定了参数类型和返回类型,以便与C函数的签名匹配。mylibrary.Add.argtypes = [ctypes.c_int, ctypes.c_int] mylibrary.Add.restype = ctypes.c_int这个例子中,我们指定了
Add函数的参数类型为两个整数,返回类型也是一个整数。 -
处理指针和数据类型:
ctypes可以处理C中的基本数据类型以及指针等复杂数据结构。你可以使用ctypes中的类型来映射C数据类型。 -
错误处理:
如果调用C函数可能会返回错误码,你可以通过检查返回值来处理错误。
-
回调函数:
你可以使用
ctypes来定义Python回调函数,并将其传递给C函数,以便C函数在适当的时候调用Python函数。 -
结构体和联合体:
你可以使用
ctypes来创建和操作C中的结构体和联合体。 -
内存管理:
ctypes提供了一些工具来处理内存分配和释放,以确保与C代码交互时不会出现内存泄漏等问题。
总的来说,ctypes是一个强大的工具,可以让Python与C代码无缝交互。它使得Python能够利用C语言编写的库,同时也提供了一种方便的方式来测试和调试C代码。然而,由于ctypes是一个动态的Python库,所以在性能要求严格的情况下,可能需要考虑使用更高级的工具,如Cython或SWIG。
基础数据类型
ctypes 定义了一些和C兼容的基本数据类型:
ctypes 类型
C 类型
Python 类型
c_bool
_Bool
bool (1)
c_char
char
单字符字节串对象
c_wchar
wchar_t
单字符字符串
c_byte
char
int
c_ubyte
unsigned char
int
c_short
short
int
c_ushort
unsigned short
int
c_int
int
int
c_uint
unsigned int
int
c_long
long
int
c_ulong
unsigned long
int
c_longlong
__int64 或 long long
int
c_ulonglong
unsigned __int64 或 unsigned long long
int
c_size_t
size_t
int
c_ssize_t
ssize_t or Py_ssize_t
int
c_float
float
float
c_double
double
float
c_longdouble
long double
float
c_char_p
char* (以 NUL 结尾)
字节串对象或 None
c_wchar_p
wchar_t* (以 NUL 结尾)
字符串或 None
c_void_p
void*
int 或 None
使用方法
基本数据类型
# -*- coding: utf-8 -*-
from ctypes import *# 字符,仅接受one character bytes, bytearray or integer
char_type = c_char(b"a")
# 字节
byte_type = c_char(1)
# 字符串
string_type = c_wchar_p("abc")
# 整型
int_type = c_int(2)
# 直接打印输出的是对象信息,获取值需要使用value方法
print(char_type, byte_type, int_type)
print(char_type.value, byte_type.value, string_type.value, int_type.value)
输出:
c_char(b'a') c_char(b'\x01') c_int(2)
b'a' b'\x01' abc 2
数组类型
数组的创建和C语言的类似,给定数据类型和长度即可,
# 数组
# 定义类型
char_array = c_char * 3
# 初始化
char_array_obj = char_array(b"a", b"b", 2)
# 打印只能打印数组对象的信息
print(char_array_obj)
# 打印值通过value方法
print(char_array_obj.value)
输出:
<main.c_char_Array_3 object at 0x7f2252e6dc20>
b'ab\x02'
也可以在创建的时候直接进行初始化,
int_array = (c_int * 3)(1, 2, 3)
for i in int_array:print(i)char_array_2 = (c_char * 3)(1, 2, 3)
print(char_array_2.value)
输出:
1
2
3
b'\x01\x02\x03'
这里需要注意,通过value方法获取值只适用于字符数组,其他类型如print(int_array.value)的使用会报错:
AttributeError: 'c_int_Array_3' object has no attribute 'value'
指针类型
ctypes提供了pointer()和POINTER()两种方法创建指针,区别在于:
pointer()用于将对象转化为指针,如下:
# 指针类型
int_obj = c_int(3)
int_p = pointer(int_obj)
print(int_p)
# 使用contents方法访问指针
print(int_p.contents)
# 获取指针指向的值
print(int_p[0])
输出:
<__main__.LP_c_int object at 0x7fddbcb1de60>
c_int(3)
3
POINTER()用于定义某个类型的指针,如下:
# 指针类型
int_p = POINTER(c_int)
# 实例化
int_obj = c_int(4)
int_p_obj = int_p(int_obj)
print(int_p_obj)
print(int_p_obj.contents)
print(int_p_obj[0])
输出:
<__main__.LP_c_int object at 0x7f47df7f79e0>
c_int(4)
4
如果弄错了初始化的方式会报错,POINTER()如下:
# 指针类型
int_p = POINTER(c_int)
# 实例化
int_obj = c_int(4)
int_p_obj = POINTER(int_obj)
报错:
TypeError: must be a ctypes type
pointer()如下:
# 指针类型
int_p = pointer(c_int)
报错:
TypeError: _type_ must have storage info
创建空指针的方式
null_ptr = POINTER(c_int)()
print(bool(null_ptr))
输出:
False
指针类型的转换
ctypes提供cast()方法将一个ctypes实例转换为指向另一个ctypes数据类型的指针,cast()接受两个参数,一个是ctypes对象,它是或可以转换成某种类型的指针,另一个是ctypes指针类型。它返回第二个参数的一个实例,该实例引用与第一个参数相同的内存块。
int_p = pointer(c_int(4))
print(int_p)char_p_type = POINTER(c_char)
print(char_p_type)cast_type = cast(int_p, char_p_type)
print(cast_type)
输出:
<__main__.LP_c_int object at 0x7f43e2fcc9e0>
<class 'ctypes.LP_c_char'>
<ctypes.LP_c_char object at 0x7f43e2fcc950>
结构体类型
结构体类型的实现,结构和联合必须派生自ctypes模块中定义的结构和联合基类。每个子类必须 定义一个_fields_属性,_fields_必须是一个二元组列表,包含字段名和字段类型。_pack_属性 决定结构体的字节对齐方式,默认是4字节对齐,创建时使用_pack_=1可以指定1字节对齐。比如初始化student_t的方法如下,特别需要注意的是字段名不能和python关键字重名
# -*- coding: utf-8 -*-
from ctypes import *# 学生信息如下
stu_info = [("class", "A"),("grade", 90),("array", [1, 2, 3]),("point", 4)]# 创建结构提类
class Student(Structure):_fields_ = [("class", c_char),("grade", c_int),("array", c_long * 3),("point", POINTER(c_int))]print("sizeof Student: ", sizeof(Student))# 实例化
long_array = c_long * 3
long_array_obj = long_array(1, 2, 3)
int_p = pointer(c_int(4))
stu_info_value = [c_char(b"A"), c_int(90), long_array_obj, int_p]stu_obj = Student(*stu_info_value)
# 这样打印报错,因为字段名和python关键字class重名了,这是需要特别注意的点
# print("stu info:", stu_obj.class, stu_obj.grade, stu_obj.array[0], stu_obj.point[0])
print("stu info:", stu_obj.grade, stu_obj.array[0], stu_obj.point[0])
输出:
sizeof Student: 40
stu info: 90 1 4
如果把_pack_改为1,则输出:
sizeof Student: 37
stu info: 90 1 4
嵌套结构体
嵌套结构体的使用需要创建基础结构体的类型,然后将基础结构体的类型作为嵌套结构体 的成员,注意基础结构体所属字段的字段类型是基础结构体的类名,如下:
# 创建类型, nest_stu字段的类型为基础结构体的类名
class NestStudent(Structure):_fields_ = [("rank", c_char),("nest_stu", Student)]# 实例化
nest_stu_info_list = [c_char(b"M"), stu_obj]
nest_stu_obj = NestStudent(*nest_stu_info_list)print("nest stu info: ", nest_stu_obj.rank, "basic stu info: ", nest_stu_obj.nest_stu.grade)
输出:
nest stu info: b'M' basic stu info: 90
结构体数组
结构体数组与普通数组的创建类似,需要提前创建结构体的类型,然后使用struct type * array_length 的方法创建数组。
# 结构体数组
# 创建结构体数组类型
stu_array = Student * 2
# 用Student类的对象实例化结构体数组
stu_array_obj = stu_array(stu_obj, stu_obj)# 增加结构体数组成员
class NestStudent(Structure):_fields_ = [("rank", c_char),("nest_stu", Student),("strct_array", Student * 2)]# 实例化
nest_stu_info_list = [c_char(b"M"), stu_obj, stu_array_obj]
nest_stu_obj = NestStudent(*nest_stu_info_list)# 打印结构体数组第二个索引的grade字段的信息
print("stu struct array info: ", nest_stu_obj.strct_array[1].grade, nest_stu_obj.strct_array[1].array[0])
输出:
stu struct array info: 90 1
结构体指针
首先创建结构体,然后使用ctype的指针方法包装为指针。
# 结构体指针
# # 创建结构体数组类型
stu_array = Student * 2
# # 用Student类的对象实例化结构体数组
stu_array_obj = stu_array(stu_obj, stu_obj)
# 曾接结构体指针成员,注意使用类型初始化指针是POINTER()
class NestStudent(Structure):_fields_ = [("rank", c_char),("nest_stu", Student),("strct_array", Student * 2),("strct_point", POINTER(Student))]# 实例化,对Student的对象包装为指针使用pointer()
nest_stu_info_list = [c_char(b"M"), stu_obj, stu_array_obj, pointer(stu_obj)]
nest_stu_obj = NestStudent(*nest_stu_info_list)# 结构体指针指向Student的对象
print("stu struct point info: ", nest_stu_obj.strct_point.contents)
# 访问Student对象的成员
print("stu struct point info: ", nest_stu_obj.strct_point.contents.grade)
输出:
stu struct point info: <__main__.Student object at 0x7f8d80e70200> # 结构体指针指向的对象信息
stu struct point info: 90 # Student结构体grade成员
结构体指针数组
创建结构体指针数组的顺序为先创建结构体,然后包装为指针,最后再创建数组,用结构体指针去实例化数组。
# 结构体指针数组
# 创建结构体数组类型
stu_array = Student * 2
# # 用Student类的对象实例化结构体数组
stu_array_obj = stu_array(stu_obj, stu_obj)
# 创建结构体指针数组
stu_p_array = POINTER(Student) * 2
# 使用pointer()初始化
stu_p_array_obj = stu_p_array(pointer(stu_obj), pointer(stu_obj))
# 曾接结构体指针成员,注意使用类型初始化指针是POINTER()
class NestStudent(Structure):_fields_ = [("rank", c_char),("nest_stu", Student),("strct_array", Student * 2),("strct_point", POINTER(Student)),("strct_point_array", POINTER(Student) * 2)]# 实例化,对Student的对象包装为指针使用pointer()
nest_stu_info_list = [c_char(b"M"), stu_obj, stu_array_obj, pointer(stu_obj), stu_p_array_obj]
nest_stu_obj = NestStudent(*nest_stu_info_list)# 数组第二索引为结构体指针
print(nest_stu_obj.strct_point_array[1])
# 指针指向Student的对象
print(nest_stu_obj.strct_point_array[1].contents)
# Student对象的grade字段
print(nest_stu_obj.strct_point_array[1].contents.grade)
输出:
<__main__.LP_Student object at 0x7f3f9a8e6200>
<__main__.Student object at 0x7f3f9a8e6290>
90
ctypes加载DLL的方式
ctypes库提供了几种方式来加载动态链接库(DLL)。以下是常用的方法:
1. 使用 CDLL 类
使用ctypes.CDLL类来加载动态链接库,这是最常用的方式。
import ctypes# 加载 DLL
mylibrary = ctypes.CDLL('mylibrary.dll')# 调用 DLL 中的函数
result = mylibrary.Add(3, 4)
print(result)
2. 使用 WinDLL 类(Windows特定)
在Windows系统上,可以使用ctypes.WinDLL类来加载DLL。它与ctypes.CDLL类似,但使用了stdcall调用约定。
import ctypes# 加载 DLL
mylibrary = ctypes.WinDLL('mylibrary.dll')# 调用 DLL 中的函数
result = mylibrary.Add(3, 4)
print(result)
3. 使用 cdll.LoadLibrary 方法
可以使用ctypes库中的cdll.LoadLibrary方法来加载动态链接库:
from ctypes import cdll# 加载 DLL
mylibrary = cdll.LoadLibrary('mylibrary.dll')# 调用 DLL 中的函数
result = mylibrary.Add(3, 4)
print(result)
4. 使用绝对路径
如果 DLL 文件不在Python脚本的当前工作目录下,你可以使用绝对路径来加载它:
from ctypes import cdll
import os# 获取 DLL 文件的绝对路径
dll_path = os.path.abspath('mylibrary.dll')# 加载 DLL
mylibrary = cdll.LoadLibrary(dll_path)# 调用 DLL 中的函数
result = mylibrary.Add(3, 4)
print(result)
5. 使用 os.add_dll_directory(Python 3.8+)
如果你使用的是Python 3.8及以上版本,可以使用os.add_dll_directory来将包含DLL的目录添加到系统路径中:
import os
from ctypes import cdll# 添加包含 DLL 的目录到系统路径
os.add_dll_directory(r'C:\path\to\dll\directory')# 加载 DLL
mylibrary = cdll.LoadLibrary('mylibrary.dll')# 调用 DLL 中的函数
result = mylibrary.Add(3, 4)
print(result)
这种方法可以避免一些在加载DLL时可能会遇到的路径问题。
请确保将示例中的 mylibrary.dll 替换成你实际要加载的DLL的文件名。
编译属于自己的python解释器
在 Windows 平台上编译修改后的 CPython 源代码,可以使用 Microsoft Visual Studio 编译器和一些附带的工具来完成。以下是详细步骤:
-
安装所需软件:
- 安装 Microsoft Visual Studio。建议安装一个完整的版本,包括 C++ 开发工具。
- 安装 Git,用于从 GitHub 克隆 CPython 仓库。
-
获取源代码:
打开命令提示符或 PowerShell,运行以下命令克隆 CPython 仓库:
git clone https://github.com/python/cpython.git -
安装 Windows SDK:
在 Visual Studio 中,使用 Visual Studio Installer 安装 “Desktop development with C++” 工作负载,并包括 Windows 10 SDK。
-
打开 Visual Studio:
打开 Visual Studio,然后打开
cpython\PCbuild\pcbuild.sln解决方案文件。 -
进行修改:
在 Visual Studio 中进行你的修改。

-
下载编译 cpython 需要的外部依赖
命令行运行
PCbuild/get_externals.bat完成后在 cpython 中会多出来一个 externals 文件夹,其中包含编译 cpython 需要的外部依赖项
-
构建:
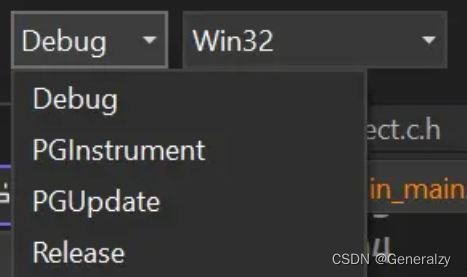
打开 pcbuild.sln ,进入 Visual Studio 进行编译。编译平台可选择 Win32、x64、ARM 和 ARM64。编译模式除了普通的 debug 和 release 之外还有 PGInstrument 和 PGUpdate 模式。
在 Visual Studio 中,选择
Release或者Debug配置,然后按下Ctrl+Shift+B或者选择 “生成” > “解决方案生成” 来构建代码。如果你在 Visual Studio 中使用
Debug配置构建,你将能够在构建过程中在 Visual Studio 中进行调试。PGInstrument 和 PGUpdate 是在 release 模式下加入 PGO (Profile Guided Optimization) 优化,这种编译模式需要 Visual Studio 的 Premium 版本。在 python 官网 下载的 python 就是在 PGO 优化模式下编译得到的。
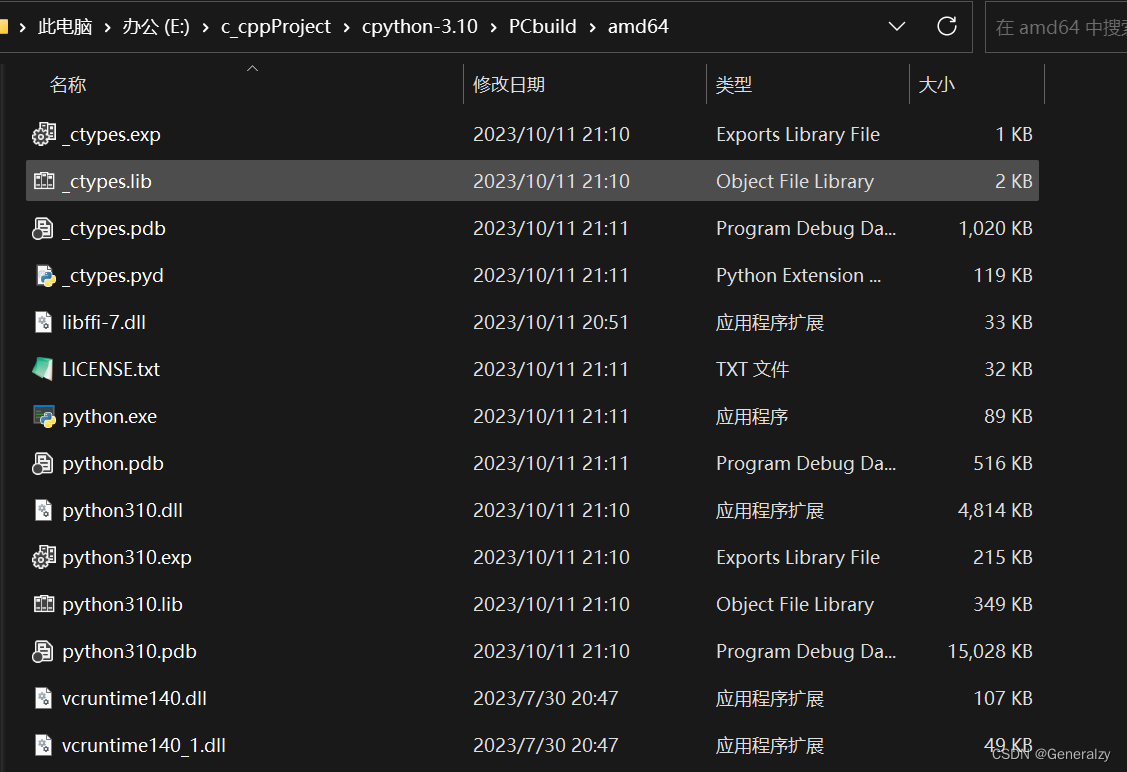
在 Visual Studio 中编译 CPython 的速度还是很快的,debug + win32 模式在笔记本上半分钟就可以编译完。编译成功后在 PCbuild/win32 路径下会生成 python_d.exe 和 python312_d.dll ,文件名中的 312 是版本号。这就是从源代码编译得到的 python,可以双击 python_d.exe 运行(后缀 _d 表示 CPython 是在 debug 模式下编译的。)
python 的核心功能由 python3.dll 来提供,python.exe 只是充当一个入口。python.exe 只是给 python3.dll 套了个壳,把命令行参数 argc argv 传递给 Py_Main 函数。
99%的人还看了
相似问题
猜你感兴趣
版权申明
本文"faster python之ctypes调用so/dll":http://eshow365.cn/6-19563-0.html 内容来自互联网,请自行判断内容的正确性。如有侵权请联系我们,立即删除!