Apacha Flume
最佳答案 问答题库548位专家为你答疑解惑
0目录
1.Flume概述
2.Flume安装部署
3.案例1
4.案例2
5.案例3
1.Flume概述
1.1 Flume定义
Flume是Cloudera提供的一个高可用的,高可靠的,分布式的海量日志采集、聚合和传输的系统。Flume基于流式架构,灵活简单。
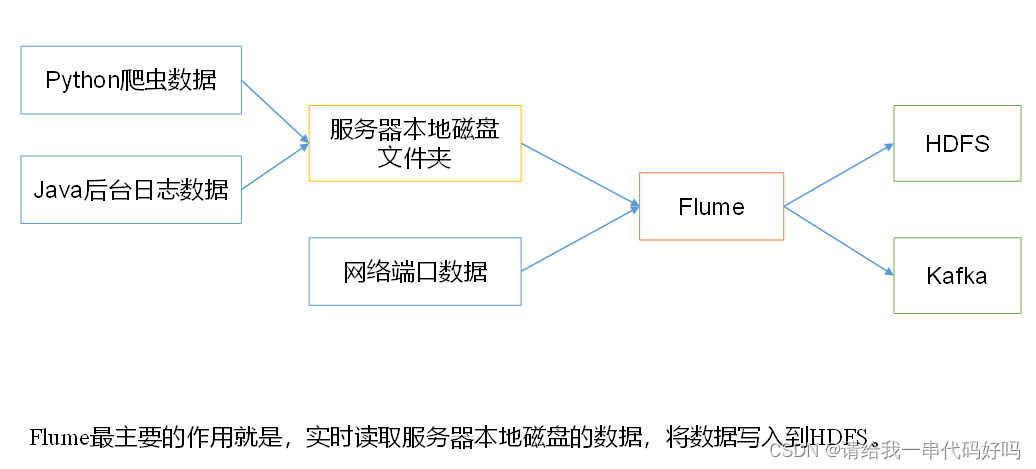
1.2 Flume基础架构
Flume组成架构如下图所示。
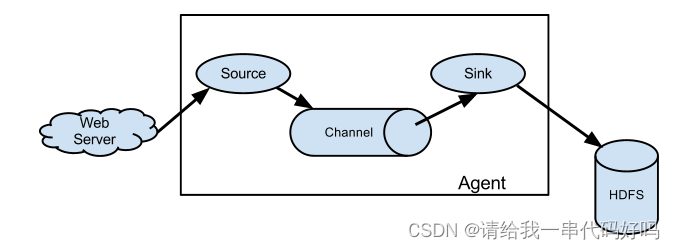
1.2.1 Agent
Agent是一个JVM进程,它以事件的形式将数据从源头送至目的。
Agent主要有3个部分组成,Source、Channel、Sink。
1.2.2 Source
Source是负责接收数据到Flume Agent的组件。Source组件可以处理各种类型、各种格式的日志数据,包括avro、thrift、exec、jms、spooling directory、netcat、taildir、sequence generator、syslog、http、legacy。
1.2.3 Sink
Sink不断地轮询Channel中的事件且批量地移除它们,并将这些事件批量写入到存储或索引系统、或者被发送到另一个Flume Agent。
Sink组件目的地包括hdfs、logger、avro、thrift、ipc、file、HBase、solr、自定义。
1.2.4 Channel
Channel是位于Source和Sink之间的缓冲区。因此,Channel允许Source和Sink运作在不同的速率上。Channel是线程安全的,可以同时处理几个Source的写入操作和几个Sink的读取操作。
Flume自带两种Channel:Memory Channel和File Channel。
Memory Channel是内存中的队列。Memory Channel在不需要关心数据丢失的情景下适用。如果需要关心数据丢失,那么Memory Channel就不应该使用,因为程序死亡、机器宕机或者重启都会导致数据丢失。
File Channel将所有事件写到磁盘。因此在程序关闭或机器宕机的情况下不会丢失数据。
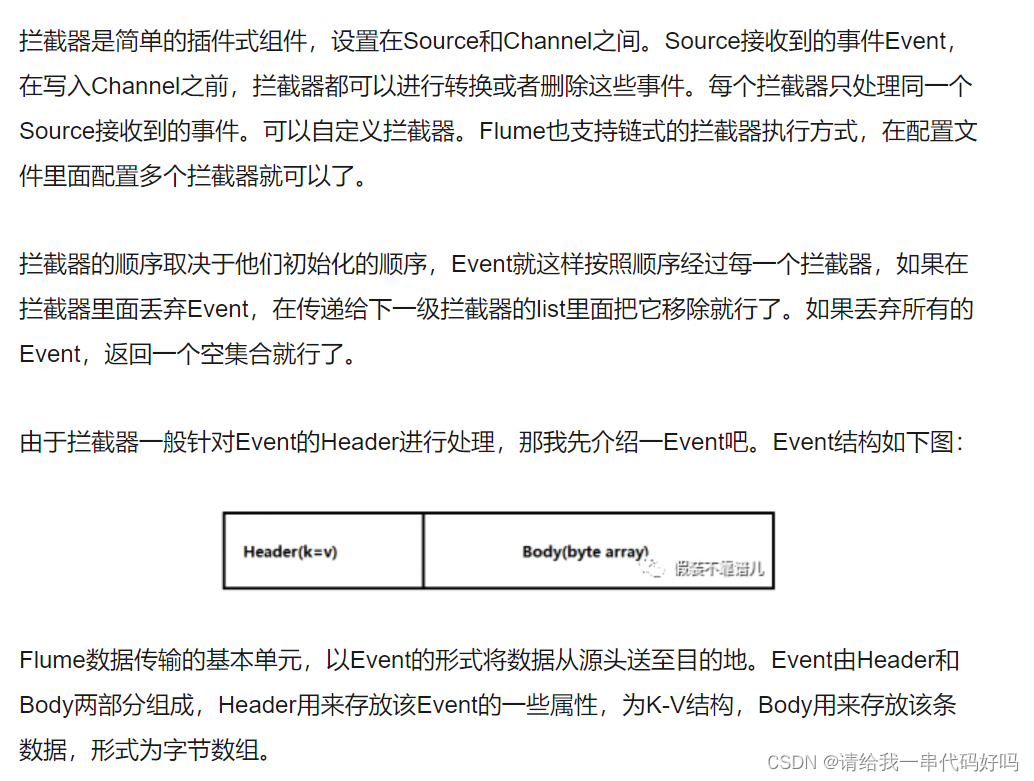
1.2.5 Event
传输单元,Flume数据传输的基本单元,以Event的形式将数据从源头送至目的地。Event由Header和Body两部分组成,Header用来存放该event的一些属性,为K-V结构,Body用来存放该条数据,形式为字节数组。

2. Flume安装部署
解压,改名
[root@kb129 install]# tar -xvf ./apache-flume-1.9.0-bin.tar.gz -C ../soft/

复制一份配置文件,并进行配置
[root@kb129 conf]# cp flume-env.sh.template flume-env.sh
[root@kb129 conf]# vim ./flume-env.sh
22 export JAVA_HOME=/opt/soft/jdk180
25 export JAVA_OPTS="-Xms2000m -Xmx2000m -Dcom.sun.management.jmxremote"
将lib文件夹下的guava-11.0.2.jar删除以兼容Hadoop 3.1.3
找到flume下现有的guava jar包并删除
[root@kb129 lib]# find ./ -name guava*
./guava-11.0.2.jar
[root@kb129 lib]# rm -rf ./guava-11.0.2.jar
拷贝新hadoop内的guava至flume内
[root@kb129 lib]# pwd
/opt/soft/hadoop313/share/hadoop/hdfs/lib
[root@kb129 lib]# cp ./guava-27.0-jre.jar /opt/soft/flume190/lib/
安装工具
[root@kb129 conf]# yum install -y net-tools
[root@kb129 conf]# yum install -y nc #安装netcat服务
[root@kb129 conf]# yum install -y telnet-server #安装netcat服务
[root@kb129 conf]# yum install -y telnet.* #安装netcat客户端
测试工具
启动服务端口
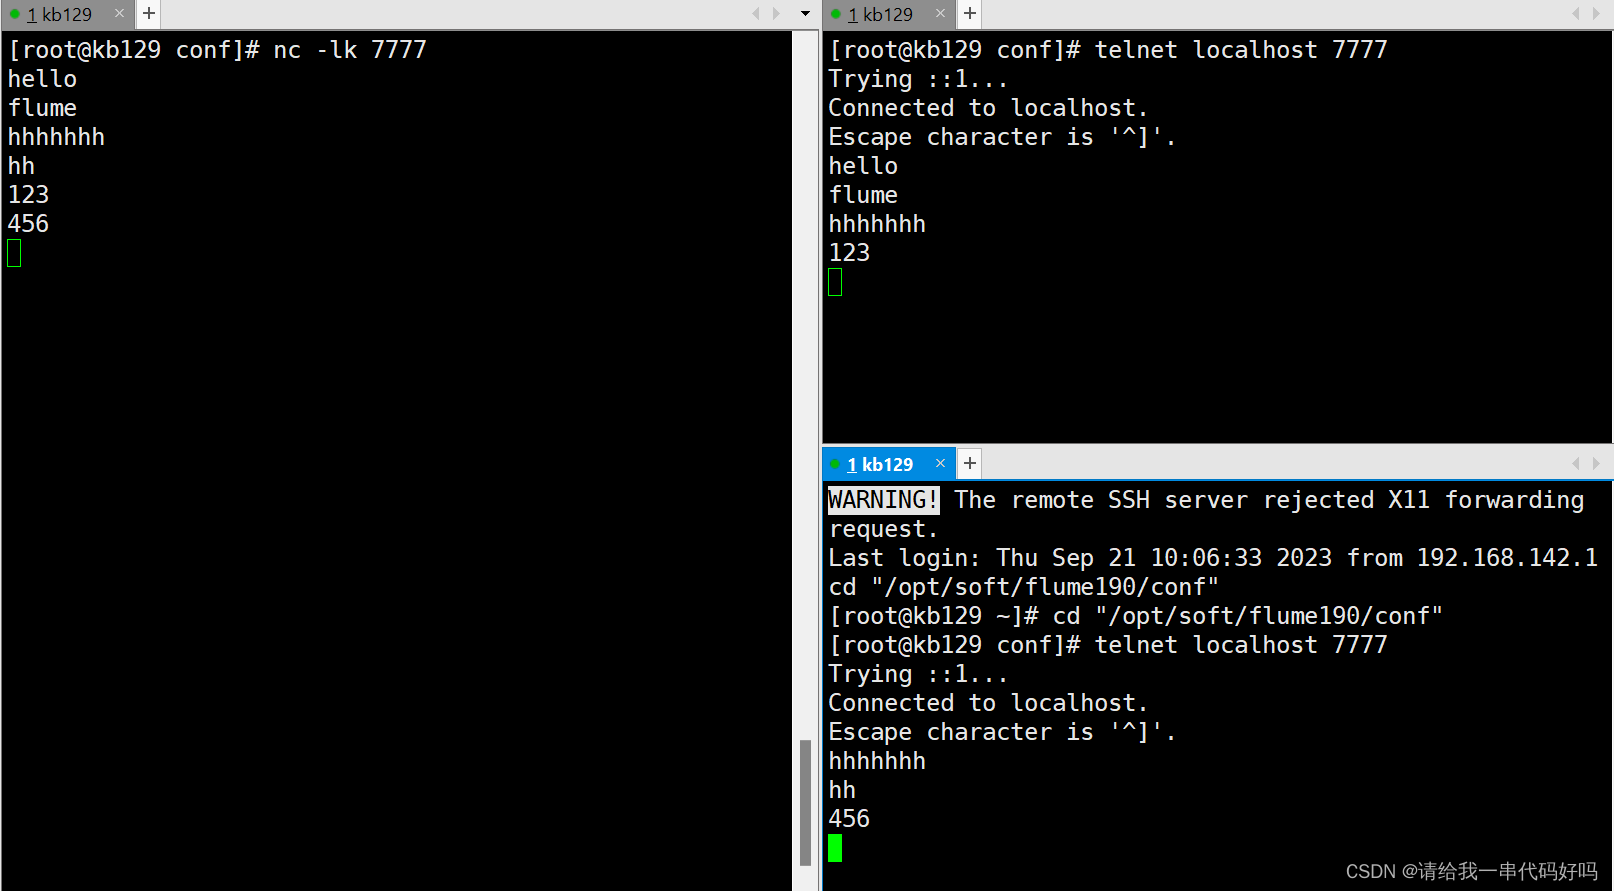
[root@kb129 conf]# nc -lk 7777
连接服务器
[root@kb129 conf]# telnet localhost 7777
查看端口是否占用
[root@kb129 conf]# netstat -lnp | grep 7777
tcp 0 0 0.0.0.0:7777 0.0.0.0:* LISTEN 9264/nc
tcp6 0 0 :::7777 :::* LISTEN 9264/nc
2.2 Flume入门案例
2.2.1 监控端口数据官方案例
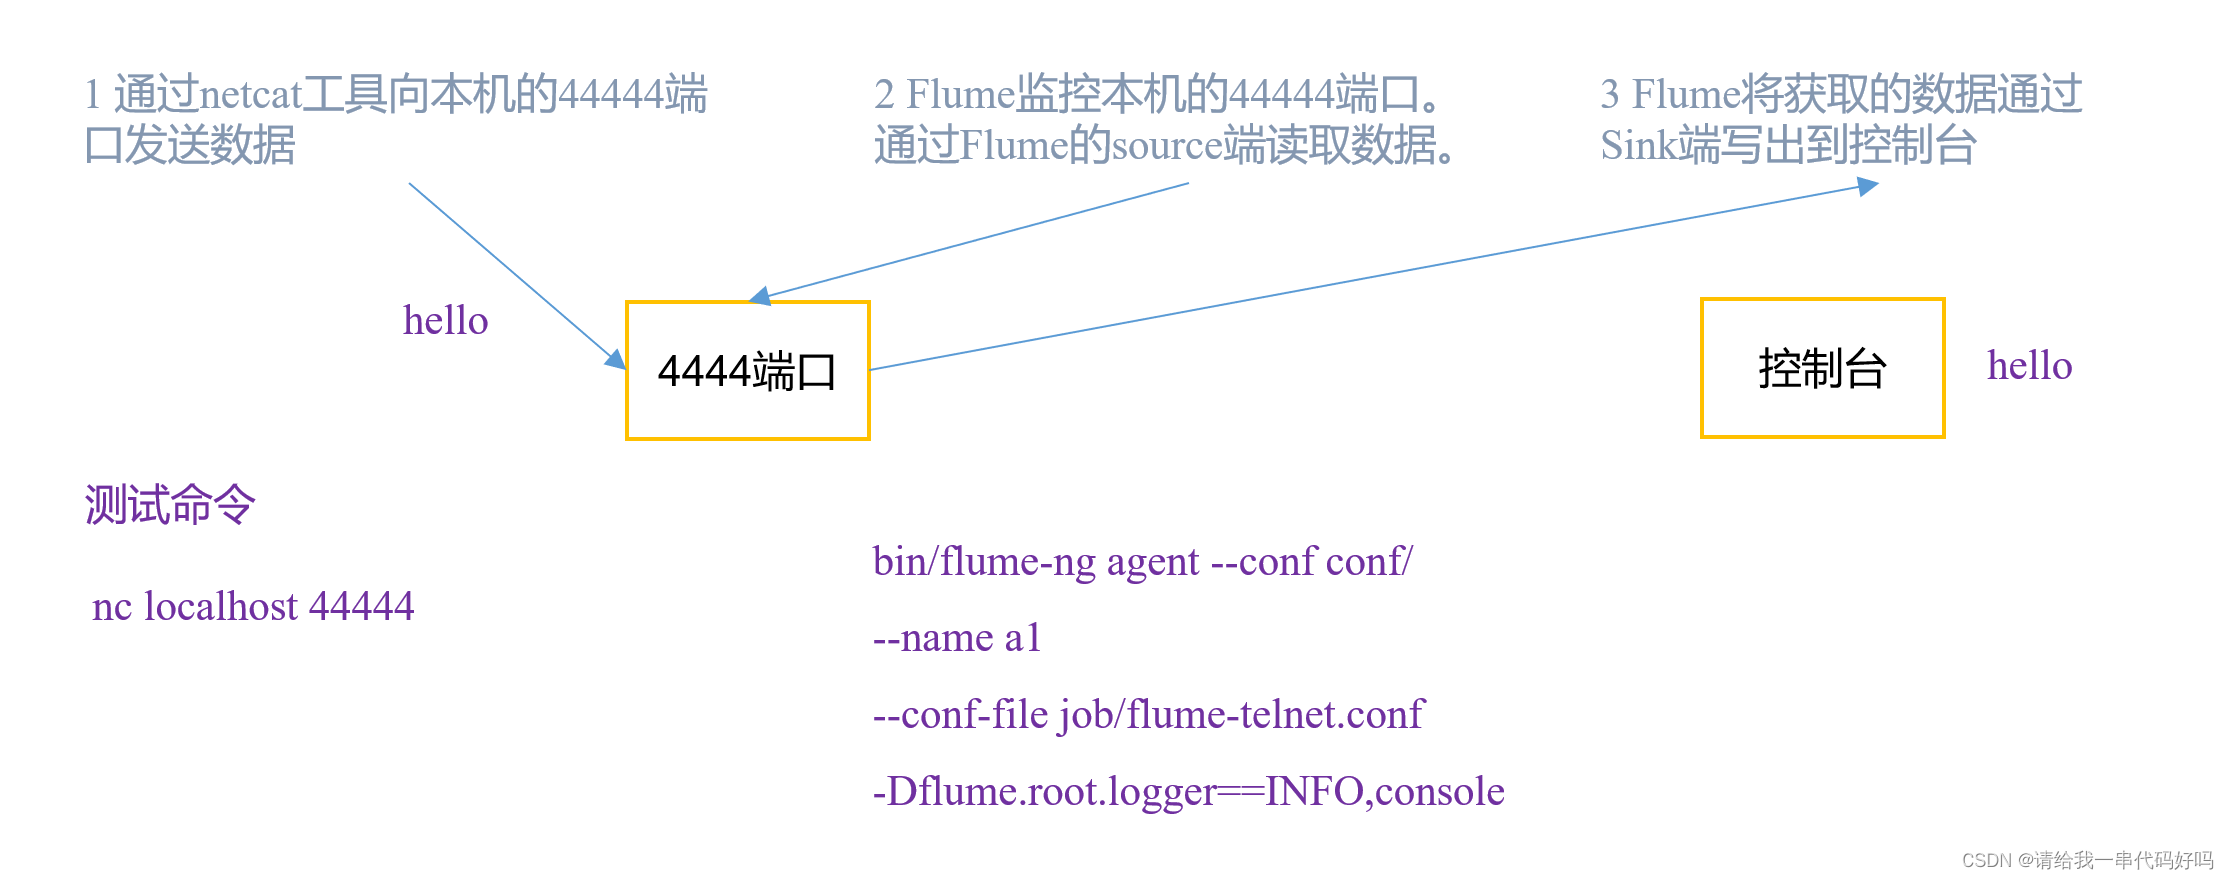
1)案例需求:
使用Flume监听一个端口,收集该端口数据,并打印到控制台。
2)需求分析:本次使用的端口为7777
3)实现步骤:
创建myconf2文件夹,写入监控配置文件
[root@kb129 lib]# cd ../conf/myconf2/
[root@kb129 myconf2]# vim ./netcat-logger.conf
a1.sources=r1
a1.channels=c1
a1.sinks=k1
# Describe/configure the source
a1.sources.r1.type=netcat
a1.sources.r1.bind=localhost
a1.sources.r1.port=7777
# Use a channel which buffers events in memory
a1.channels.c1.type=memory
# Describe the sink
a1.sinks.k1.type=logger
# Bind the source and sink to the channel
a1.sources.r1.channels=c1
a1.sinks.k1.channel=c1

启动监控命令(a1,conf目录,conf文件,指定控制台输出info信息)
![]()
[root@kb129 flume190]# ./bin/flume-ng agent --name a1 --conf ./conf/ --conf-file ./conf/myconf2/netcat-logger.conf -Dflume.root.logger=INFO,console
参数说明:
--conf/-c:表示配置文件存储在conf/目录
--name/-n:表示给agent起名为a1
--conf-file/-f:flume本次启动读取的配置文件是在job文件夹下flume-telnet.conf文件。
-Dflume.root.logger=INFO,console :-D表示flume运行时动态修改flume.root.logger参数属性值,并将控制台日志打印级别设置为INFO级别。日志级别包括:log、info、warn、error。
[root@kb129 conf]# telnet localhost 7777
输入内容,控制台可监控输入在Flume监听页面观察接收数据情况

2.2.2 实时监控单个追加文件
1)案例需求:使用Flume监听单个的文件
2)需求分析:
3)实现步骤:
[root@kb129 myconf2]# vim ./ filelogger.conf
a2.sources=r1
a2.channels=c1
a2.sinks=k1
# Describe/configure the source
a2.sources.r1.type=exec
a2.sources.r1.command=tail -f /opt/tmp/flumelog.log
# Use a channel which buffers events in memory
a2.channels.c1.type=memory
a2.channels.c1.capacity=1000
a2.channels.c1.transactionCapacity=100
# Describe the sink
a2.sinks.k1.type=logger
# Bind the source and sink to the channel
a2.sources.r1.channels=c1
a2.sinks.k1.channel=c1
开启flume监听端口
[root@kb129 flume190]# ./bin/flume-ng agent -n a2 -c ./conf/ -f ./conf/myconf2/filelogger.conf -Dflume.root.logger=INFO,console

2.2.3 实时监控单个追加文件
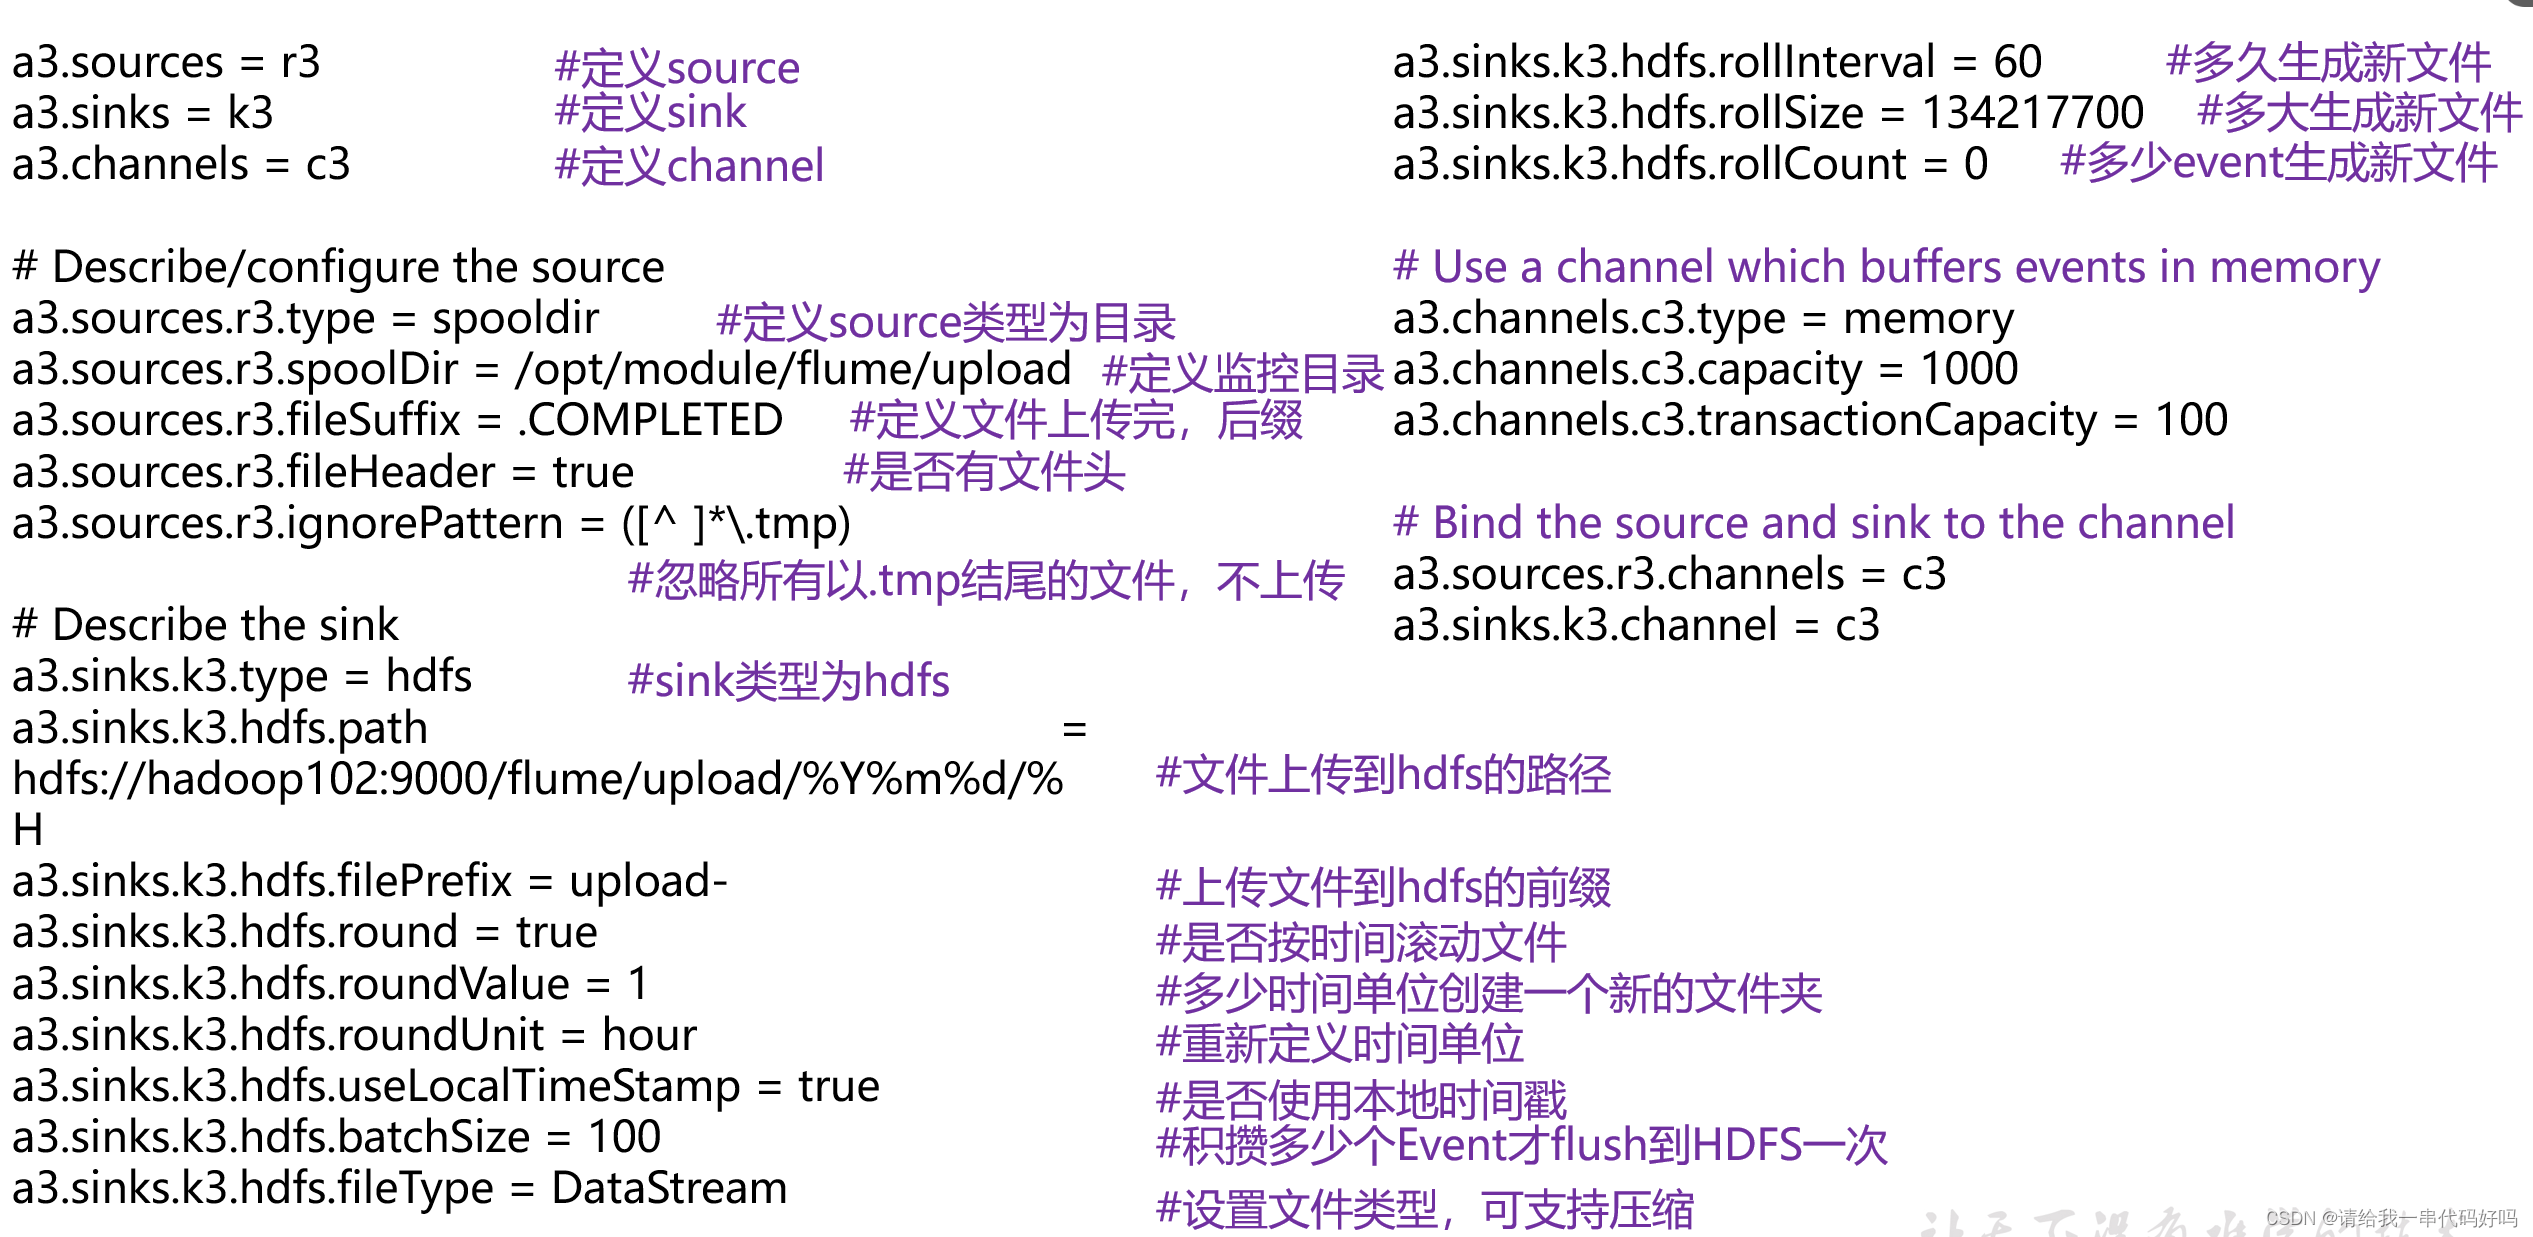
1)案例需求:使用Flume监听整个目录的文件,并上传至HDFS
2)需求分析:
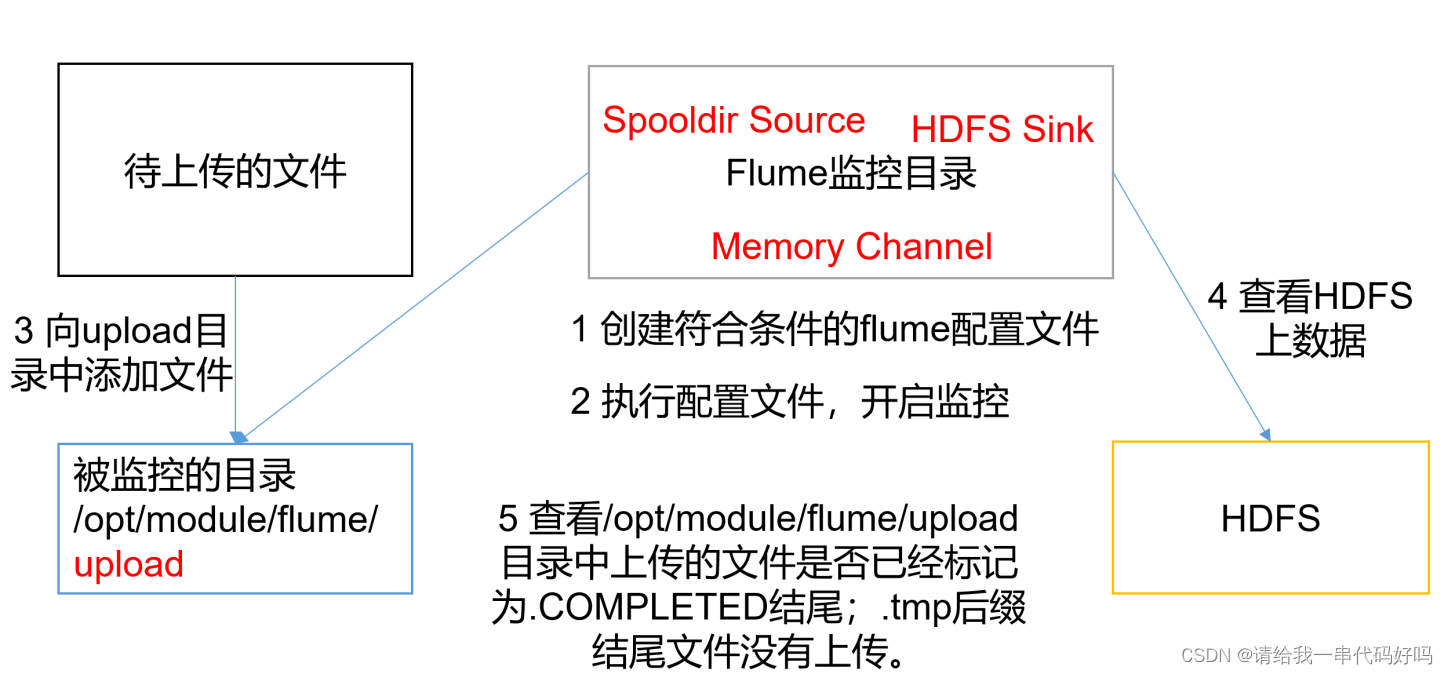
3)实现步骤:
[root@kb129 myconf2]# vim ./file-flume-hdfs.conf
a3.sources=r1
a3.sinks=k1
a3.channels=c1
# Describe/configure the source
a3.sources.r1.type=exec
a3.sources.r1.command=tail -f /opt/tmp/flumelog.log
# Use a channel which buffers events in memory
a3.channels.c1.type=memory
a3.channels.c1.capacity=1000
a3.channels.c1.transactionCapacity=100
# Describe the sink
a3.sinks.k1.type=hdfs
a3.sinks.k1.hdfs.fileType=DataStream
a3.sinks.k1.hdfs.filePrefix=flumetohdfs
a3.sinks.k1.hdfs.fileSuffix=.txt
a3.sinks.k1.hdfs.path=hdfs://kb129:9000/kb23flume/
# Bind the source and sink to the channel
a3.sources.r1.channels=c1
a3.sinks.k1.channel=c1
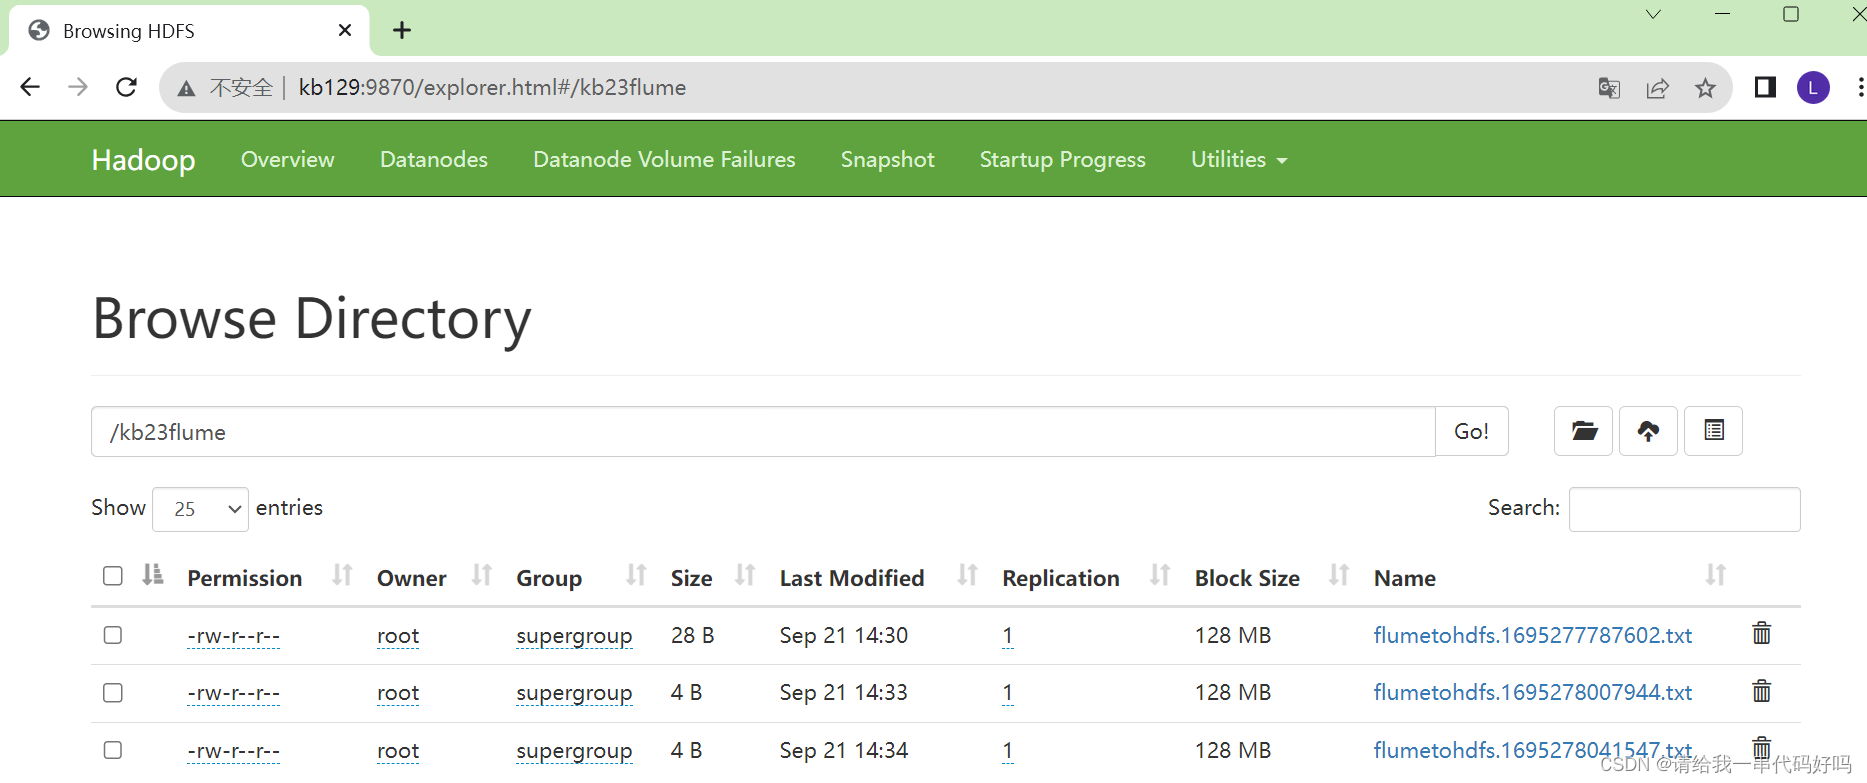
启动监控
[root@kb129 flume190]# ./bin/flume-ng agent -n a3 -c ./conf/ -f ./conf/myconf2/file-flume-hdfs.conf -Dflume.root.logger=INFO,console
2.2.4 实时监控单个追加文件,多个输出
1)案例需求:使用Flume监听整个目录的文件,并上传至HDFS和本地logger
2)实现步骤:
[root@kb129 myconf2]# vim ./file-flume-hdfslogger.conf
a4.sources=r1
a4.channels=c1 c2
a4.sinks=k1 k2
# Describe/configure the source
a4.sources.r1.type=exec
a4.sources.r1.command=tail -f /opt/tmp/flumelog.log
# Use a channel which buffers events in memory
a4.channels.c1.type=memory
a4.channels.c2.type=memory
a4.channels.c1.capacity=1000
a4.channels.c1.transactionCapacity=100
# Describe the sink
a4.sinks.k1.type=logger
a4.sinks.k2.type=hdfs
a4.sinks.k2.hdfs.fileType=DataStream
a4.sinks.k2.hdfs.filePrefix=flumetohdfs
a4.sinks.k2.hdfs.fileSuffix=.txt
a4.sinks.k2.hdfs.path=hdfs://kb129:9000/kb23flume1/
# Bind the source and sink to the channel
a4.sources.r1.channels=c1 c2
a4.sinks.k1.channel=c1
a4.sinks.k2.channel=c2
启动flume监控
[root@kb129 flume190]# ./bin/flume-ng agent -n a4 -c ./conf/ -f ./conf/myconf2/file-flume-hdfslogger.conf -Dflume.root.logger=INFO,console
追加文件,可以在控制台和hdfs中查看到监控日志
2.2.5 实时监控端口数据,输出至HDFS
1)案例需求:使用Flume监听整个目录的文件,并上传至HDFS和本地logger
2)实现步骤:
使用Flume监听一个端口,收集该端口数据,并输出到hdfs
[root@kb129 myconf2]# vim ./demo.conf
a5.sources=r1
a5.sinks=k1
a5.channels=c1
# Describe/configure the source
a5.sources.r1.type=netcat
a5.sources.r1.bind=localhost
a5.sources.r1.port=7777
# Use a channel which buffers events in memory
a5.channels.c1.type=memory
a5.channels.c1.capacity=1000
a5.channels.c1.transactionCapacity=100
# Describe the sink
a5.sinks.k1.type=hdfs
a5.sinks.k1.hdfs.fileType=DataStream
a5.sinks.k1.hdfs.filePrefix=flumetohdfs
a5.sinks.k1.hdfs.fileSuffix=.txt
a5.sinks.k1.hdfs.path=hdfs://kb129:9000/kb23flume2/
# Bind the source and sink to the channel
a5.sources.r1.channels=c1
a5.sinks.k1.channel=c1
启动监听
[root@kb129 flume190]# ./bin/flume-ng agent -n a5 -c ./conf/ -f ./conf/myconf2/demo.conf -Dflume.root.logger=INFO,console
开启通信端口,发送数据,在hdfs查看
3.案例1
在Flume中,"event"是指数据流中的一条记录或事件。它可以是一个文本行、一个JSON对象、一个日志条目或任何其他形式的数据。每个event都包含一个payload(有效负载)和一组可选的header(头部)。
Payload是event的主要数据部分,它可以是任何形式的数据。例如,如果你正在使用Flume来收集日志数据,那么payload可能是一个日志条目的文本行。
Header是可选的元数据,用于提供关于event的附加信息。它可以包含诸如时间戳、源地址、事件类型等信息。Header可以帮助Flume在数据流中对event进行处理和路由。
理解Flume中的event很重要,因为它是Flume数据流的基本单位。Flume通过将event从一个源(source)传递到一个或多个目的地(sink)来实现数据的收集和传输。在Flume的架构中,event在各个组件之间流动,通过配置和定制可以实现各种数据处理和传输需求。
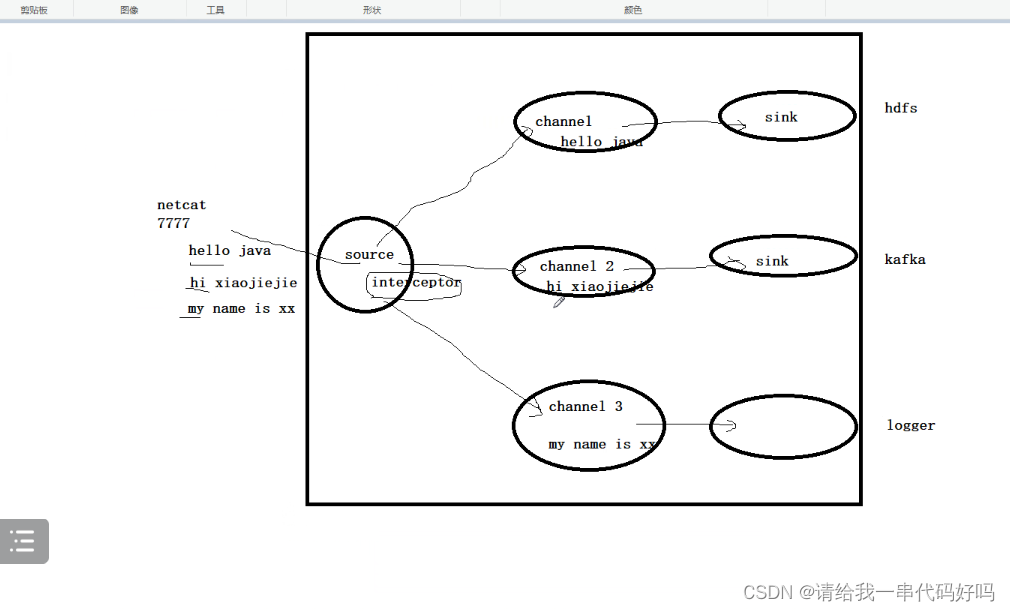
自定义拦截器
实现功能(控制条输入hello 到hdfs hi到kafka 其他控制台输出)
导入依赖
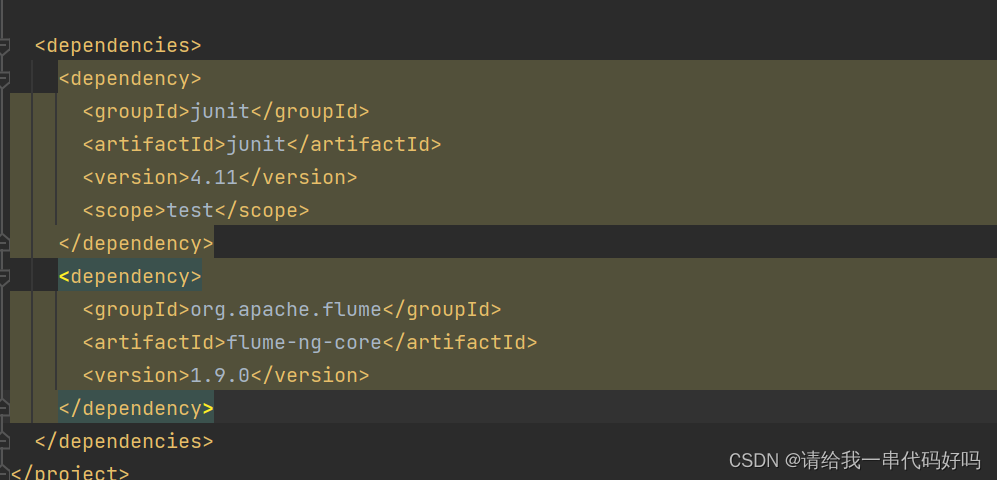
Java代码
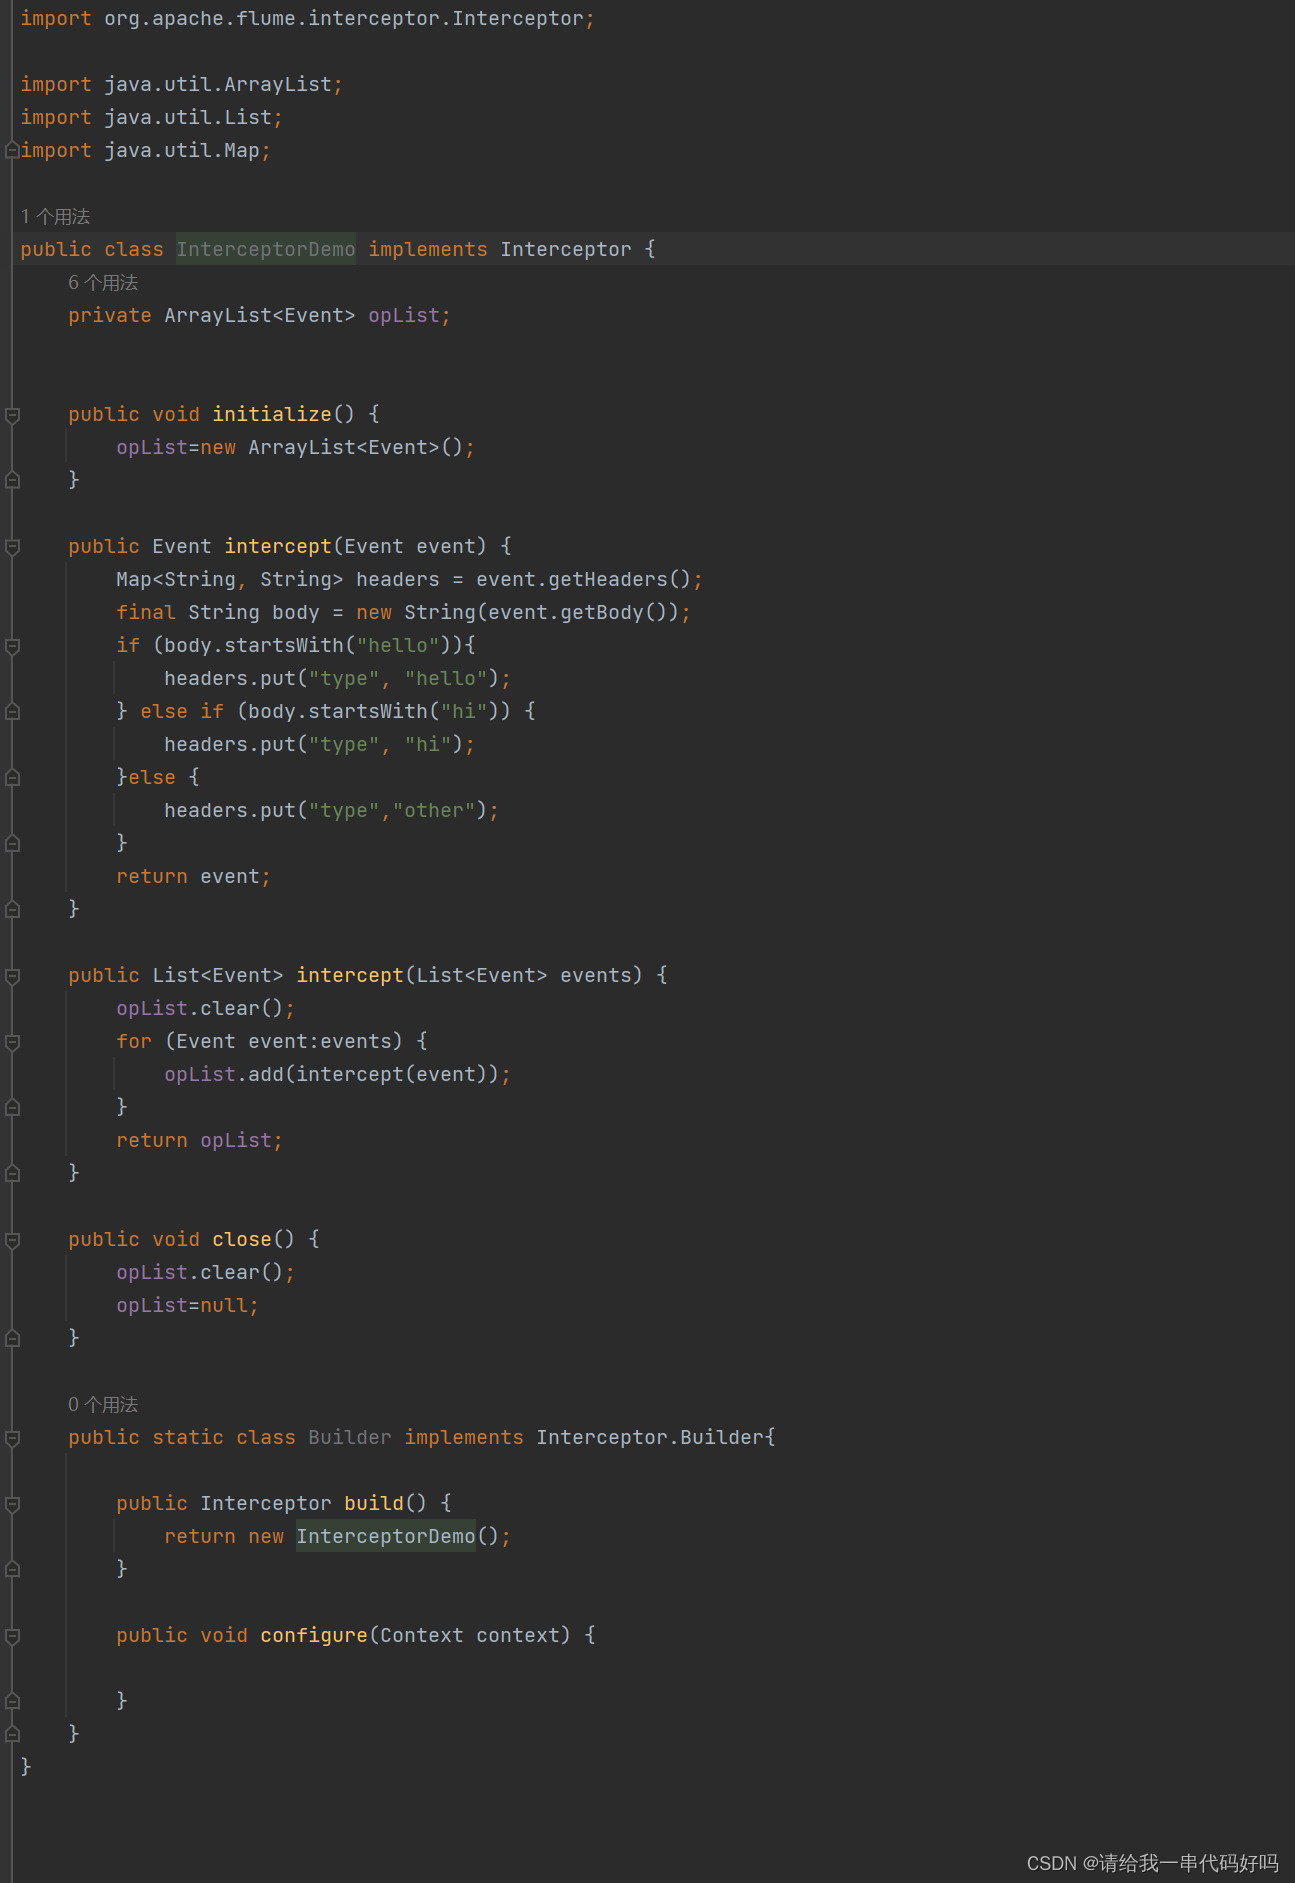
代码解释
这是一个实现了Flume拦截器(Interceptor)接口的Java类示例。拦截器用于在Flume事件流中对事件进行预处理、转换和过滤等操作。
在该示例中,拦截器名为InterceptorDemo,实现了Interceptor接口,其中包含以下方法:
initialize(): 初始化方法,在这里创建了一个用于存储处理后事件的数据结构,即ArrayList<Event> opList。
intercept(Event event): 该方法用于处理单个事件,根据事件内容进行判断和处理,将对应的类型信息添加到事件的header中,然后返回该事件。
intercept(List<Event> events): 该方法用于处理一组事件,遍历每个事件并调用intercept(Event event)进行处理,将处理后的事件添加到opList,最后返回opList。
close(): 关闭方法,清空opList并将其置为空。
在该示例中,还包含一个静态内部类Builder,该类实现了Interceptor.Builder接口,用于构建和配置拦截器。在当前示例中,Builder类的方法没有实际操作,因此configure(Context context)留空,build()方法返回InterceptorDemo的一个新实例。
通过使用这个拦截器示例,可以在Flume的配置中指定使用该拦截器来进行事件的预处理和转换操作。
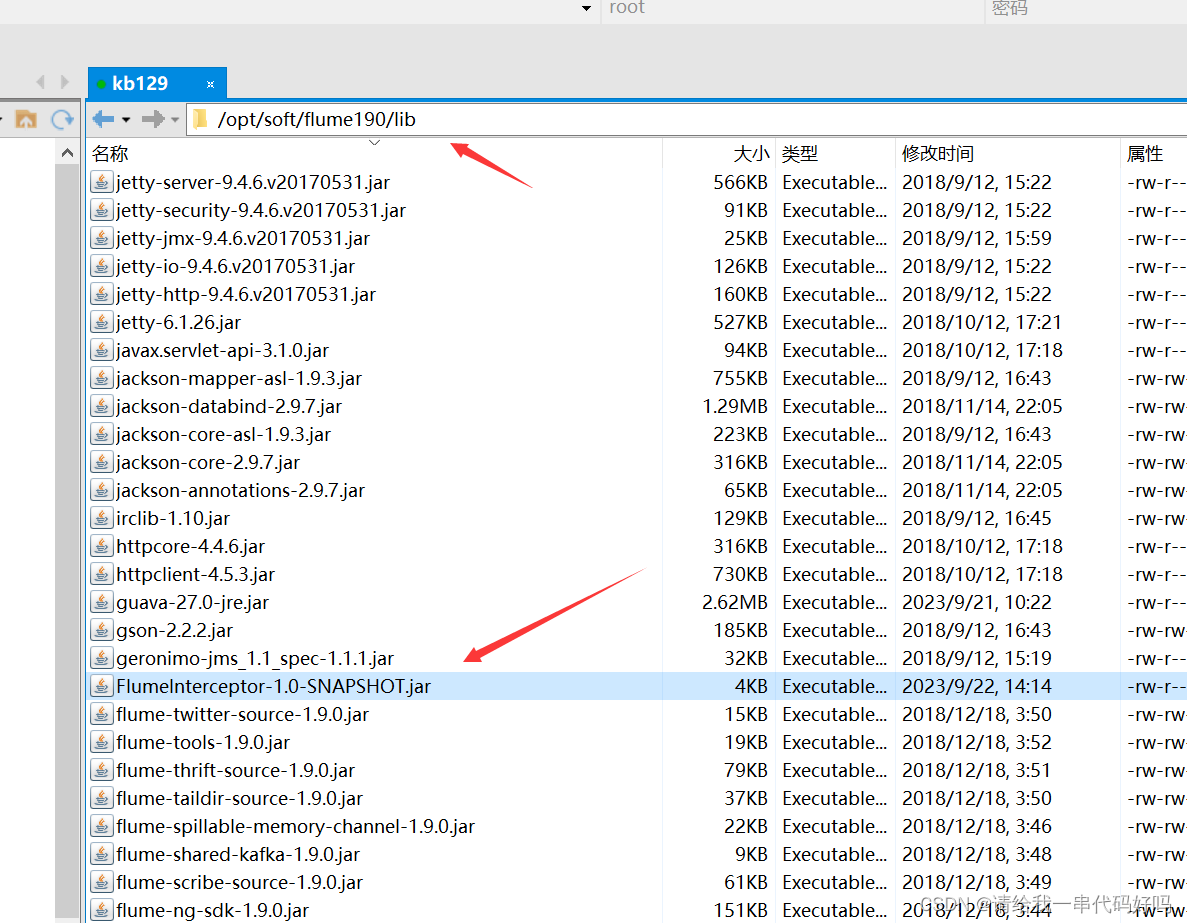
打包jar
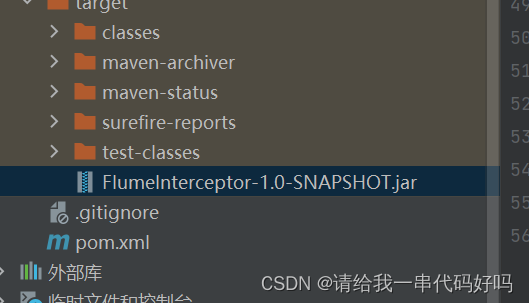
放到lib目录下
新建文件

编辑
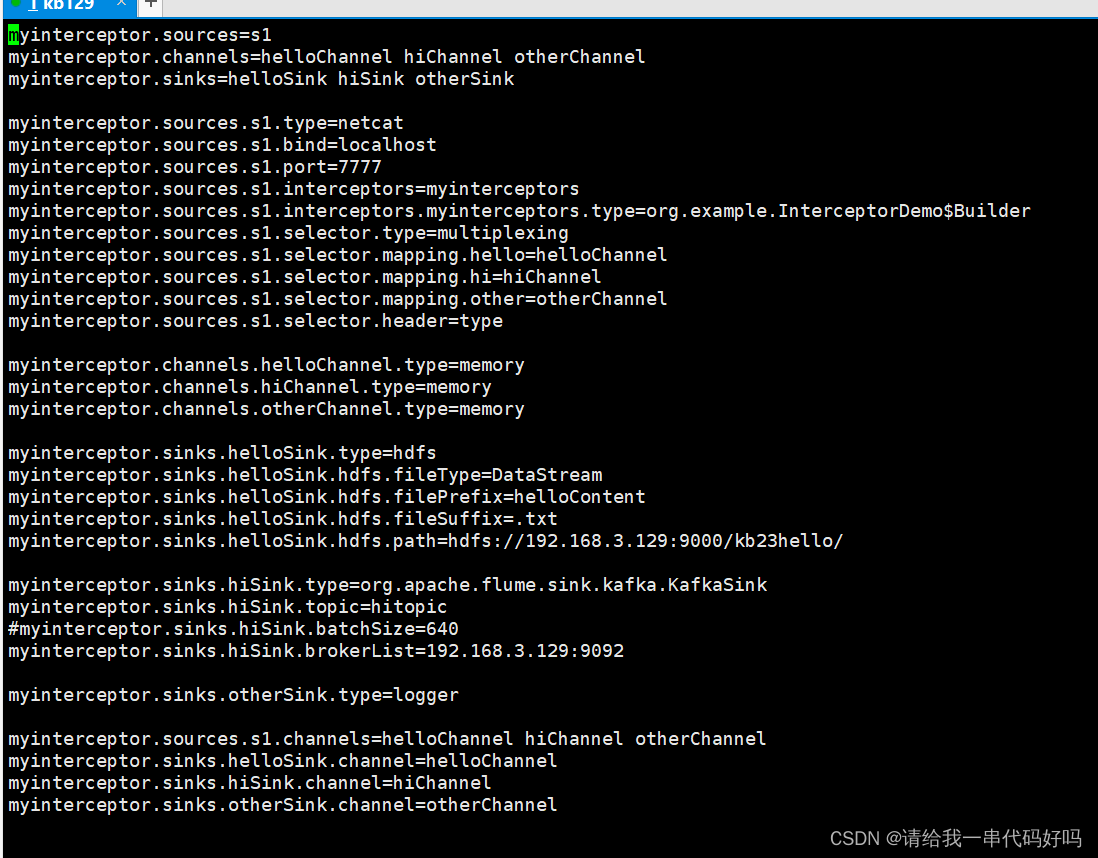
myinterceptor.sources=s1
myinterceptor.channels=helloChannel hiChannel otherChannel
myinterceptor.sinks=helloSink hiSink otherSink
myinterceptor.sources.s1.type=netcat
myinterceptor.sources.s1.bind=localhost
myinterceptor.sources.s1.port=7777
myinterceptor.sources.s1.interceptors=myinterceptors
#java类的路径
myinterceptor.sources.s1.interceptors.myinterceptors.type=org.example.InterceptorDemo$Builder
myinterceptor.sources.s1.selector.type=multiplexing
myinterceptor.sources.s1.selector.mapping.hello=helloChannel
myinterceptor.sources.s1.selector.mapping.hi=hiChannel
myinterceptor.sources.s1.selector.mapping.other=otherChannel
myinterceptor.sources.s1.selector.header=type
myinterceptor.channels.helloChannel.type=memory
myinterceptor.channels.hiChannel.type=memory
myinterceptor.channels.otherChannel.type=memory
myinterceptor.sinks.helloSink.type=hdfs
myinterceptor.sinks.helloSink.hdfs.fileType=DataStream
myinterceptor.sinks.helloSink.hdfs.filePrefix=helloContent
myinterceptor.sinks.helloSink.hdfs.fileSuffix=.txt
myinterceptor.sinks.helloSink.hdfs.path=hdfs://192.168.3.129:9000/kb23hello/
myinterceptor.sinks.hiSink.type=org.apache.flume.sink.kafka.KafkaSink
myinterceptor.sinks.hiSink.topic=hitopic
#myinterceptor.sinks.hiSink.batchSize=640
myinterceptor.sinks.hiSink.brokerList=192.168.3.129:9092
myinterceptor.sinks.otherSink.type=logger
myinterceptor.sources.s1.channels=helloChannel hiChannel otherChannel
myinterceptor.sinks.helloSink.channel=helloChannel
myinterceptor.sinks.hiSink.channel=hiChannel
myinterceptor.sinks.otherSink.channel=otherChannel
含义
以下是每个配置属性的含义:
myinterceptor.sources:指定拦截器的数据源的名称,这里为"s1"。
myinterceptor.channels:指定拦截器的通道的名称,这里分别为"helloChannel"、"hiChannel"和"otherChannel"。
myinterceptor.sinks:指定拦截器的接收器的名称,这里分别为"helloSink"、"hiSink"和"otherSink"。
以下是每个组件的详细配置:
myinterceptor.sources.s1:指定名为"s1"的数据源,使用netcat类型接收网络数据。
myinterceptor.channels.helloChannel、myinterceptor.channels.hiChannel和myinterceptor.channels.otherChannel:分别指定以内存为类型的通道用于数据传输。
myinterceptor.sinks.helloSink:指定名为"helloSink"的接收器,使用hdfs类型将数据输出到HDFS中。
myinterceptor.sinks.hiSink:指定名为"hiSink"的接收器,使用kafka类型将数据发送到Kafka主题。
myinterceptor.sinks.otherSink:指定名为"otherSink"的接收器,将数据输出到日志。
其他配置属性根据组件的类型和需求进行了相应的设置,如绑定地址、端口号、选择器类型、路径、主题名等。
总之,这个Flume配置文件在接收数据源的同时,使用内存通道将数据传递给不同类型的接收器,包括将数据输出到HDFS和Kafka主题,以及输出到日志。具体的业务逻辑和处理过程可能需要根据实际需求进行定制和配置。
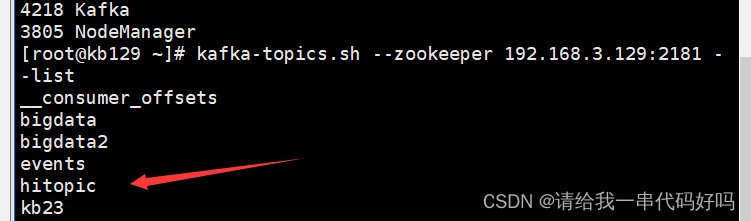
新建kafka hitopic (启动hadoop 集群;zookeeper和kafka)
kafka-topics.sh --create --zookeeper 192.168.3.129:2181 --topic hitopic --partitions 3 --replication-factor 1
kafka-topics.sh --zookeeper 192.168.3.129:2181 --list
Flume190路径下执行命令
./bin/flume-ng agent --name myinterceptor --conf ./conf/ --conf-file ./conf/myconf2/netcat-myinterceptor.conf -Dflume.root.logger=INFO,console
启动端口 nc -lk 7777

开启客户端
telnet localhost 7777
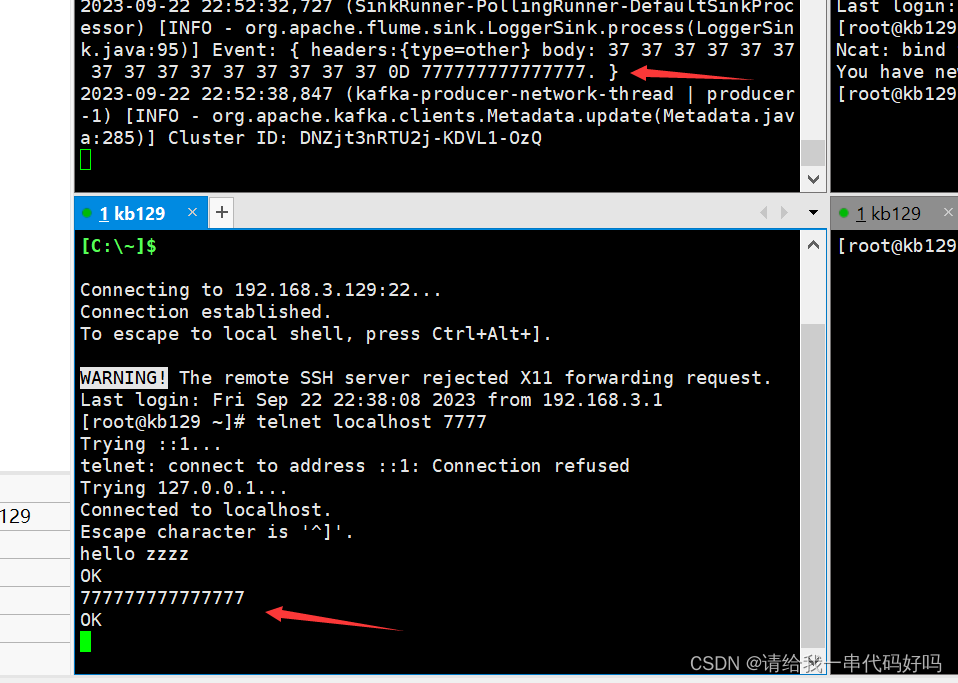
检测结果(其他) 7777已经在控制台输出
4.案例2 channel为file(之前都是memory) 控制台输出
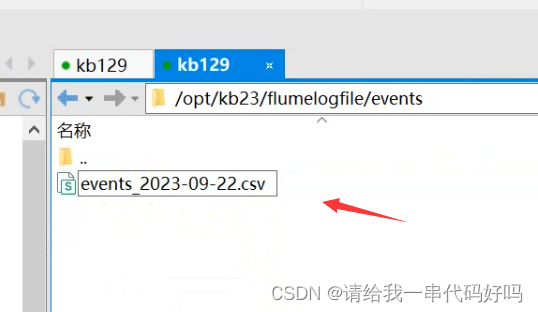
新建文件,放置数据原 目录为
![]()

新建文件,放置checkpointDir和dataDirs 后面会解释

新建
![]()
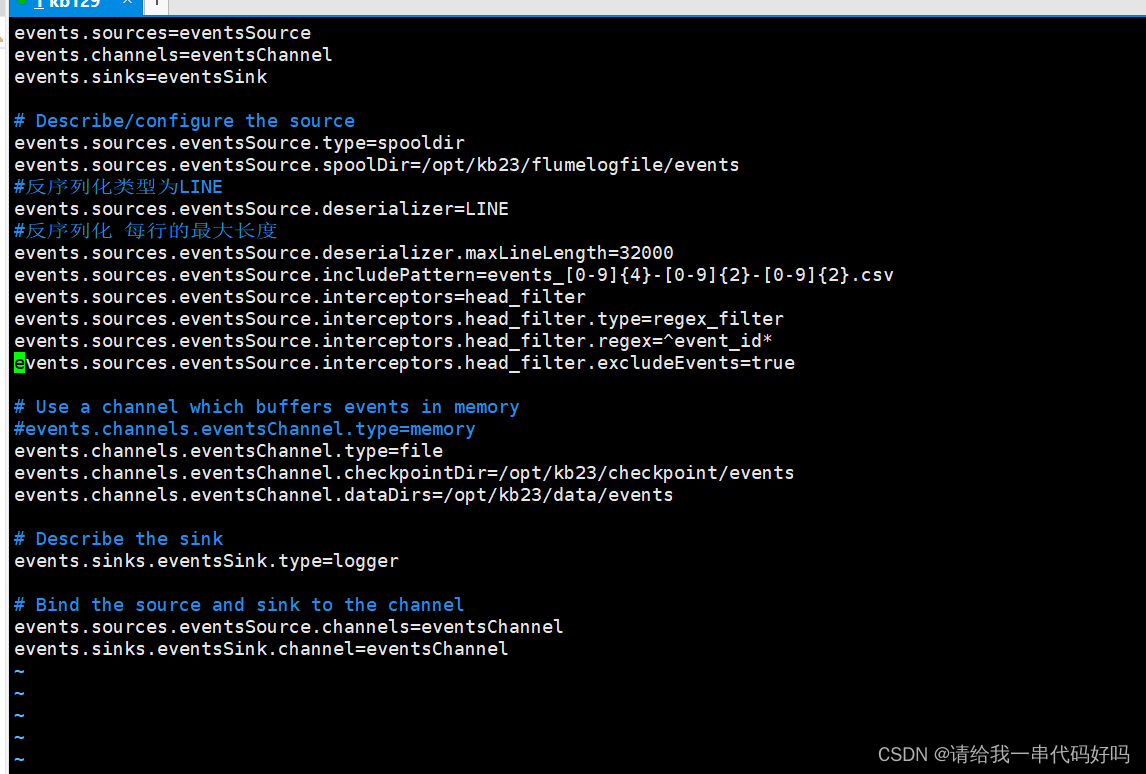
events.sources=eventsSource
events.channels=eventsChannel
events.sinks=eventsSink
# Describe/configure the source
events.sources.eventsSource.type=spooldir
events.sources.eventsSource.spoolDir=/opt/kb23/flumelogfile/events
#反序列化类型为LINE
events.sources.eventsSource.deserializer=LINE
#反序列化 每行的最大长度
events.sources.eventsSource.deserializer.maxLineLength=32000
events.sources.eventsSource.includePattern=events_[0-9]{4}-[0-9]{2}-[0-9]{2}.csv
events.sources.eventsSource.interceptors=head_filter
events.sources.eventsSource.interceptors.head_filter.type=regex_filter
events.sources.eventsSource.interceptors.head_filter.regex=^event_id*
events.sources.eventsSource.interceptors.head_filter.excludeEvents=true
# Use a channel which buffers events in memory
#events.channels.eventsChannel.type=memory
events.channels.eventsChannel.type=file
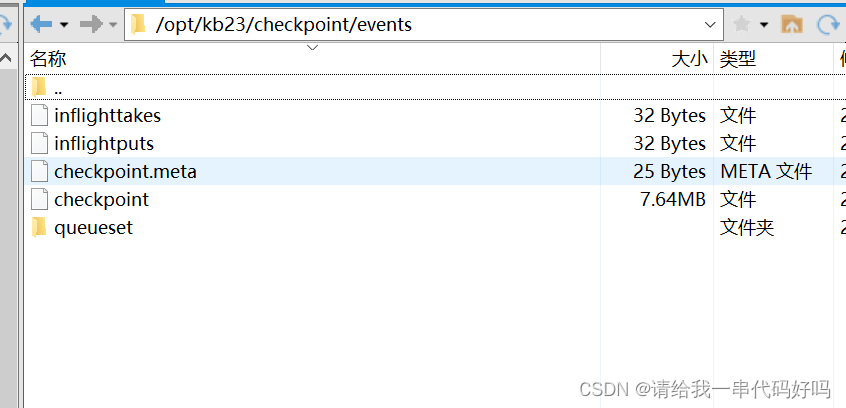
events.channels.eventsChannel.checkpointDir=/opt/kb23/checkpoint/events
events.channels.eventsChannel.dataDirs=/opt/kb23/data/events
# Describe the sink
events.sinks.eventsSink.type=logger
# Bind the source and sink to the channel
events.sources.eventsSource.channels=eventsChannel
events.sinks.eventsSink.channel=eventsChannel
这段代码是一个Flume配置文件,用于描述一个简单的数据流程。它包含了以下组件配置:
events.sources.eventsSource:指定了一个名为"eventsSource"的数据源,类型为spooldir,表示从指定的文件夹中读取数据。
events.sources.eventsSource.spoolDir:指定了待读取文件的目录路径。
events.sources.eventsSource.deserializer:指定了数据源的反序列化类型为LINE,表示每行是一个事件。
events.sources.eventsSource.includePattern:使用正则表达式来匹配待读取文件的名称模式。
events.sources.eventsSource.interceptors.head_filter:指定了一个名为"head_filter"的拦截器,用于根据事件的头部信息过滤事件。
events.sources.eventsSource.interceptors.head_filter.type:指定了"head_filter"拦截器的类型为regex_filter,表示使用正则表达式过滤器。
events.sources.eventsSource.interceptors.head_filter.regex:指定了正则表达式,以匹配以"event_id"开头的事件。
events.sources.eventsSource.interceptors.head_filter.excludeEvents:指定了是否排除匹配的事件。
events.channels.eventsChannel:指定了一个名为"eventsChannel"的通道,类型为file,表示使用文件系统进行缓存。
events.channels.eventsChannel.checkpointDir:指定了通道的检查点目录。
events.channels.eventsChannel.dataDirs:指定了通道的数据目录。
events.sinks.eventsSink:指定了一个名为"eventsSink"的接收器,类型为logger,表示将事件输出到日志。
events.sources.eventsSource.channels=eventsChannel:将数据源连接到通道。
events.sinks.eventsSink.channel=eventsChannel:将接收器连接到通道。
总之,这个Flume配置文件描述了一个数据流程,从指定文件夹中读取数据,并使用拦截器对事件进行过滤处理,然后将事件通过文件系统通道缓存,在接收器中将事件输出到日志中。具体的业务逻辑和处理过程可能需要根据实际需求进行定制和配置。
执行命令 flume190目录下
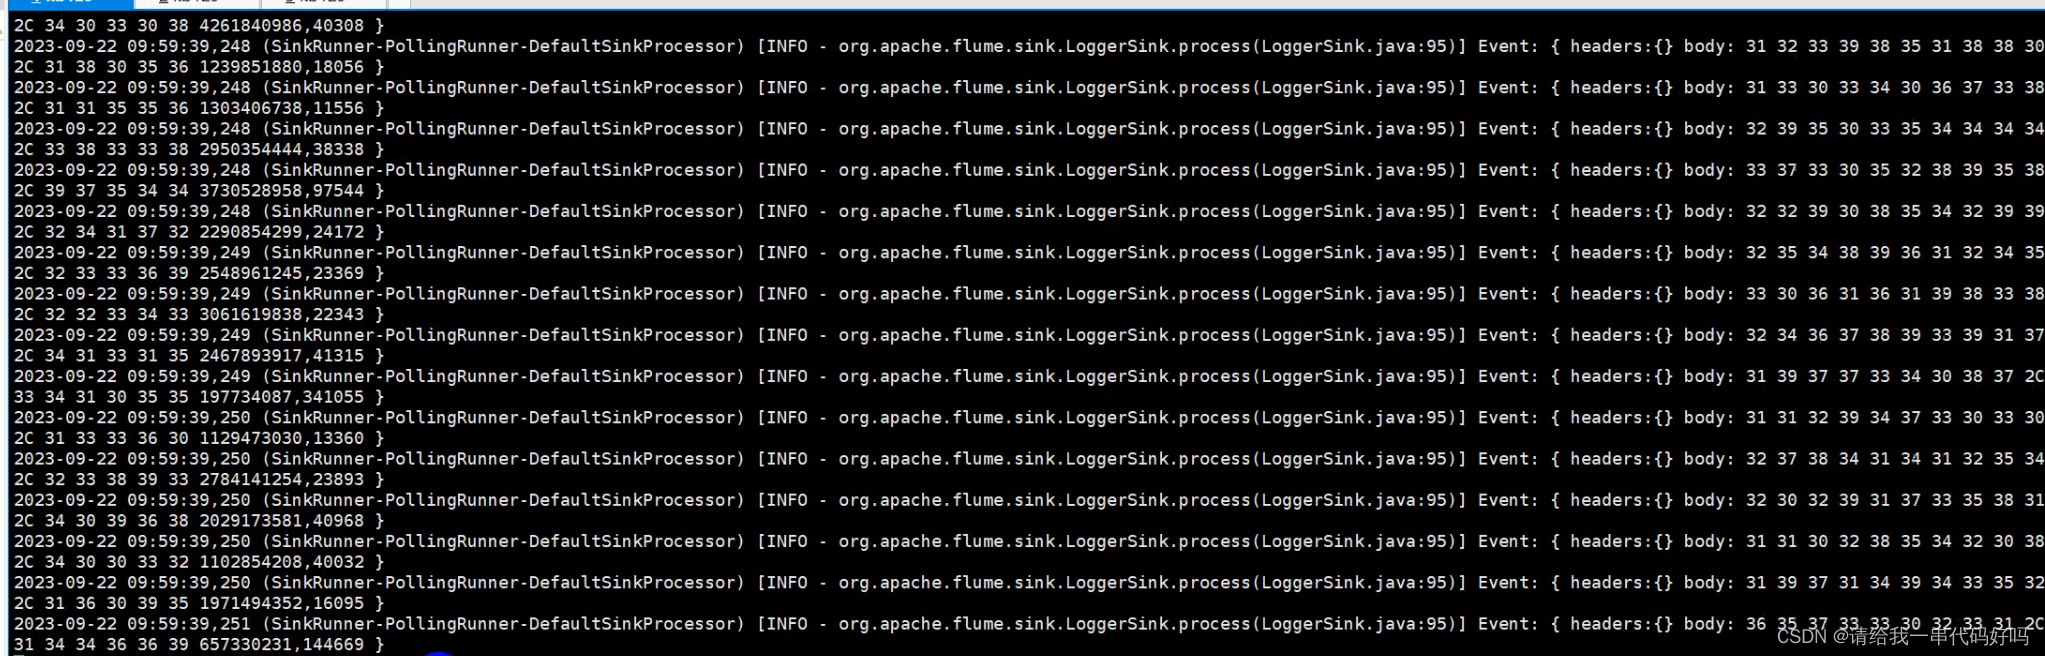
./bin/flume-ng agent --name myinterceptor --conf ./conf/ --conf-file ./conf/myconf2/events-flume-logger.conf -Dflume.root.logger=INFO,console
![]()
控制台输出结果
完成后
 目录下
目录下
![]() 显示完成
显示完成
检查对应目录


输出对应文件


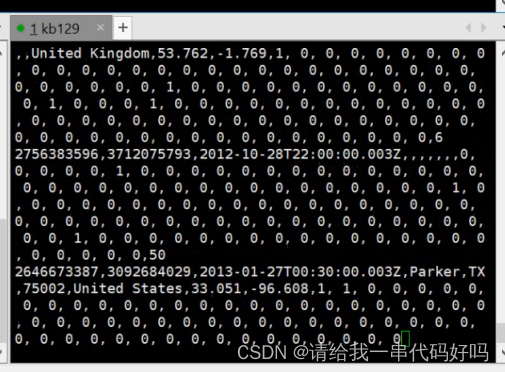
5.案例3 source为本地文件,channel为file,sink为kafka和控制台
上产源数据
新建
![]()
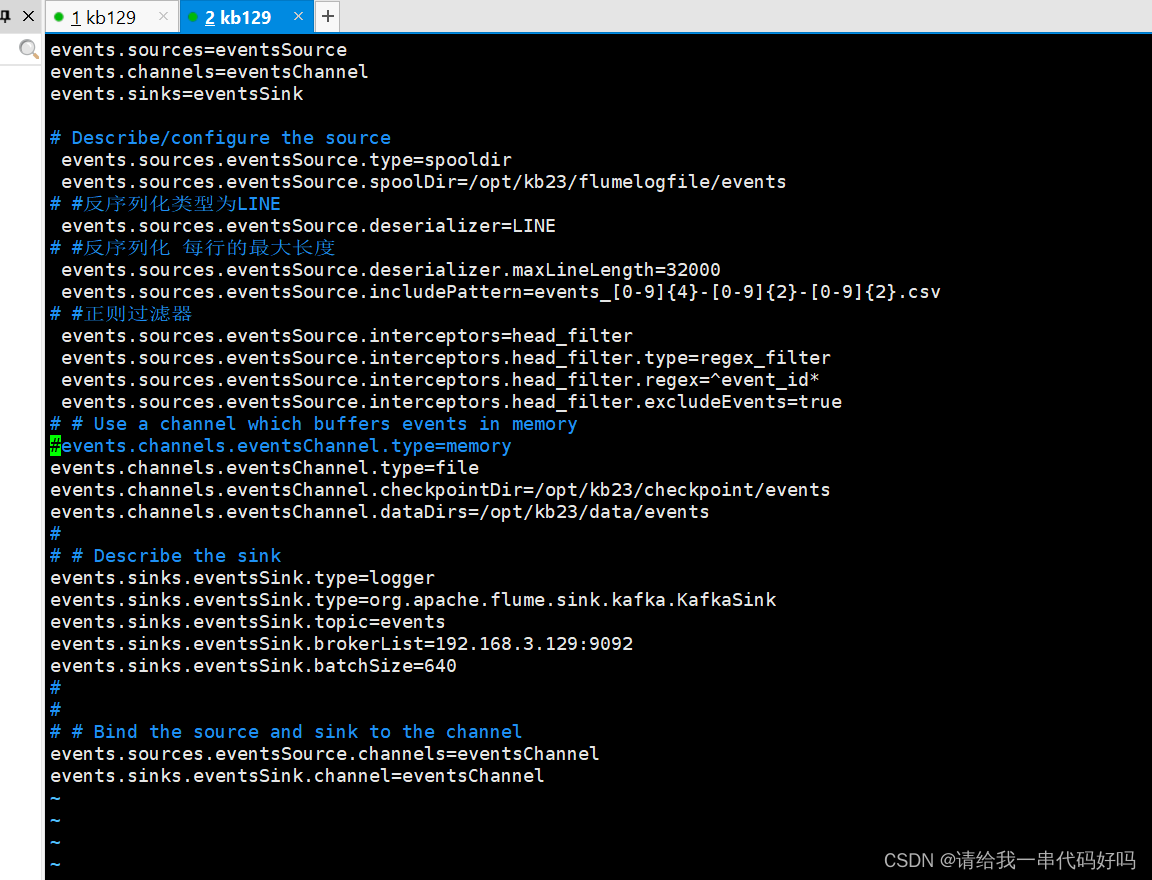
events.sources=eventsSource
events.channels=eventsChannel
events.sinks=eventsSink
# Describe/configure the source
events.sources.eventsSource.type=spooldir
events.sources.eventsSource.spoolDir=/opt/kb23/flumelogfile/events
# #反序列化类型为LINE
events.sources.eventsSource.deserializer=LINE
# #反序列化 每行的最大长度
events.sources.eventsSource.deserializer.maxLineLength=32000
events.sources.eventsSource.includePattern=events_[0-9]{4}-[0-9]{2}-[0-9]{2}.csv
# #正则过滤器
events.sources.eventsSource.interceptors=head_filter
events.sources.eventsSource.interceptors.head_filter.type=regex_filter
events.sources.eventsSource.interceptors.head_filter.regex=^event_id*
events.sources.eventsSource.interceptors.head_filter.excludeEvents=true
# # Use a channel which buffers events in memory
#events.channels.eventsChannel.type=memory
events.channels.eventsChannel.type=file
events.channels.eventsChannel.checkpointDir=/opt/kb23/checkpoint/events
events.channels.eventsChannel.dataDirs=/opt/kb23/data/events
#
# # Describe the sink
events.sinks.eventsSink.type=logger
events.sinks.eventsSink.type=org.apache.flume.sink.kafka.KafkaSink
events.sinks.eventsSink.topic=events
events.sinks.eventsSink.brokerList=192.168.3.129:9092
events.sinks.eventsSink.batchSize=640
#
#
# # Bind the source and sink to the channel
events.sources.eventsSource.channels=eventsChannel
events.sinks.eventsSink.channel=eventsChannel
~
创建kafka topic
kafka-topics.sh --create --zookeeper 192.168.3.129:2181 --topic events --partitions 3 --replication-factor 1
执行命令 flume190目录下

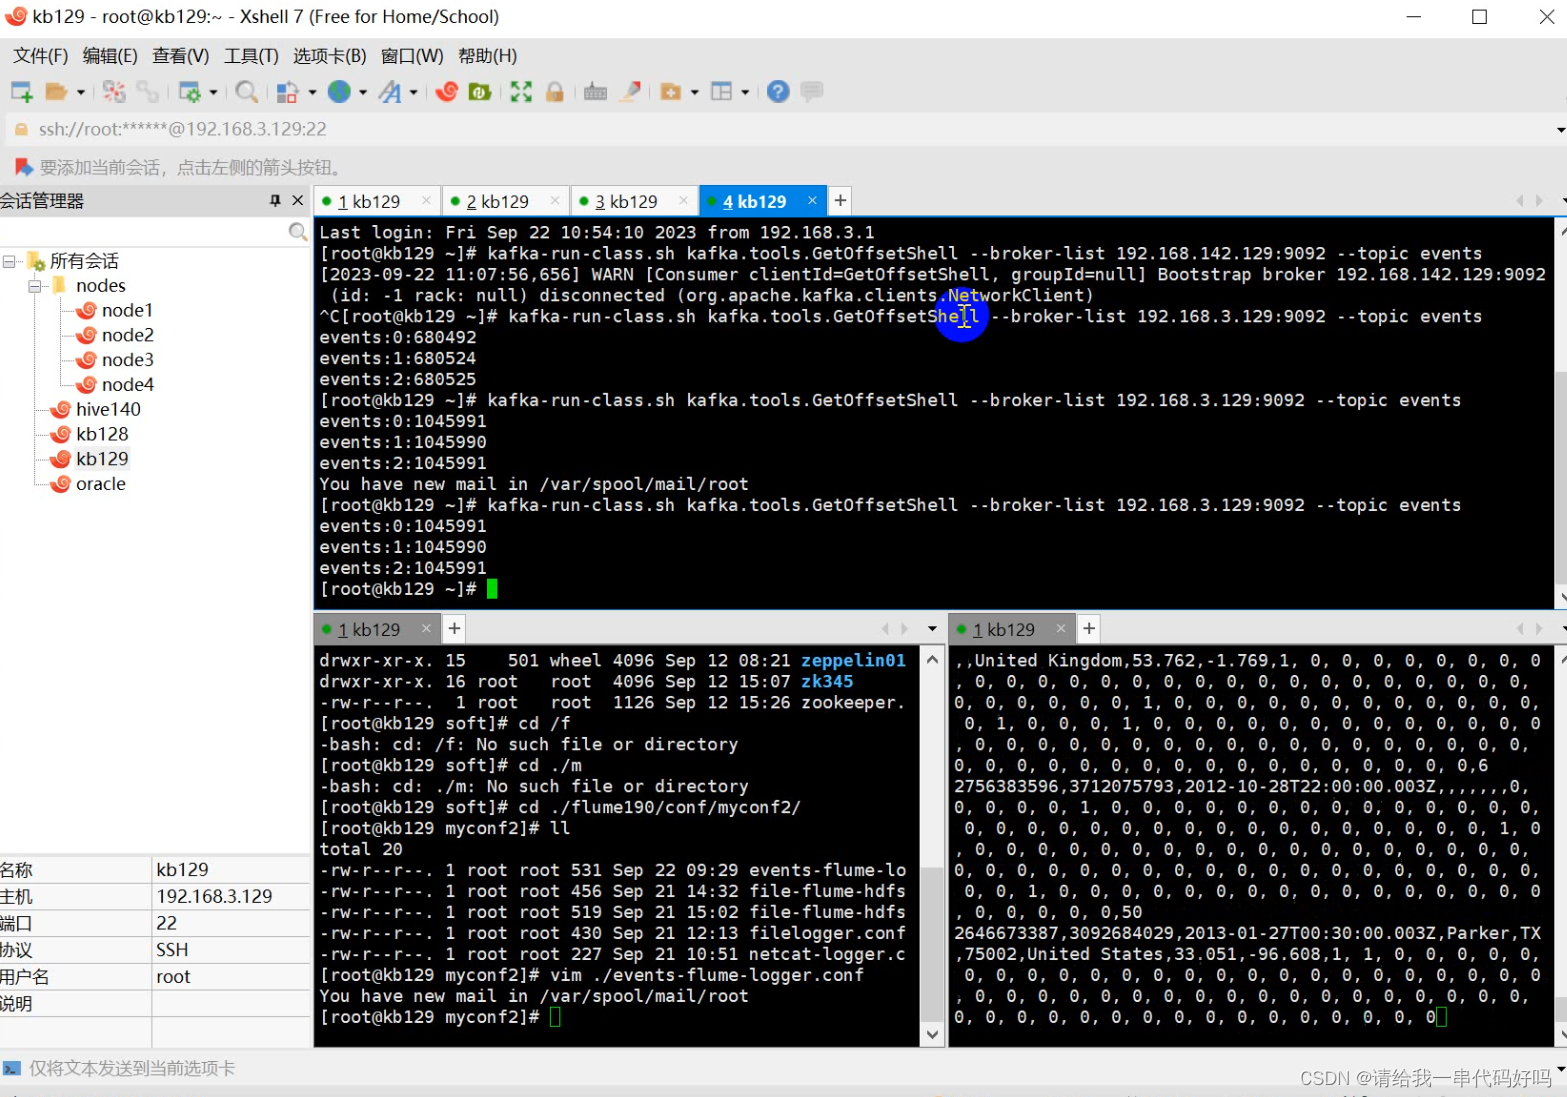
执行结果
kafka-run-class.sh kafka.tools.GetOffsetShell --broker-list 192.168.3.129:9092 --topic events
过滤结果

Kafa 消息队列接收消息
检查
 目录下
目录下
![]() 显示完成
显示完成
检查对应目录


输出对应文件

99%的人还看了
相似问题
猜你感兴趣
版权申明
本文"Apacha Flume":http://eshow365.cn/6-15382-0.html 内容来自互联网,请自行判断内容的正确性。如有侵权请联系我们,立即删除!