已解决
SpringBoot2.7.14整合Swagger3.0的详细步骤及容易踩坑的地方
来自网友在路上 169869提问 提问时间:2023-09-21 19:22:24阅读次数: 69
最佳答案 问答题库698位专家为你答疑解惑
🧑💻作者名称:DaenCode
🎤作者简介:啥技术都喜欢捣鼓捣鼓,喜欢分享技术、经验、生活。
😎人生感悟:尝尽人生百味,方知世间冷暖。
📖所属专栏:SpringBoot实战
系列文章目录
以下是专栏部分内容,更多内容请前往专栏查看!

专栏推荐
- 专门为Redis入门打造的专栏,包含Redis基础知识、基础命令、五大数据类型实战场景、key删除策略、内存淘汰机制、持久化机制、哨兵模式、主从复制、分布式锁等等内容。
链接>>>>>>>>>《Redis从头学》 - 专门为RabbitMQ入门打造的专栏,持续更新中。。。。。。。。
链接>>>>>>>《图解RabbitMQ》
文章目录
- 系列文章目录
- 专栏推荐
- 🌟引入依赖
- 🌟applicationproperties配置文件
- 🌟配置类创建
- 🌟常用注解
- 🌟具体用法
- @ApiModel+@ApiModelProperty
- @Api+@ApiOperation+@ApiParam
- @ApiResponses+@ApiResponse
- 效果查看
- 🌟写在最后
🌟引入依赖
<!--swagger ui接口文档依赖--><dependency><groupId>io.springfox</groupId><artifactId>springfox-boot-starter</artifactId></dependency>
🌟applicationproperties配置文件
Springfox MVC路径匹配是基于AntPathMatcher的,而Spring Boot 2.7.14基于PathPatternMatcher。可以查看WebMvcProperties类。
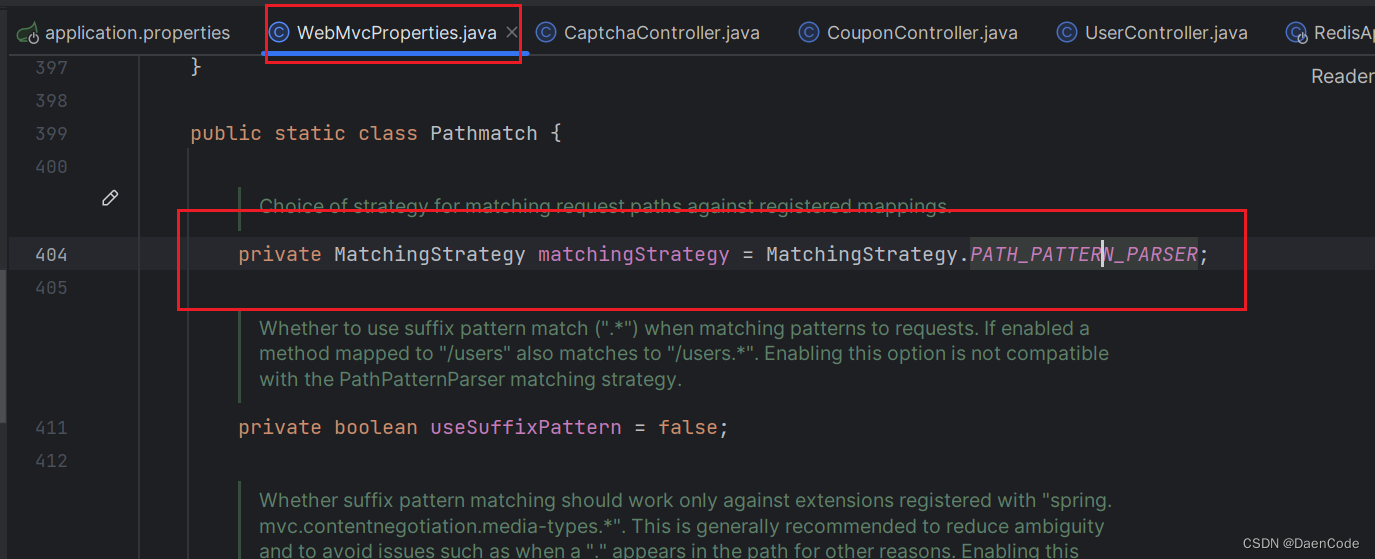 因此,修改mvc的匹配策略为ant_path_matcher。如果swagger与springboot匹配策略不一致则会有错误:
Failed to start bean ‘ documentationPluginsBootstrapper ‘ ; nested exception…
spring.mvc.pathmatch.matching-strategy=ant_path_matcher
🌟配置类创建
@Component
@Data
@EnableOpenApi
public class SwaggerConfiguration {/*** 用户端接口文档* @return*/@Beanpublic Docket webApiDoc(){return new Docket(DocumentationType.OAS_30).groupName("用户端接口文档").pathMapping("/")//定义是否开启swagger.enable(true).apiInfo(apiInfo()).select().apis(RequestHandlerSelectors.basePackage("top.daencode"))//正则匹配请求路径,并分配至当前分组.paths(PathSelectors.ant("/api/**")).build()//新版swagger3.0配置.globalRequestParameters(getGlobalRequestParameters()).globalResponses(HttpMethod.GET, getGlobalResponseMessage()).globalResponses(HttpMethod.POST, getGlobalResponseMessage());}/*** 管理端接口文档* @return*/@Beanpublic Docket adminApiDoc(){return new Docket(DocumentationType.OAS_30).groupName("管理端接口文档").pathMapping("/")//定义是否开启swagger.enable(true).apiInfo(apiInfo()).select().apis(RequestHandlerSelectors.basePackage("top.daencode"))//正则匹配请求路径,并分配至当前分组.paths(PathSelectors.ant("/api/**")).build().globalRequestParameters();}/*** 接口文档元数据信息* @return*/private ApiInfo apiInfo(){return new ApiInfoBuilder().title("xxx项目接口文档").description("接口文档").contact(new Contact("daencode","https:daencode.top","shoanjen@126.com")).version("v1.0").build();}/*** 生成全局通用请求参数* @return*/private List<RequestParameter> getGlobalRequestParameters() {List<RequestParameter> parameters = new ArrayList<>();parameters.add(new RequestParameterBuilder().name("token").description("登录令牌").in(ParameterType.HEADER).query(q -> q.model(m -> m.scalarModel(ScalarType.STRING))).required(false).build());
//        可以配置多个
//        parameters.add(new RequestParameterBuilder()
//                .name("version")
//                .description("版本号")
//                .required(true)
//                .in(ParameterType.HEADER)
//                .query(q -> q.model(m -> m.scalarModel(ScalarType.STRING)))
//                .required(false)
//                .build());return parameters;}/*** 生成通用的接口文档响应信息* @return*/private List<Response> getGlobalResponseMessage() {List<Response> responseList = new ArrayList<>();responseList.add(new ResponseBuilder().code("4xx").description("请求错误,根据code和msg检查").build());return responseList;}
}
注意:
- 使用@EnableOpenApi开启swagger3.0。
- apis(RequestHandlerSelectors.basePackage(“top.daencode”)):注意修改此处生效的包名。
- .paths(PathSelectors.ant(“/api/**”)):修改接口的通用路径。
- parameters.add:生成全局通用配置参数,比如说用户登录的token。
🌟常用注解
🌟具体用法
@ApiModel+@ApiModelProperty
@ApiModel("用户登录对象")
@Data
public class UserLogin {@ApiModelProperty(value = "用户名",example = "daencode")private String username;@ApiModelProperty(value = "密码",example = "123456")private String password;@ApiModelProperty(value = "验证码",example = "3425")private String captcha;
}
@Api+@ApiOperation+@ApiParam
@Api("用户模块")
@RestController
@RequestMapping("/api/v1/user")
public class UserController {@Autowiredprivate UserService userService;@PostMapping("login")@ApiOperation("用户登录")public JsonData login(@ApiParam("登录对象") @RequestBody UserLogin userLogin){//token为空则返回失败,否则返回成功String token=userService.login(userLogin);return token==null?JsonData.buildError("登录失败"):JsonData.buildSuccess(token);}
}
@ApiResponses+@ApiResponse
@ApiOperation("创建用户")
@ApiResponses(value = {@ApiResponse(code = 201, message = "用户创建成功", response = User.class),@ApiResponse(code = 400, message = "请求参数有误"),@ApiResponse(code = 401, message = "未授权访问"),@ApiResponse(code = 500, message = "服务器内部错误")
})
@PostMapping("/users")
public ResponseEntity<User> createUser(@RequestBody User user) {// ...
}
效果查看
1.前往postman发起接口请求测试。
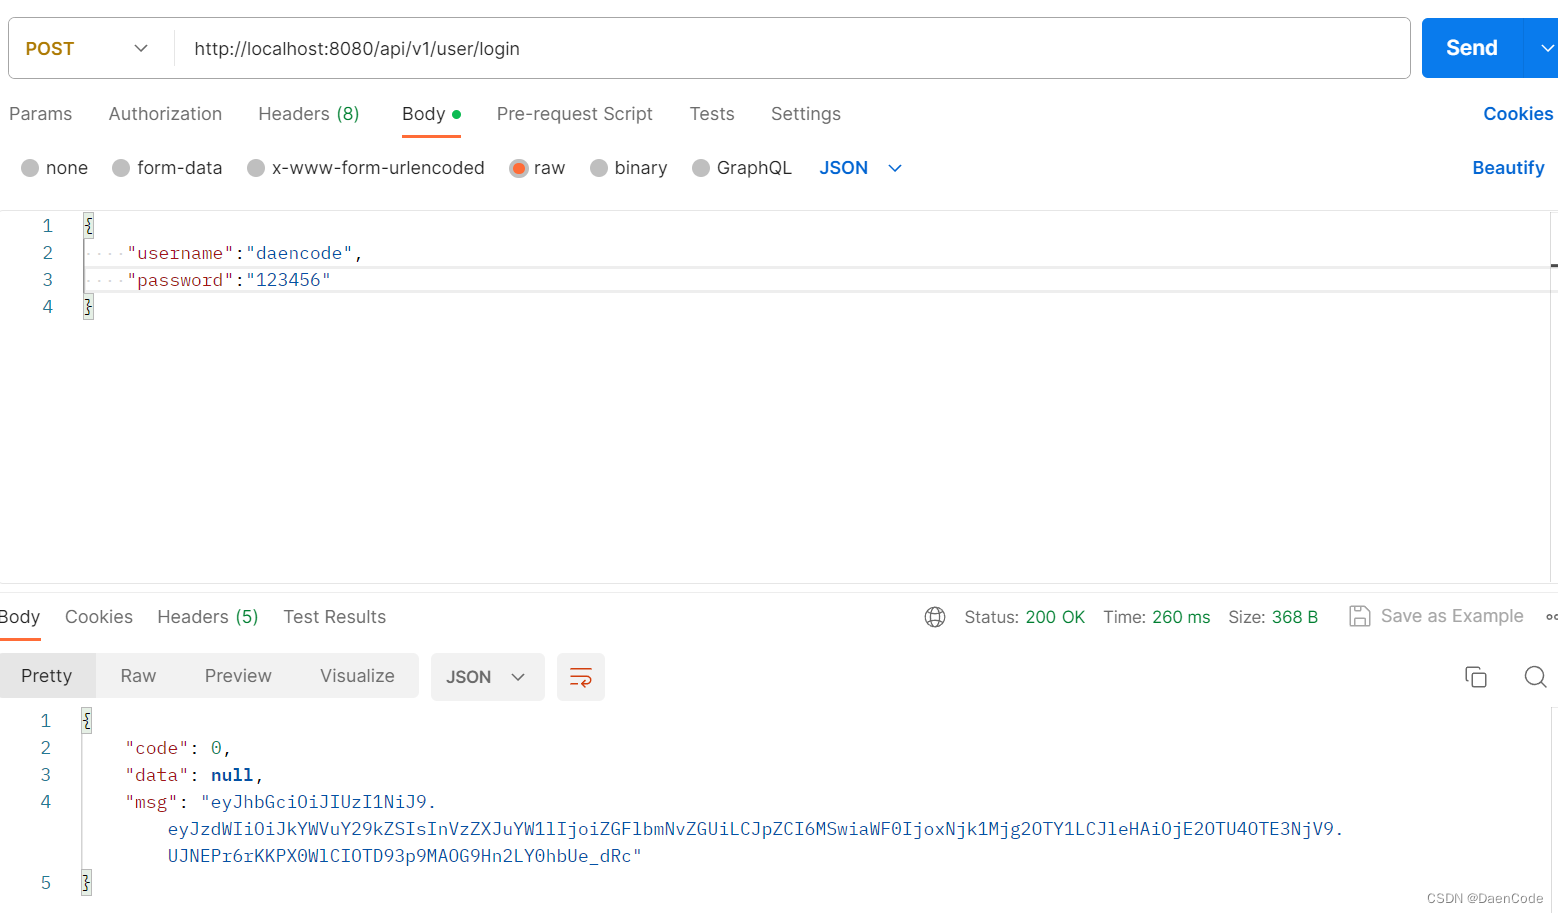
2.访问:http://localhost:8080/swagger-ui/index.html,查看接口文档。

🌟写在最后
有关于SpringBoot2.7.14整合Swagger3.0的详细步骤及容易踩坑的地方到此就结束了。感谢大家的阅读,希望大家在评论区对此部分内容散发讨论,便于学到更多的知识。

查看全文
99%的人还看了
相似问题
- MeterSphere | 接口测试请求体中,int类型的入参实现动态化变量
- postman设置接口关联这样做,薪资直接涨3k
- 接口自动化中cookies的处理技术
- C#中抽象类、抽象方法和接口暨内联临时变量的精彩表达
- 【实战详解】如何快速搭建接口自动化测试框架?Python + Requests
- 一次显著的接口性能优化,从10s优化到0.9s
- 做接口自动化遇到的20个难点,记录下我是如何解决的!
- 全网最全jmeter接口测试/接口自动化测试看这篇文章就够了:跨线程组传递jmeter变量及cookie的处理
- 微信小程序发货信息录入接口 错误上传时间非法,请按照 RFC 3339 格式填写?
- 京东商品详情数据接口【京东API接口开发系列】,监控京东价格走势,接口代码示例,可高并发批量获取
猜你感兴趣
版权申明
本文"SpringBoot2.7.14整合Swagger3.0的详细步骤及容易踩坑的地方":http://eshow365.cn/6-10913-0.html 内容来自互联网,请自行判断内容的正确性。如有侵权请联系我们,立即删除!