3D RPG Course | Core 学习日记四:鼠标控制人物移动
最佳答案 问答题库858位专家为你答疑解惑
前言
前边我们做好了Navgation智能导航地图烘焙,并且设置好了Player的NavMeshAgent,现在我们可以开始实现鼠标控制人物的移动了。除了控制人物移动以外,我们还需要实现鼠标指针的变换。
实现要点
要实现鼠标控制人物移动,点击地图对应的位置,然后玩家移动到那个位置,我们需要先了解两个关键的API,这两个API对于与用户界面和鼠标交互相关的场景十分关键,可以说大部分的3D场景鼠标交互都是用这两个API。
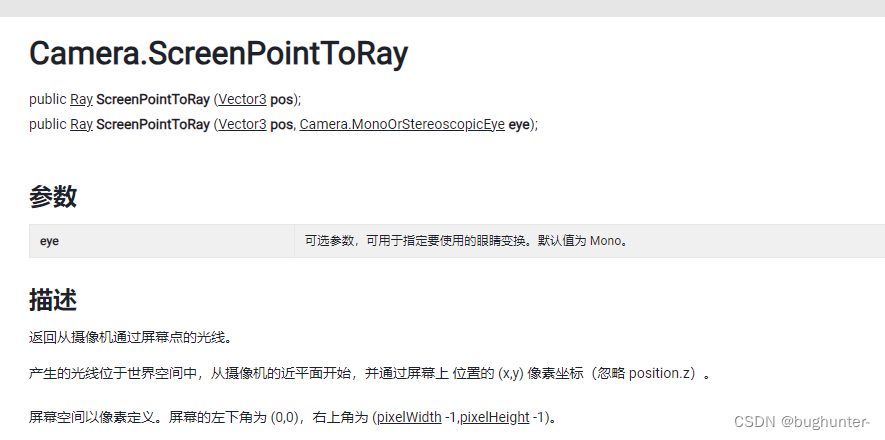
第一个API是Camera.ScreenPointToRay,官方文档描述:

这个API的作用是返回一条从摄像机射向屏幕指定坐标位置的一条射线。
函数原型:public Ray ScreenPointToRay (Vector3 pos);
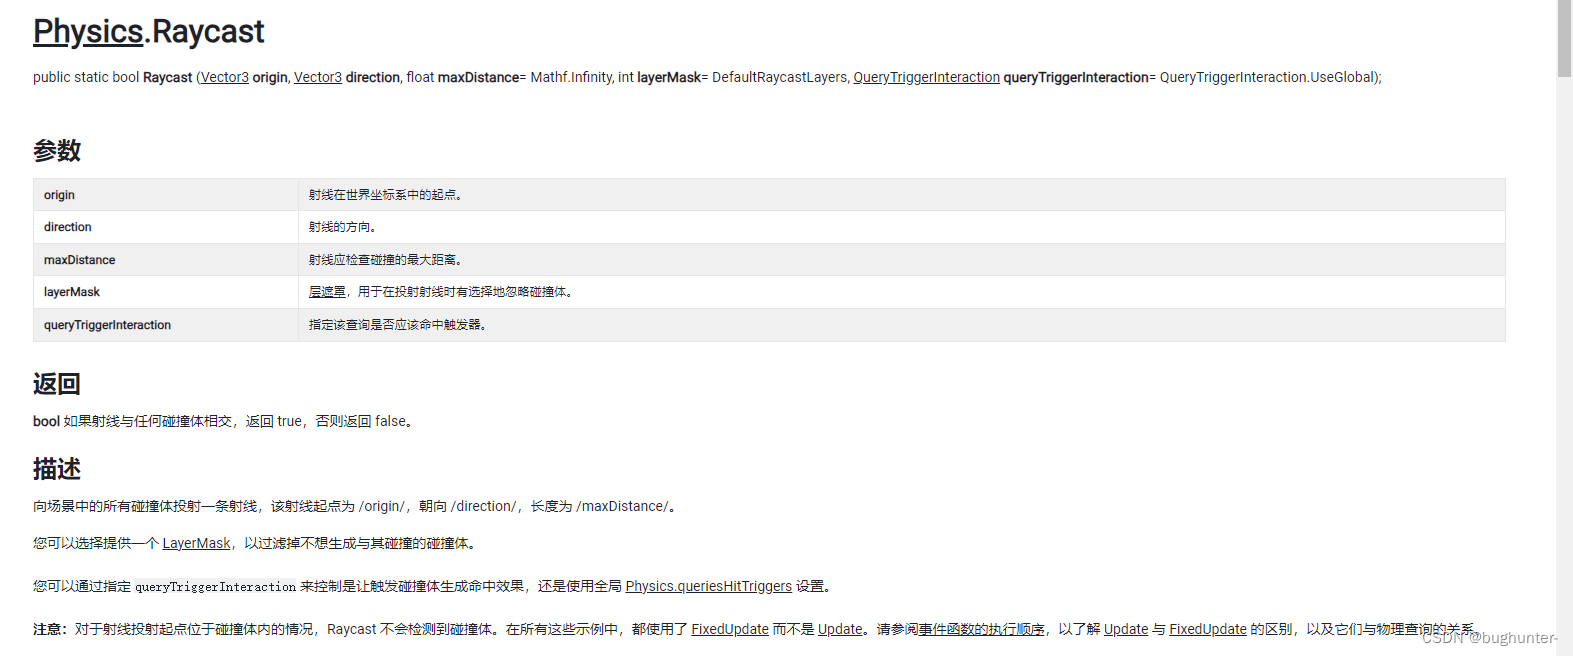
第二个API是Physics.Raycast,官方文档描述:

这个API的作用是,判断一条射线是否有和场景中任何碰撞体发声碰撞。
函数原型:public static bool Raycast(Ray ray, out RaycastHit hitInfo);
MouseManager代码:
using System.ComponentModel;
using System;
using System.Collections;
using System.Collections.Generic;
using UnityEngine;
using UnityEngine.Events;
using UnityEngine.EventSystems;public class MouseManager : MonoBehaviour {public static MouseManager Instance;                        // 单例public Texture2D point, doorway, attack, target, arrow;     // 鼠标指针/** 事件广播 **/public event Action<Vector3> onm ouseClicked;                // 鼠标点击事件public event Action<GameObject> OnEnemyClicked;             // 点击敌人事件private RaycastHit hitInfo;                                 // 射线信息private void Awake() {if (Instance != null) {Destroy(gameObject);}Instance = this;}private void Update() {SetCursorTexture();MouseControl();}public void SetCursorTexture() {// 从摄像机发射一条射线到目标点,这在进行射线命中检测时非常有用,特别是与用户界面和鼠标交互相关的场景中Ray ray = Camera.main.ScreenPointToRay(Input.mousePosition);// 判断射线是否与任何碰撞体发生碰撞,并且通过out参数返回碰撞信息,然后我们通过碰撞体的tag来切换对应的鼠标贴图if (Physics.Raycast(ray, out hitInfo)) {// 切换鼠标贴图switch (hitInfo.collider.gameObject.tag) {case "Ground":Cursor.SetCursor(target, new Vector2(16, 16), CursorMode.Auto);break;case "Enemy":Cursor.SetCursor(attack, new Vector2(16, 16), CursorMode.Auto);break;}}}public void MouseControl() {// 如果鼠标左键点下,并且射线有和场景种的物体发生碰撞,则根据碰撞的物体执行对应的操作if (Input.GetMouseButton(0) && hitInfo.collider != null) {// 如果射线碰撞的物体tag是"Ground"则执行OnMouseClicked绑定的事件if (hitInfo.collider.gameObject.CompareTag("Ground")) {OnMouseClicked?.Invoke(hitInfo.point);}// 如果射线碰撞的物体tag是"Enemy"则执行OnEnemyClicked绑定的事件if (hitInfo.collider.gameObject.CompareTag("Enemy")) {OnEnemyClicked?.Invoke(hitInfo.collider.gameObject);}}}}
总结:实现鼠标与场景交互功能,我们一般需要进行两个步骤,第一步先使用Camera.ScreenPointToRay方法获得从摄像机发射到对应屏幕坐标位置的射线,第二步使用Physics.Raycast判断这个射线是否有和场景中的碰撞体发生碰撞,并且通过out参数返回碰撞信息hitInfo,如果发生了碰撞,我们根据碰撞信息进行对应的操作。
PlayerController代码:
using System;
using System.Collections;
using System.Collections.Generic;
using UnityEngine;
using UnityEngine.AI;public class PlayerController : MonoBehaviour {private NavMeshAgent agent;private Animator anim;private GameObject attackTarget;private float attackCD;private void Awake() {agent = GetComponent<NavMeshAgent>();anim = GetComponent<Animator>();}private void Start() {// 绑定event事件MouseManager.Instance.OnMouseClicked += EventMoveToTarget;MouseManager.Instance.OnEnemyClicked += EventAttack;}private void Update() {SwitchAnimation();AttackCDTimeCounter();}/// <summary>///     根据人物的移动速度切换相应的动画/// </summary>private void SwitchAnimation() {anim.SetFloat("Speed", agent.velocity.sqrMagnitude);}/// <summary>///     走向目标位置/// </summary>/// <param name="target">目标位置</param>public void EventMoveToTarget(Vector3 target) {// 当我们点击了地图开始行走时,我们要中断正在进行的攻击逻辑StopAllCoroutines();// 因为在走向敌人并且攻击的逻辑完成之后我们会把NavMeshAgent的isStopped设为true,所以我们在这里要先将其重新置为falseagent.isStopped = false;// 将NavMeshAgent的目标设置为target,这样角色就会寻路移动到target位置agent.destination = target;}/// <summary>///     走向攻击目标并开始攻击/// </summary>/// <param name="target">攻击目标</param>private void EventAttack(GameObject target) {if (target != null) {attackTarget = target;StartCoroutine("MoveAndAttackEnemy");}}/// <summary>///     攻击CD计时器/// </summary>private void AttackCDTimeCounter() {if (attackCD > 0f) {attackCD -= Time.deltaTime;}}/// <summary>///     通过协程实现移动到敌人面前并采取攻击/// </summary>public IEnumerator MoveAndAttackEnemy() {// 将NavMeshAgent的isStopped置为false,开启移动agent.isStopped = false;// 如果玩家此时就在怪物旁边(距离小于等于1),那么玩家在攻击前需要先转身;如果不写这一句的话,当玩家离怪物距离小于1的时候,则玩家不会转身,就直接开始攻击transform.LookAt(attackTarget.transform);// 如果玩家没有走近怪物身边,则将NavMeshAgent的destination设置为怪物的位置while (Vector3.Distance(attackTarget.transform.position, transform.position) > 1.0f) {agent.destination = attackTarget.transform.position;yield return null;  // 暂停协程等待下一帧继续执行}// 将NavMeshAgent的isStopped置为true,停止移动agent.isStopped = true;// 攻击if (attackCD <= 0) {	// 攻击CD// 触发攻击动画anim.SetTrigger("Attack");// 重置攻击冷却attackCD = 0.5f;}}}
代码要点:
(1)通过MouseManager的单例访问event并给event绑定事件监听;
(2)通过Animator动画控制器的状态值来触发动画改变;
(3)通过改变NavMeshAgent的destination属性值来控制人物的移动;
(4)因为destination属性值控制人物的移动是异步操作,所以我们不能直接在设置destination属性之后启动攻击动画,以下这种方式是错误的:
agent.destination = attackTarget.transform.position;
anim.SetFloat("Speed", agent.velocity.sqrMagnitude);
我们要通过协程来实现移动到怪物身边之后启动攻击动画的逻辑。
/// <summary>
///     通过协程实现移动到敌人面前并采取攻击
/// </summary>
public IEnumerator MoveAndAttackEnemy() {// 将NavMeshAgent的isStopped置为false,开启移动agent.isStopped = false;// 如果玩家此时就在怪物旁边(距离小于等于1),那么玩家在攻击前需要先转身;如果不写这一句的话,当玩家离怪物距离小于1的时候,则玩家不会转身,就直接开始攻击transform.LookAt(attackTarget.transform);// 如果玩家没有走近怪物身边,则将NavMeshAgent的destination设置为怪物的位置while (Vector3.Distance(attackTarget.transform.position, transform.position) > 1.0f) {agent.destination = attackTarget.transform.position;yield return null;  // 暂停协程等待下一帧继续执行}// 将NavMeshAgent的isStopped置为true,停止移动agent.isStopped = true;// 攻击if (attackCD <= 0) {	// 攻击CD// 触发攻击动画anim.SetTrigger("Attack");// 重置攻击冷却attackCD = 0.5f;}
}
99%的人还看了
相似问题
猜你感兴趣
版权申明
本文"3D RPG Course | Core 学习日记四:鼠标控制人物移动":http://eshow365.cn/6-36883-0.html 内容来自互联网,请自行判断内容的正确性。如有侵权请联系我们,立即删除!
- 上一篇: 用趋动云GPU部署自己的Stable Diffusion
- 下一篇: 软考-系统架构-2023-反思