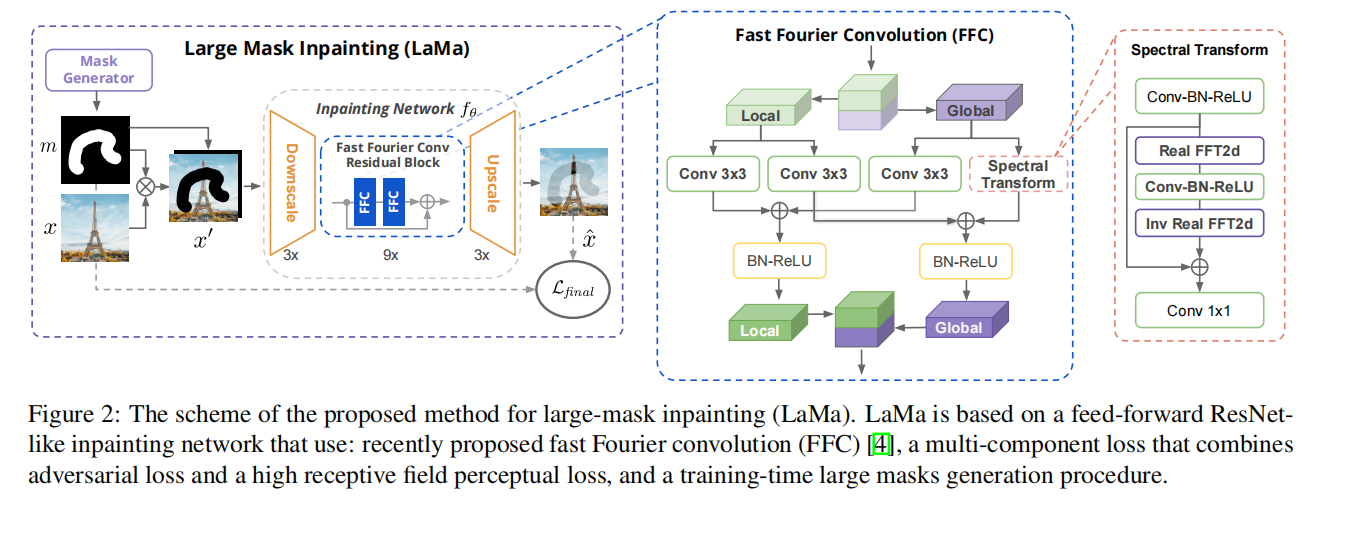
LaMa 论文复现:Resolution-robust Large Mask Inpainting with Fourier Convolutions
最佳答案 问答题库538位专家为你答疑解惑
代码:GitHub - andy971022/auto-lama
论文:https://arxiv.org/abs/2109.07161
1 LaMa 论文简介

2 LaMa代码复现
2.1 环境部署
2.1.1 下载源码,创建环境,安装必需库
git clone https://github.com/advimman/lamacd lama
conda env create -f conda_env.yml
conda activate lama
conda install pytorch torchvision torchaudio cudatoolkit=10.2 -c pytorch -y
pip install pytorch-lightning==1.2.92.2 公开数据集训练测试与结果可视化
2.2.1 LaMa 测试数据集和预训练模型下载
(1)预训练模型下载链接:
预训练模型 https://disk.yandex.ru/d/kHJkc7bs7mKIVA![]() https://disk.yandex.ru/d/kHJkc7bs7mKIVA
https://disk.yandex.ru/d/kHJkc7bs7mKIVA
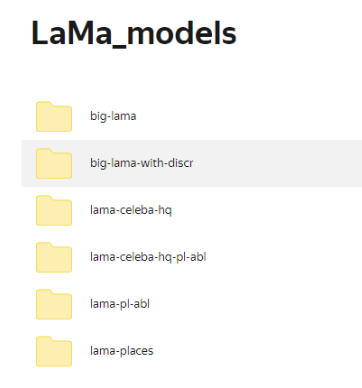
预训练模型下载好后,存放在checkpoints文件夹下。

(2)测试数据集下载:
# Download data from http://places2.csail.mit.edu/download.html# Places365-Standard: Train(105GB)/Test(19GB)/Val(2.1GB) from High-resolution images sectionwget http://data.csail.mit.edu/places/places365/train_large_places365standard.tarwget http://data.csail.mit.edu/places/places365/val_large.tarwget http://data.csail.mit.edu/places/places365/test_large.tar![]()
http://data.csail.mit.edu/places/places365/val_large.tar
http://data.csail.mit.edu/places/places365/test_large.tar
2.2.2 place365 数据集训练
2.2.3 place365 数据集测试
预测性能,基于big-lama数据集中的LaMa_test_images。
运行以下命令,其中refine=true 表示将运行图像修复器。
(nerf) D:\0A_project\lama-main\bin> python predict.py refine=True model.path=$(pwd)../checkpoint/big-lama indir=$(pwd)../LaMa_test_images outdir=$(pwd)../output
model.path=$(pwd)/big-lama: 这部分是传递给predict.py脚本的命令行参数之一。它设置了一个参数model.path,并将其值设置为当前目录(通过$(pwd)获取)下的big-lama。
indir=$(pwd)/LaMa_test_images: 这是另一个命令行参数,用于设置输入目录。它将indir参数的值设置为当前目录下的LaMa_test_images目录。
outdir=$(pwd)/output: 类似地,这是设置输出目录的参数。它将outdir参数的值设置为当前目录下的output目录。
出错如下:
Traceback (most recent call last):File "predict.py", line 24, in <module>from  saicinpainting.evaluation.utils import move_to_device
ModuleNotFoundError: No module named 'saicinpainting'
代码段引用模块包内容如下:
import logging
import os
import traceback
import sys
from saicinpainting.evaluation.refinement import refine_predict
from saicinpainting.evaluation.utils import move_to_device
文件结构如下,saicinpainting模块包位于lama-main 主文件夹下,predict.py位于bin文件夹中。


因此,出现 ModuleNotFoundError: No module named 'saicinpainting' 错误是该包没有在搜索路径中找到,故需要把该路径添加到搜索路径中,代码更改如下:
import logging
import os
import traceback
import sys
sys.path.append(r'D:\0A_project\lama-main')  # 添加项目根目录到 sys.path
from saicinpainting.evaluation.refinement import refine_predict
from saicinpainting.evaluation.utils import move_to_device
再次运行,又报错(待解决)

(1)不要用GPU预测,尝试无法解决
(2)python predict.py refine=True model.path=$(pwd)../checkpoint/big-lama indir=$(pwd)../LaMa_test_images outdir=$(pwd)../output HYDRA_FULL_ERROR=1 无法解决
(3)D:\0A_project\lama-main\configs\prediction\default.yaml 添加 HYDRA_FULL_ERROR=1 无法解决
(4)注释掉predict.py line 41
# register_debug_signal_handlers() # kill -10 <pid> will result in traceback dumped into log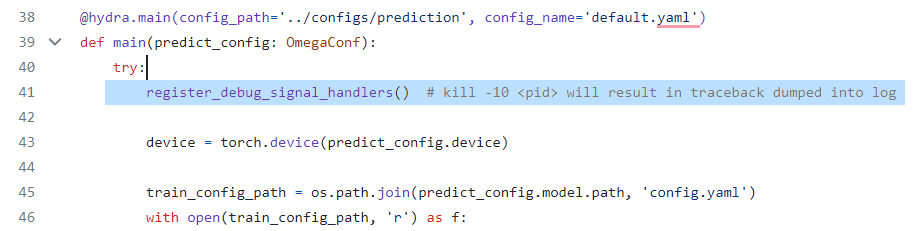
(2)在predict.py line45 后面加上一句
train_config_path = os.path.join('<your_full_path_to_lama_base_directory>', train_config_path)如下:
在lin54 句后面加上
checkpoint_path = os.path.join('<your_full_path_to_lama_base_directory>', checkpoint_path)2.2.4 测试结果和参数可视化
2.3 制作自己的数据集,训练测试与结果的可视化
2.3.1 制作自己的数据集
(1)创建数据集图片对应的mask图,命名为images_name_maskxxx.png, 将images原图与对应的masks原图放在同一文件夹下。数据集文件格式如下:
``` image1_mask001.pngimage1.pngimage2_mask001.pngimage2.png```(2)利用(https://github.com/advimman/lama/blob/main/bin/gen_mask_dataset.py) 生成随机的mask图片。将自己图像的数据集存放在myown_dataset文件夹下面。将configs/prediction/default.yaml 文件中的`image_suffix` 声明为png或jpg或_input.jpg,如下
indir: no  # 将在CLI中被覆盖
outdir: no  # 将在CLI中被覆盖model:path: no  # 将在CLI中被覆盖checkpoint: best.ckptdataset:kind: defaultimg_suffix: .pngpad_out_to_modulo: 8  # 输出图像将被填充到8的倍数device: cuda  # 使用CUDA设备
out_key: inpainted  # 输出键:inpaintedrefine: False  # 如果为True,将运行图像修复器
refiner:gpu_ids: 0,1  # 使用的GPU编号。如果只使用单个GPU,使用:"0,"modulo: ${dataset.pad_out_to_modulo}  # 与数据集的填充模数一致n_iters: 15  # 每个尺度的迭代修复次数lr: 0.002  # 学习率min_side: 512  # 所有尺度的图像边缘都应 >= min_side / sqrt(2)max_scales: 3  # 图像-掩码金字塔的最大降尺度数量px_budget: 1800000  # 像素预算。任何图像都将调整大小以满足高*宽 <= px_budget
运行命令
python3 bin/gen_mask_dataset.py indir=$(pwd)/myown_dataset outdir=$(pwd)/myown_dataset gen_mask_dataset.py解读如下
#!/usr/bin/env python3import glob  # 用于查找文件
import os  # 提供文件和目录操作的功能
import shutil  # 用于文件复制和移动
import traceback  # 用于处理异常信息import PIL.Image as Image  # 用于处理图像的Python库
import numpy as np  # 用于数值计算的Python库
from joblib import Parallel, delayed  # 用于并行处理任务的库from saicinpainting.evaluation.masks.mask import SegmentationMask, propose_random_square_crop  # 导入特定的图像处理功能
from saicinpainting.evaluation.utils import load_yaml, SmallMode  # 导入加载YAML配置和小模式处理的功能
from saicinpainting.training.data.masks import MixedMaskGenerator  # 导入混合掩码生成器# 创建一个包装器,用于生成多个掩码变体
class MakeManyMasksWrapper:def __init__(self, impl, variants_n=2):self.impl = implself.variants_n = variants_ndef get_masks(self, img):img = np.transpose(np.array(img), (2, 0, 1))return [self.impl(img)[0] for _ in range(self.variants_n)]# 处理图像
def process_images(src_images, indir, outdir, config):# 根据配置选择掩码生成器if config.generator_kind == 'segmentation':mask_generator = SegmentationMask(**config.mask_generator_kwargs)elif config.generator_kind == 'random':variants_n = config.mask_generator_kwargs.pop('variants_n', 2)mask_generator = MakeManyMasksWrapper(MixedMaskGenerator(**config.mask_generator_kwargs),variants_n=variants_n)else:raise ValueError(f'Unexpected generator kind: {config.generator_kind}')max_tamper_area = config.get('max_tamper_area', 1)for infile in src_images:try:# 获取文件相对路径file_relpath = infile[len(indir):]img_outpath = os.path.join(outdir, file_relpath)os.makedirs(os.path.dirname(img_outpath), exist_ok=True)# 打开输入图像并转换为RGB格式image = Image.open(infile).convert('RGB')# 将输入图像缩放到输出分辨率,并过滤小图像if min(image.size) < config.cropping.out_min_size:handle_small_mode = SmallMode(config.cropping.handle_small_mode)if handle_small_mode == SmallMode.DROP:continueelif handle_small_mode == SmallMode.UPSCALE:factor = config.cropping.out_min_size / min(image.size)out_size = (np.array(image.size) * factor).round().astype('uint32')image = image.resize(out_size, resample=Image.BICUBIC)else:factor = config.cropping.out_min_size / min(image.size)out_size = (np.array(image.size) * factor).round().astype('uint32')image = image.resize(out_size, resample=Image.BICUBIC)# 生成和选择掩码src_masks = mask_generator.get_masks(image)filtered_image_mask_pairs = []for cur_mask in src_masks:if config.cropping.out_square_crop:(crop_left,crop_top,crop_right,crop_bottom) = propose_random_square_crop(cur_mask,min_overlap=config.cropping.crop_min_overlap)cur_mask = cur_mask[crop_top:crop_bottom, crop_left:crop_right]cur_image = image.copy().crop((crop_left, crop_top, crop_right, crop_bottom))else:cur_image = imageif len(np.unique(cur_mask)) == 0 or cur_mask.mean() > max_tamper_area:continuefiltered_image_mask_pairs.append((cur_image, cur_mask))mask_indices = np.random.choice(len(filtered_image_mask_pairs),size=min(len(filtered_image_mask_pairs), config.max_masks_per_image),replace=False)# 剪裁掩码并保存掩码和输入图像mask_basename = os.path.join(outdir, os.path.splitext(file_relpath)[0])for i, idx in enumerate(mask_indices):cur_image, cur_mask = filtered_image_mask_pairs[idx]cur_basename = mask_basename + f'_crop{i:03d}'Image.fromarray(np.clip(cur_mask * 255, 0, 255).astype('uint8'),mode='L').save(cur_basename + f'_mask{i:03d}.png')cur_image.save(cur_basename + '.png')except KeyboardInterrupt:returnexcept Exception as ex:print(f'Could not make masks for {infile} due to {ex}:\n{traceback.format_exc()}')# 主函数
def main(args):if not args.indir.endswith('/'):args.indir += '/'os.makedirs(args.outdir, exist_ok=True)config = load_yaml(args.config)in_files = list(glob.glob(os.path.join(args.indir, '**', f'*.{args.ext}'), recursive=True))if args.n_jobs == 0:process_images(in_files, args.indir, args.outdir, config)else:in_files_n = len(in_files)chunk_size = in_files_n // args.n_jobs + (1 if in_files_n % args.n_jobs > 0 else 0)Parallel(n_jobs=args.n_jobs)(delayed(process_images)(in_files[start:start+chunk_size], args.indir, args.outdir, config)for start in range(0, len(in_files), chunk_size))# 如果这个脚本被直接执行
if __name__ == '__main__':import argparseaparser = argparse.ArgumentParser()aparser.add_argument('config', type=str, help='Path to config for dataset generation')aparser.add_argument('indir', type=str, help='Path to folder with images')aparser.add_argument('outdir', type=str, help='Path to folder to store aligned images and masks to')aparser.add_argument('--n-jobs', type=int, default=0, help='How many processes to use')aparser.add_argument('--ext', type=str, default='jpg', help='Input image extension')main(aparser.parse_args())
用于处理图像并生成掩码。它包含了一些配置选项、图像处理功能以及处理多个图像的能力。主要的功能包括处理输入图像,生成掩码,剪裁图像和掩码,然后将它们保存到指定的输出目录。这个脚本还支持多进程处理,可以加快处理大量图像。
在上述代码中,"掩码" 是指一个二值图像,通常表示了一些区域的存在或缺失。数学形式表示掩码通常是一个矩阵(或图像),其中每个元素可以是二进制值(0或1),表示相应位置是否包含某种特征或信息。
具体地,如果我们考虑一个二维掩码矩阵,其中每个元素 (i, j) 的值为 1 表示该位置被覆盖或包含信息,值为 0 表示该位置没有信息或被遮挡。掩码通常用于图像处理和计算机视觉任务中,用于标识感兴趣的区域或对象。
例如,一个简单的数学形式的表示可以是:
- 对于一个 2D 图像,
M(i, j)表示掩码矩阵中的元素,其中(i, j)是矩阵的坐标,M(i, j)的值为 1 表示该位置包含信息,M(i, j)的值为 0 表示该位置不包含信息。
掩码通常用于图像分割、遮挡区域检测、图像处理等任务,以便识别和操作图像中的感兴趣区域。在代码中,掩码用二维数组(NumPy数组)来表示,其中元素的值为0或1,这样可以方便地进行图像处理操作。
2.3.2 训练自己的数据集
python3 bin/predict.py model.path=$(pwd)/big-lama indir=$(pwd)/LaMa_test_images outdir=$(pwd)/output2.3.3 测试自己的数据集
python3 bin/predict.py model.path=$(pwd)/big-lama indir=$(pwd)/LaMa_test_images outdir=$(pwd)/output2.3.4 测试结果参数及可视化
99%的人还看了
相似问题
猜你感兴趣
版权申明
本文"LaMa 论文复现:Resolution-robust Large Mask Inpainting with Fourier Convolutions":http://eshow365.cn/6-36469-0.html 内容来自互联网,请自行判断内容的正确性。如有侵权请联系我们,立即删除!