Spring笔记(二)(黑马)(AOP面向切面编程)
最佳答案 问答题库718位专家为你答疑解惑
01、AOP 简介
1.1 AOP的概念
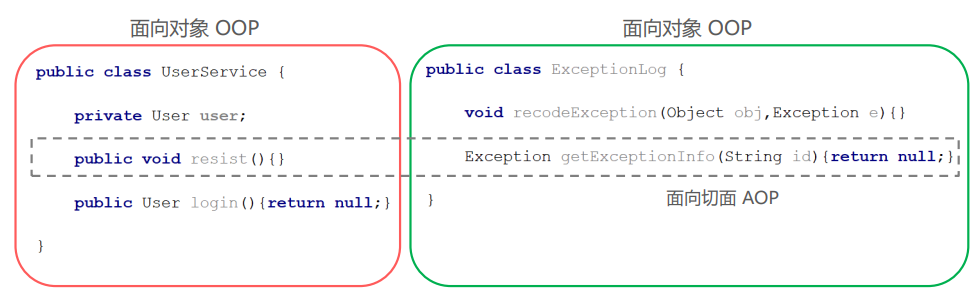
AOP,Aspect Oriented Programming,面向切面编程,是对面向对象编程OOP的升华。OOP是纵向对一个事物的抽象,一个对象包括静态的属性信息,包括动态的方法信息等。而AOP是横向的对不同事物的抽象,属性与属性、方法与方法、对象与对象都可以组成一个切面,而用这种思维去设计编程的方式叫做面向切面编程
1.2 AOP思想的实现方案
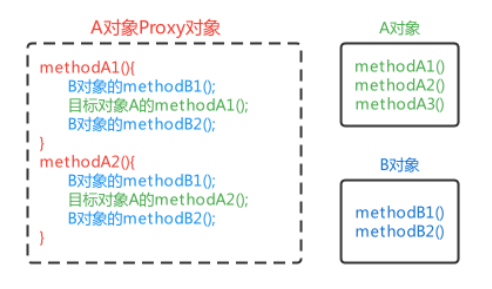
动态代理技术,在运行期间,对目标对象的方法进行增强,代理对象同名方法内可以执行原有逻辑的同时嵌入执行其他增强逻辑或其他对象的方法
1.3 模拟AOP的基础代码
其实在之前学习BeanPostProcessor时,在BeanPostProcessor的after方法中使用动态代理对Bean进行了增 强,实际存储到单例池singleObjects中的不是当前目标对象本身,而是当前目标对象的代理对象Proxy,这样在调用目标对象方法时,实际调用的是代理对象Proxy的同名方法,起到了目标方法前后都进行增强的功能, 对该方式进行一下优化,将增强的方法提取出去到一个增强类中,且只对com.mem.service.impl包下的任何类的任何方法进行增强
- 引入坐标
- 编写目标对象
userService
public interface UserService {void show1();void show2();
}public class UserServiceImpl implements UserService {@Overridepublic void show1() {System.out.println("show1 ...");}@Overridepublic void show2() {System.out.println("show2 ...");}
}
- 编写增强(通知)对象
myAdvice
// 增强类,内部提供增强方法
public class MyAdvice {public void beforeAdvice(){System.out.println("前置增强....");}public void afterReturningAdvice(){System.out.println("后置增强....");}
}
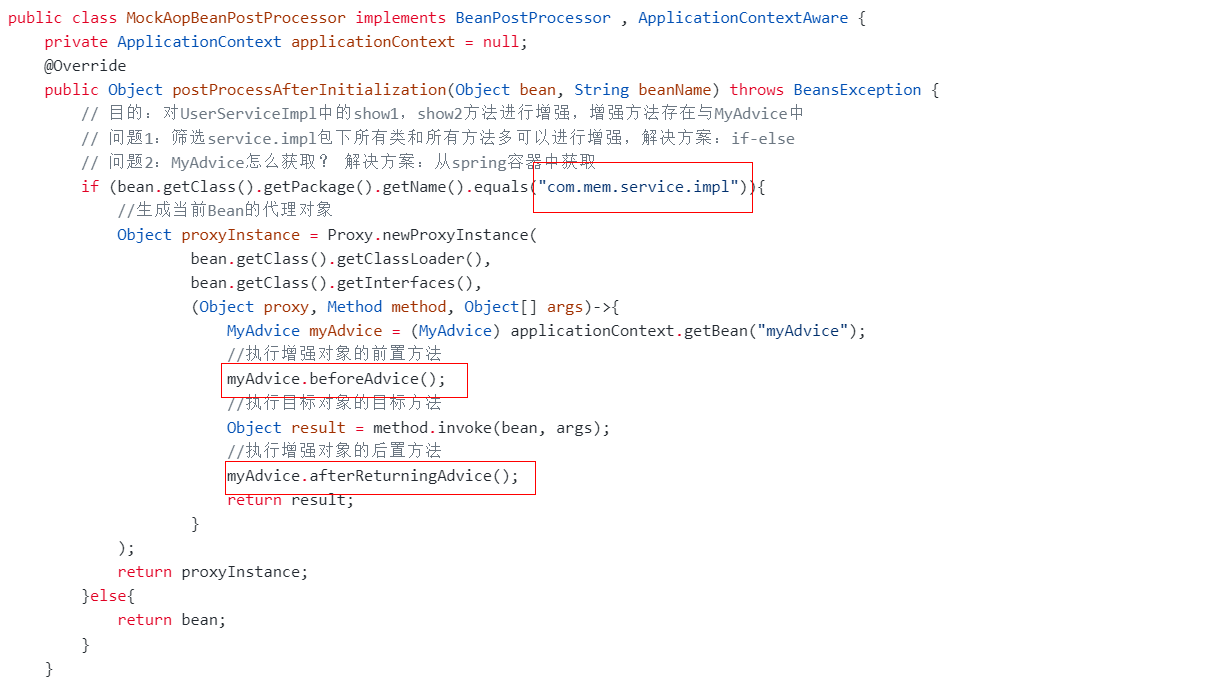
- 编写bean后处理器模拟AOP实现
public class MockAopBeanPostProcessor implements BeanPostProcessor , ApplicationContextAware {private ApplicationContext applicationContext = null;@Overridepublic Object postProcessAfterInitialization(Object bean, String beanName) throws BeansException {// 目的:对UserServiceImpl中的show1,show2方法进行增强,增强方法存在与MyAdvice中// 问题1:筛选service.impl包下所有类和所有方法多可以进行增强,解决方案:if-else// 问题2:MyAdvice怎么获取? 解决方案:从spring容器中获取if (bean.getClass().getPackage().getName().equals("com.mem.service.impl")){//生成当前Bean的代理对象Object proxyInstance = Proxy.newProxyInstance(bean.getClass().getClassLoader(),bean.getClass().getInterfaces(),(Object proxy, Method method, Object[] args)->{MyAdvice myAdvice = (MyAdvice) applicationContext.getBean("myAdvice");//执行增强对象的前置方法myAdvice.beforeAdvice();//执行目标对象的目标方法Object result = method.invoke(bean, args);//执行增强对象的后置方法myAdvice.afterReturningAdvice();return result;});return proxyInstance;}else{return bean;}}@Overridepublic void setApplicationContext(ApplicationContext applicationContext) throws BeansException {this.applicationContext = applicationContext;}
}
- 配置文件:载入容器
<bean id="myAdvice" class="com.mem.advice.MyAdvice"/>
<bean id="userService" class="com.mem.service.impl.UserServiceImpl"/>
<bean id="mockAopBeanPostProcessor" class="com.mem.processor.MockAopBeanPostProcessor"/>
- 测试
public class ApplicationContextTest {public static void main(String[] args) {ApplicationContext applicationContext = new ClassPathXmlApplicationContext("applicationContext.xml");UserService userService = (UserService) applicationContext.getBean("userService");userService.show1();}
}
// 输出
前置增强....
show1 ...
后置增强....
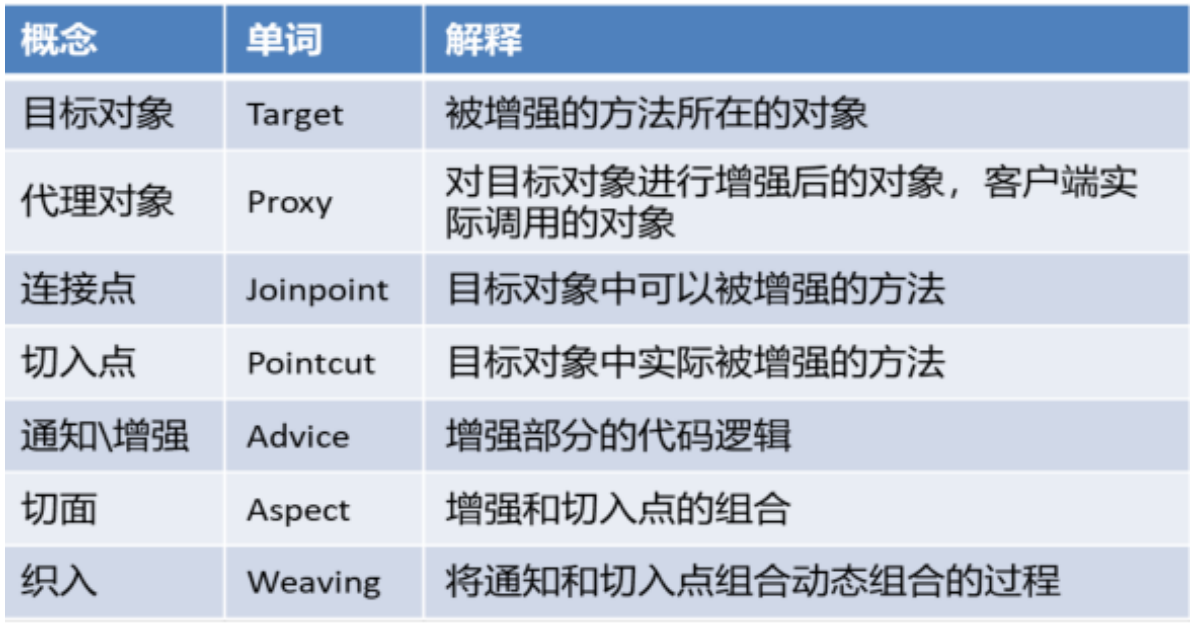
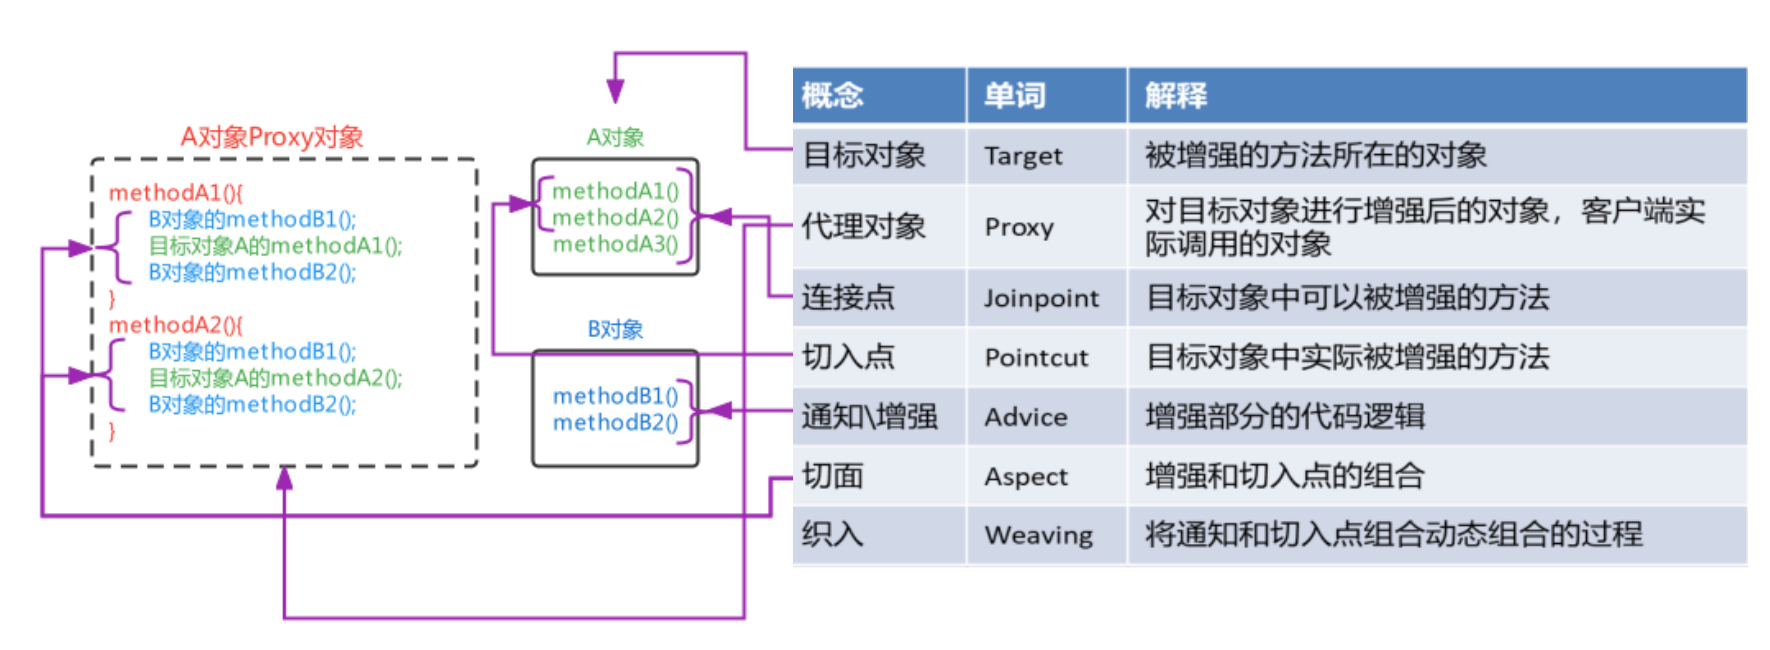
1.4 AOP相关概念
02、基于xml配置的AOP
2.1 xml方式AOP快速入门
前面我们自己编写的AOP基础代码还是存在一些问题的,主要如下:
- 被增强的包名在代码写死了
- 通知对象的方法在代码中写死了
通过配置文件的方式去解决上述问题
- 配置哪些包、哪些类、哪些方法需要被增强 (涉及切点表达式的配置)
- 配置目标方法要被哪些通知方法所增强,在目标方法执行之前还是之后执行增强(涉及织入的配置)
配置方式的设计、配置文件(注解)的解析工作,Spring已经帮我们封装好了
xml方式配置AOP的步骤:
- 导入AOP相关坐标;
<dependency><groupId>org.aspectj</groupId><artifactId>aspectjweaver</artifactId><version>1.9.6</version>
</dependency>
aspectj是实现AOP的一种实现方式
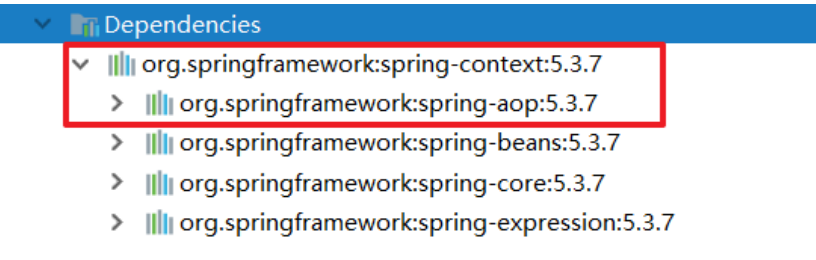
Spring-context坐标下已经包含spring-aop的包了,所以就不用额外导入了
- 准备目标类、准备增强(通知)类,并配置给Spring管理;
- 目标类
public interface UserService {void show1();void show2();
}public class UserServiceImpl implements UserService {@Overridepublic void show1() {System.out.println("show1 ...");}@Overridepublic void show2() {System.out.println("show2 ...");}
}
- 通知类
// 增强类,内部提供增强方法
public class MyAdvice {public void beforeAdvice(){System.out.println("前置增强....");}public void afterReturningAdvice(){System.out.println("后置增强....");}
}
- 配置文件(需引入aop的命名空间)
<bean id="myAdvice" class="com.mem.advice.MyAdvice"/>
<bean id="userService" class="com.mem.service.impl.UserServiceImpl"/>
- 配置切点表达式(哪些方法被增强);
- 配置织入(切点被哪些通知方法增强,是前置增强还是后置增强)。
- 追加配置文件
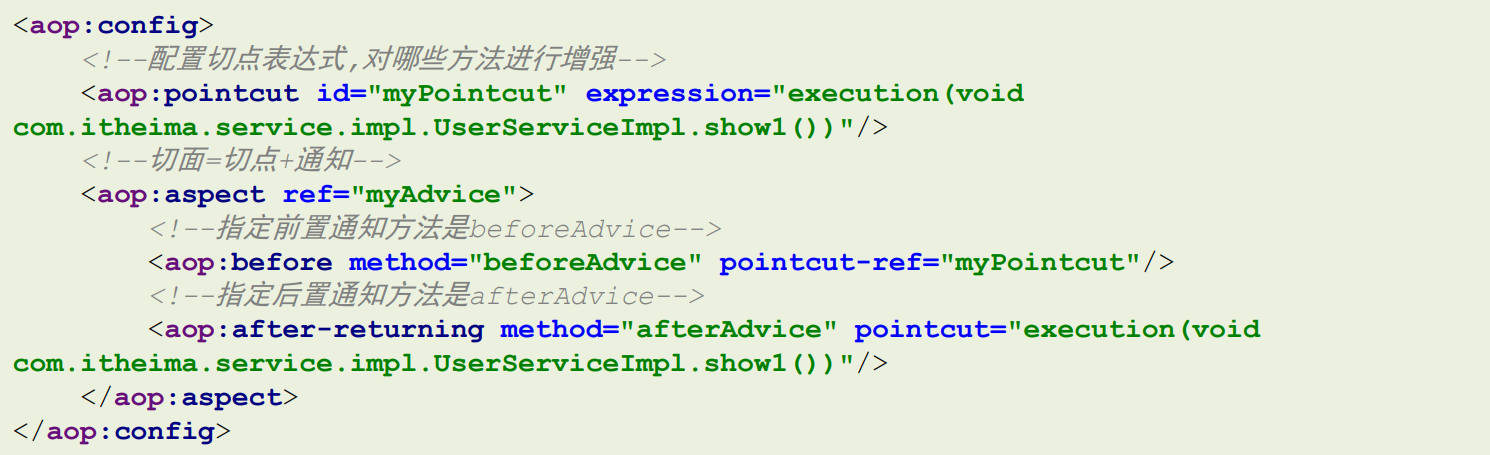
<!--配置aop-->
<aop:config><!--配置切点表达式,目的:指定哪些方法要被增强--><aop:pointcut id="myPointcut" expression="execution(void com.mem.service.impl.UserServiceImpl.show*())"/><!--配置织入,目的:指定哪些切点与哪些通知进行结合--><aop:aspect id="" ref="myAdvice"><aop:before method="beforeAdvice" pointcut-ref="myPointcut"/><aop:after-returning method="afterReturningAdvice" pointcut-ref="myPointcut"/></aop:aspect>
</aop:config>
- 测试结果和上面模拟的效果一样
2.2 xml方式AOP配置详解
xml配置AOP的方式还是比较简单的,下面看一下AOP详细配置的细节:
- 切点表达式的配置方式
- 切点表达式的配置语法
- 通知的类型
- AOP的配置的两种方式
2.2.1 切点表达式的配置方式:
有两种
- 直接将切点表达式配置在通知上
- 可以将切点表达式抽取到外面,在通知上进行引用
2.2.2 切点表达式的配置语法
切点表达式是配置要对哪些连接点(哪些类的哪些方法)进行通知的增强,语法如下:

其中,
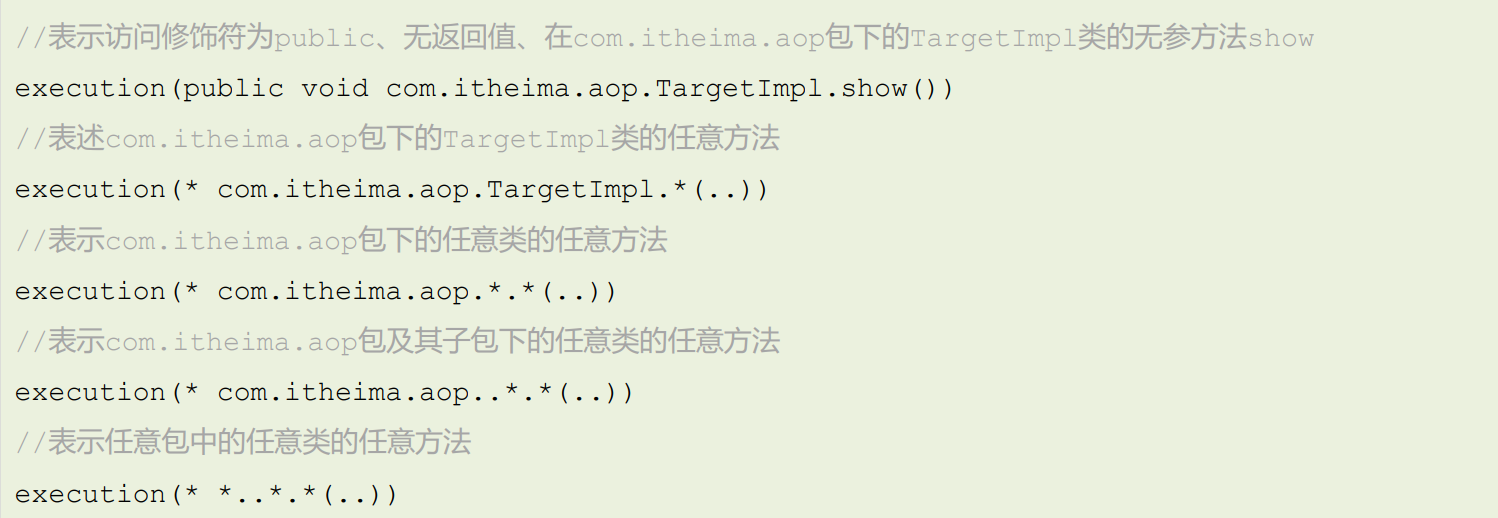
- 访问修饰符可以省略不写;
- 返回值类型、某一级包名、类名、方法名 可以使用
*表示任意; - 包名与类名之间使用单点
.表示该包下的类,使用双点..表示该包及其子包下的类; - 参数列表可以使用两个点
..表示任意参数。
切点表达式举几个例子方便理解
2.2.3 通知的类型
AspectJ的通知由以下五种类型
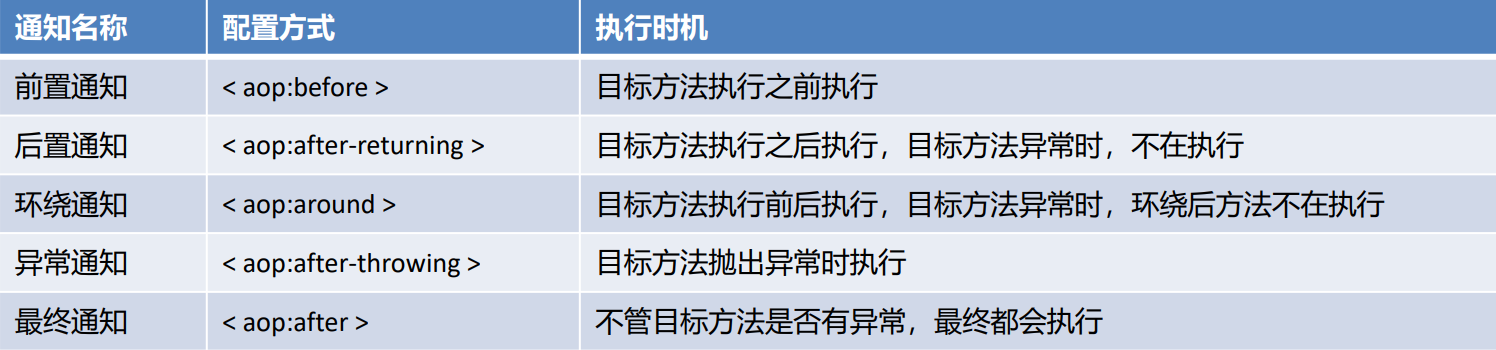
- 前置和后置如上
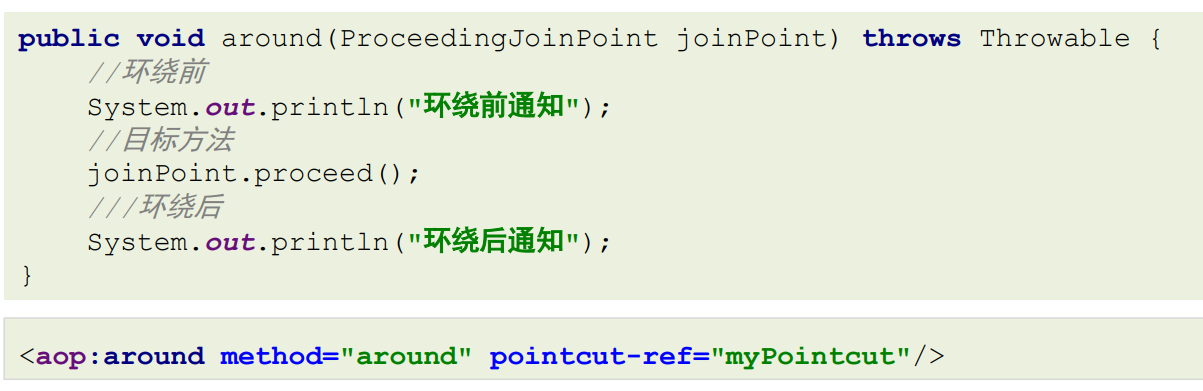
- 环绕通知
- 异常通知,当目标方法抛出异常时,异常通知方法执行,且后置通知和环绕后通知不在执行

- 最终通知,类似异常捕获中的finally,不管目标方法有没有异常,最终都会执行的通知

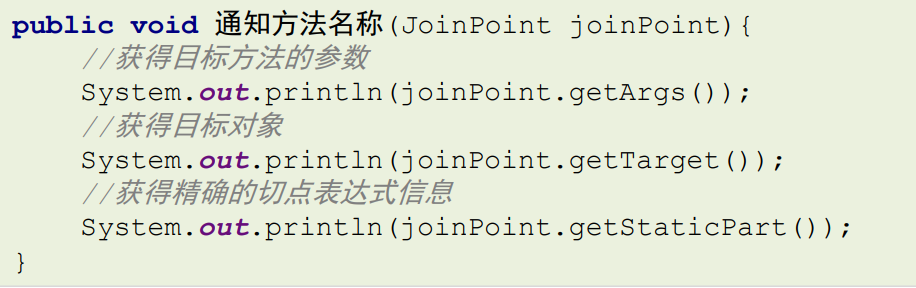
通知方法在被调用时,Spring可以为其传递一些必要的参数

- JoinPoint 对象
- ProceedingJoinPoint对象

- Throwable对象

2.2.4 AOP的配置的两种方式
AOP的xml有两种配置方式,如下:
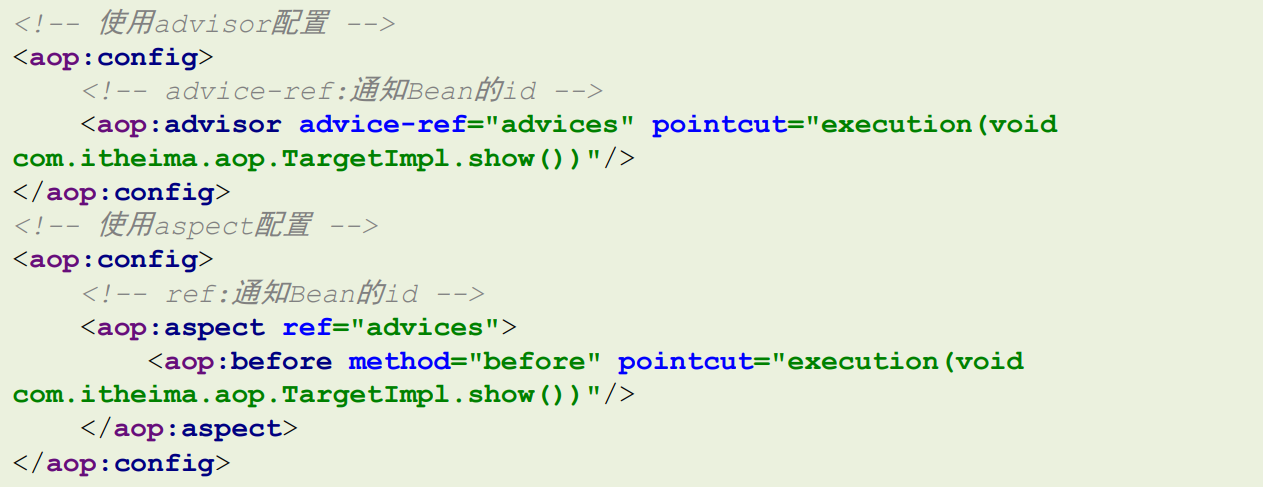
- 使用
<advisor>配置切面(详见之前的配置) - 使用
<aspect>配置切面(如下)
Spring定义了一个Advice接口,实现了该接口的类都可以作为通知类出现

Advice的子功能接口
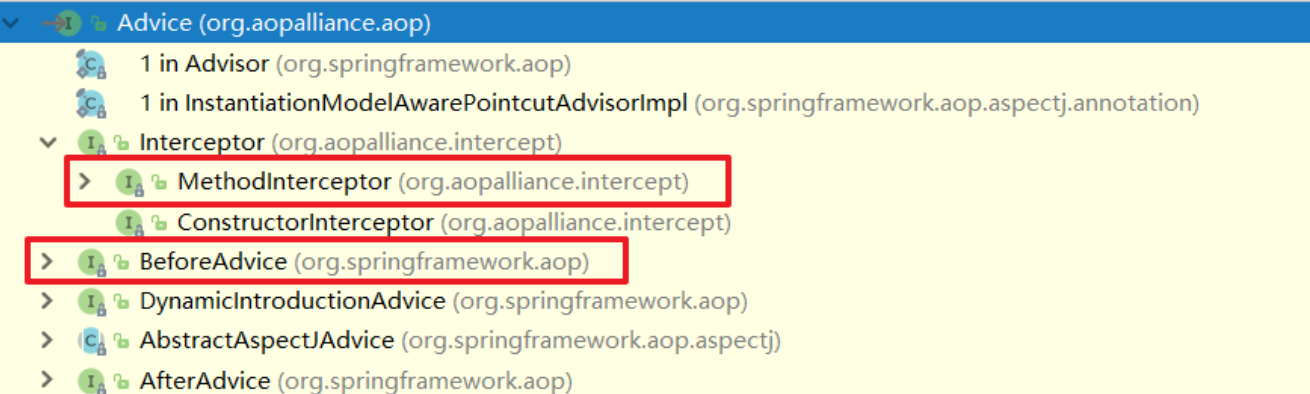
前置通知和后置通知接口
通知类实现了前置通知和后置通知接口
public class MyAdvice2 implements MethodBeforeAdvice, AfterReturningAdvice {@Overridepublic void afterReturning(Object o, Method method, Object[] objects, Object o1) throws Throwable {System.out.println("后置通知*****");}@Overridepublic void before(Method method, Object[] objects, Object o) throws Throwable {System.out.println("前置通知*****");}
}
切面使用advisor标签配置
<!--配置aop-->
<aop:config><!--配置切点表达式,目的:指定哪些方法要被增强--><aop:pointcut id="myPointcut" expression="execution(void com.mem.service.impl.UserServiceImpl.show*())"/><!--配置织入,目的:指定哪些切点与哪些通知进行结合--><aop:advisor advice-ref="myAdvice2" pointcut-ref="myPointcut"/>
</aop:config>
环绕通知
通知类实现了方法拦截器接口
public class MyAdvice3 implements MethodInterceptor {@Overridepublic Object invoke(MethodInvocation methodInvocation) throws Throwable {System.out.println("环绕前*****");// 执行目标方法Object res = methodInvocation.getMethod().invoke(methodInvocation.getThis(), methodInvocation.getArguments());System.out.println("环绕后*****");return res;}
}
切面使用advisor标签配置
<!--配置aop-->
<aop:config><!--配置切点表达式,目的:指定哪些方法要被增强--><aop:pointcut id="myPointcut" expression="execution(void com.mem.service.impl.UserServiceImpl.show*())"/><!--配置织入,目的:指定哪些切点与哪些通知进行结合--><aop:advisor advice-ref="myAdvice3" pointcut-ref="myPointcut"/>
</aop:config>
两种方式的比较<advisor> 和<aspect>
1)配置语法不同:
2)通知类的定义要求不同,advisor 需要的通知类需要实现Advice的子功能接口:

aspect 不需要通知类实现任何接口,在配置的时候指定哪些方法属于哪种通知类型即可,更加灵活方便:

3)可配置的切面数量不同:
- 一个advisor只能配置一个固定通知和一个切点表达式;
- 一个aspect可以配置多个通知和多个切点表达式任意组合,粒度更细。
4)使用场景不同:
- 如果通知类型多、允许随意搭配情况下可以使用aspect进行配置;
- 如果通知类型单一、且通知类中通知方法一次性都会使用到的情况下可以使用advisor进行配置;
- 在通知类型已经固定,不用人为指定通知类型时,可以使用advisor进行配置,例如后面要学习的Spring事务 控制的配置;
由于实际开发中,自定义aop功能的配置大多使用aspect的配置方式,所以我们后面主要讲解aspect的配置, advisor是为了后面Spring声明式事务控制做铺垫,此处大家了解即可。
2.3 xml方式AOP原理刨析
通过xml方式配置AOP时,我们引入了AOP的命名空间,根据讲解的,要去找spring-aop包下的META-INF,在去找spring.handlers文件
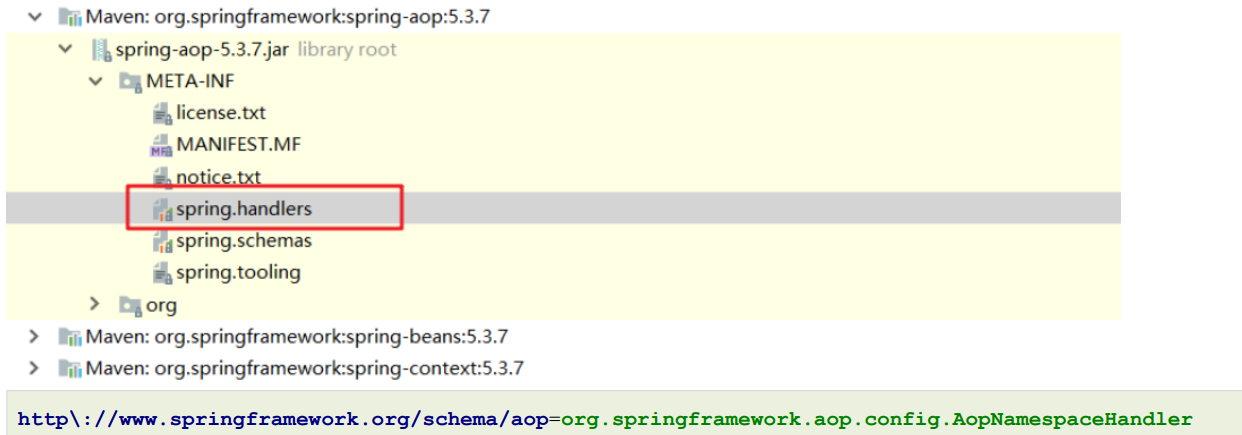
最终加载的是 AopNamespaceHandler,该Handler的init方法中注册了config标签对应的解析器(ConfigBeanDefinitionParser)
public class AopNamespaceHandler extends NamespaceHandlerSupport {public AopNamespaceHandler() {}public void init() {this.registerBeanDefinitionParser("config", new ConfigBeanDefinitionParser());this.registerBeanDefinitionParser("aspectj-autoproxy", new AspectJAutoProxyBeanDefinitionParser());this.registerBeanDefinitionDecorator("scoped-proxy", new ScopedProxyBeanDefinitionDecorator());this.registerBeanDefinitionParser("spring-configured", new SpringConfiguredBeanDefinitionParser());}
}
以ConfigBeanDefinitionParser作为入口进行源码剖析,最终会注册一个AspectJAwareAdvisorAutoProxyCreator 进入到Spring容器中
public abstract class AopConfigUtils {@Nullablepublic static BeanDefinition registerAspectJAutoProxyCreatorIfNecessary(BeanDefinitionRegistry registry, @Nullable Object source) {return registerOrEscalateApcAsRequired(AspectJAwareAdvisorAutoProxyCreator.class, registry, source);}
}
那该类作用是什么呢?看一下继承体系图
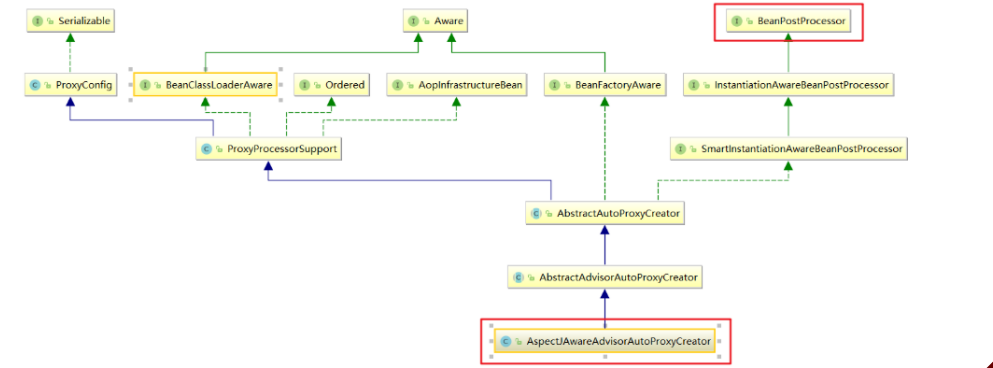
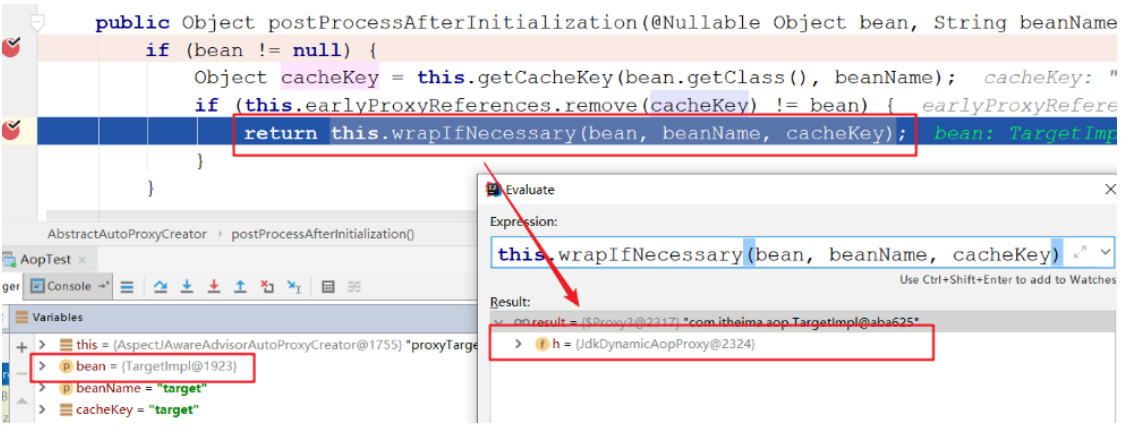
AspectJAwareAdvisorAutoProxyCreator 的上上级父类AbstractAutoProxyCreator中的 postProcessAfterInitialization方法
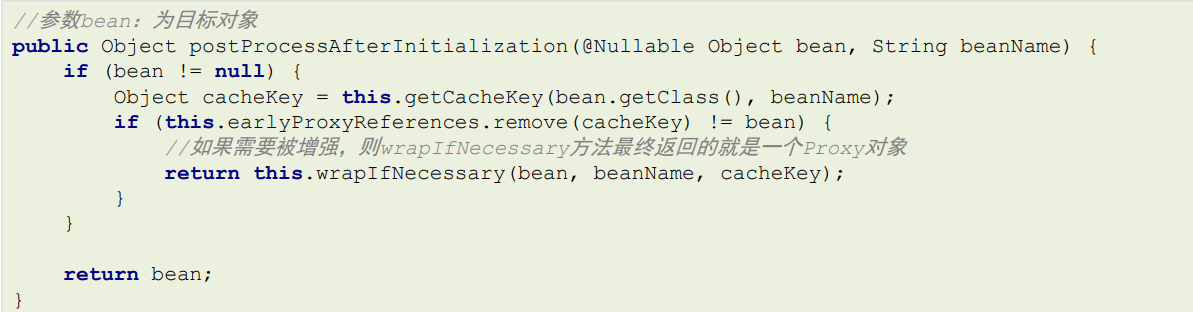
通过断点方式观察,当bean是匹配切点表达式时,this.wrapIfNecessary(bean, beanName, cacheKey)返回的是 一个**JDKDynamicAopProxy **
可以在深入一点,对wrapIfNecessary在剖析一下,看看是不是我们熟知的通过JDK的 Proxy.newProxyInstance(ClassLoader loader, Class[] interfaces,InvocationHandler h) 的方式创建的代理 对象呢?经过如下一系列源码跟踪
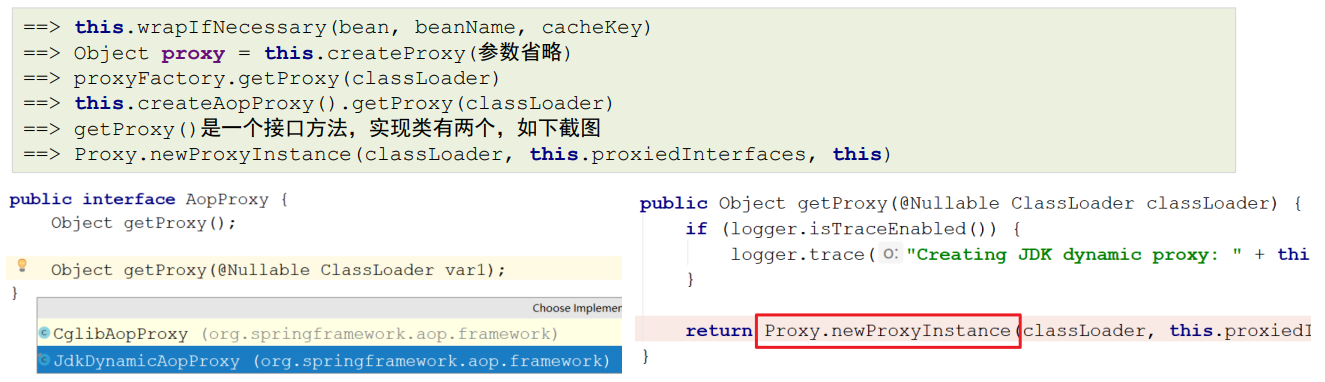
动态代理实现:
动态代理的实现的选择,在调用getProxy() 方法时,我们可选用的 AopProxy接口有两个实现类,如上图,这两种都是动态生成代理对象的方式,一种就是基于JDK的,一种是基于Cglib的

配置<aop:config proxy-target-class=“true”> 后
删除proxy-target-class="true"(默认)
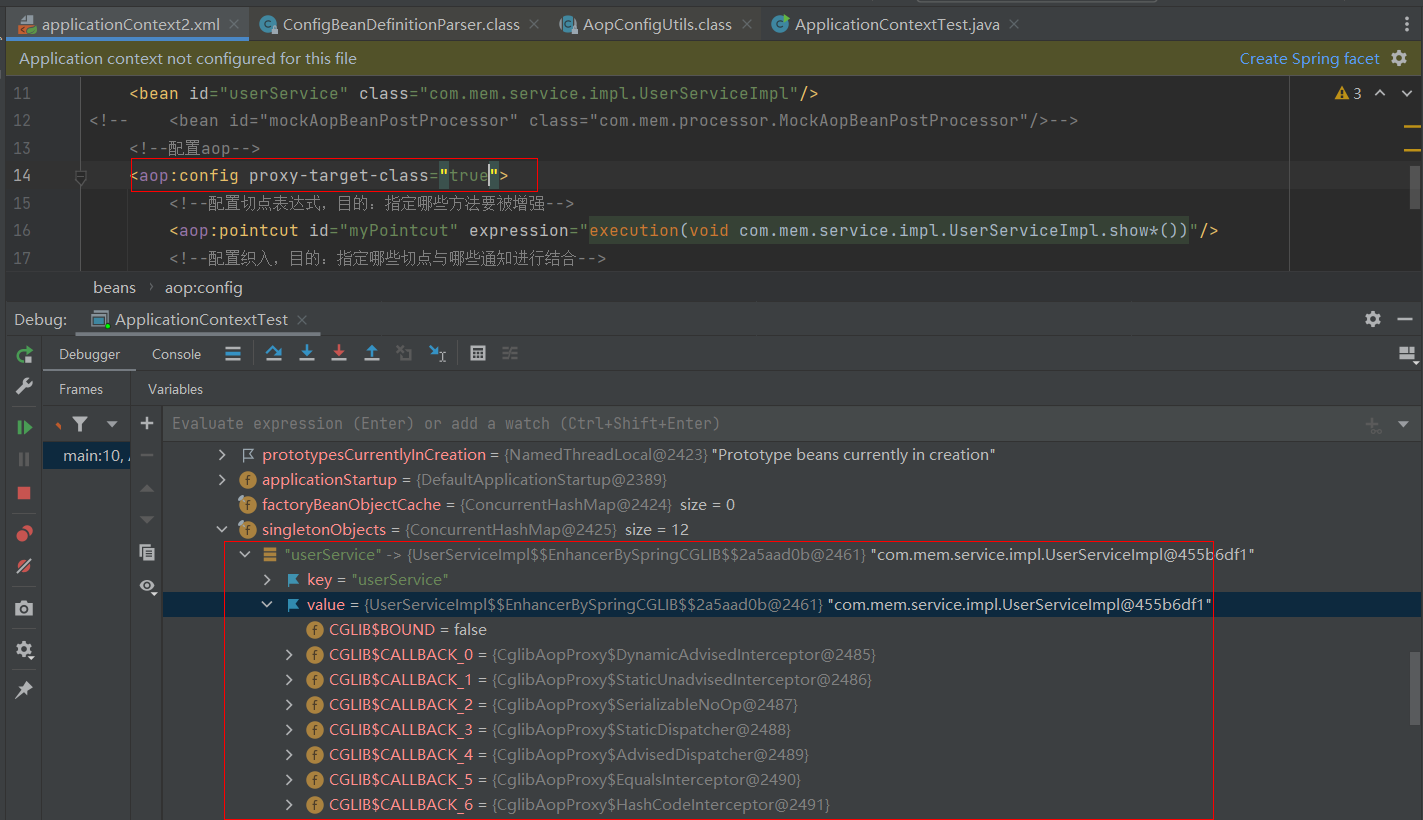
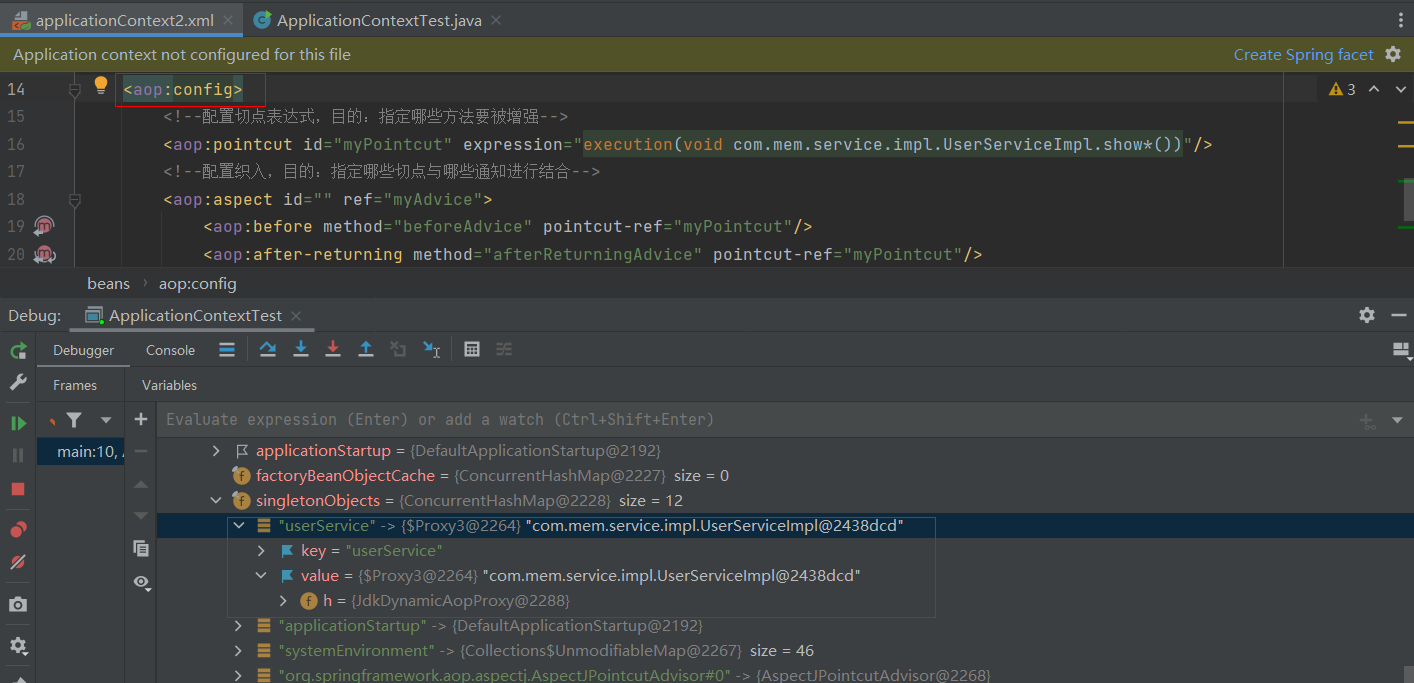
- JDK动态代理 生成的代理类与目标对象更偏向兄弟关系
- Cglib动态代理生成的代理类为目标对象的子类
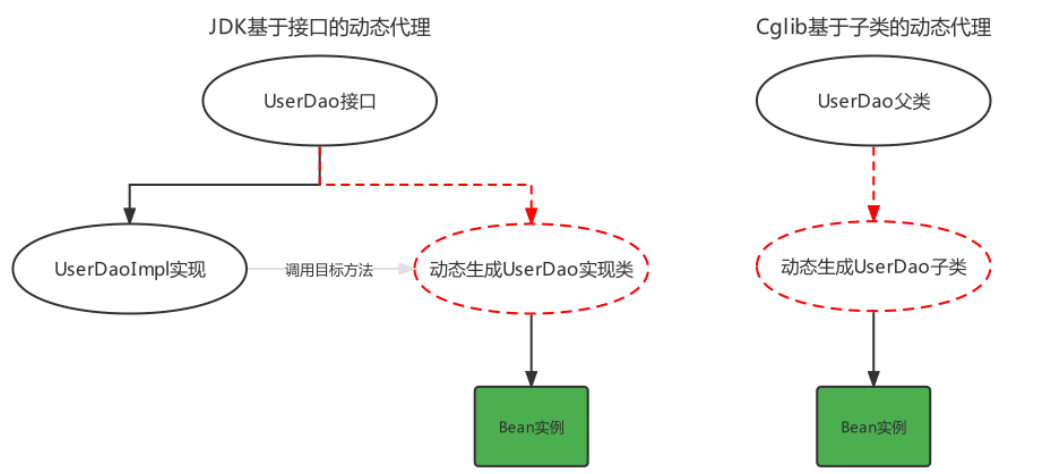
JDK的动态代理代码,之前已经写过了,下面看一下Cglib基于超类的动态代理
- 目标类
public class Target {public void show(){System.out.println("show.....");}
}
- 通知类
public class MyAdvice4 {public void beforeAdvice(){System.out.println("前置增强....");}public void afterReturningAdvice(){System.out.println("后置增强....");}
}
- CgLib代理测试
/*** CGLib基于父类的动态代理*/
public class MyCglibProxyTest {public static void main(String[] args) {// 目标对象Target target = new Target();// 通知对象MyAdvice4 myAdvice4 = new MyAdvice4();// 编写CGLib的代码Enhancer enhancer = new Enhancer();// 设置父类enhancer.setSuperclass(Target.class); // 生成的代理对象就是Target的子类// 设置回调enhancer.setCallback(new MethodInterceptor() {@Override// intercept方法相当于JDK的Proxy的invoke方法public Object intercept(Object o, Method method, Object[] objects, MethodProxy methodProxy) throws Throwable {myAdvice4.beforeAdvice();Object res = method.invoke(target, objects);myAdvice4.afterReturningAdvice();return res;}});// 生成代理对象Target proxy = (Target) enhancer.create();proxy.show();/*** 前置增强....* show.....* 后置增强....*/}
}
03、基于注解配置的AOP
3.1 注解方式AOP基本使用
Spring的AOP也提供了注解方式配置,使用相应的注解替代之前的xml配置,xml配置AOP时,我们主要配置了三部分:目标类被Spring容器管理、通知类被Spring管理、通知与切点的织入(切面),如下:
<!--配置通知 -->
<bean id="myAdvice" class="com.mem.advice.MyAdvice"/>
<!--配置目标 -->
<bean id="userService" class="com.mem.service.impl.UserServiceImpl"/>
<!--配置aop-->
<aop:config><!--配置织入,目的:指定哪些切点与哪些通知进行结合--><aop:aspect id="" ref="myAdvice"><aop:before method="beforeAdvice" pointcut="execution(void com.mem.service.impl.UserServiceImpl.show*())"/><aop:after-returning method="afterReturningAdvice" pointcut="execution(void com.mem.service.impl.UserServiceImpl.show*())"/></aop:aspect>
</aop:config>
- 用注解替代
通知和目标
@Service  // 第一步
public interface UserService {void show1();
}
@Component  // 第二步
public class MyAdvice {public void beforeAdvice(){System.out.println("前置增强....");}public void afterReturningAdvice(){System.out.println("后置增强....");}
}
- 用注解替代
配置aop
配置aop,其实配置aop主要就是配置通知类中的哪个方法(通知类型)对应的切点表达式是什么
@Component
@Aspect  // 第三步
public class MyAdvice {// <aop:before method="beforeAdvice" pointcut="execution(void com.mem.service.impl.UserServiceImpl.show*())"/>@Before("execution(void com.mem.service.impl.UserServiceImpl.show*())")  // 第四步public void beforeAdvice(){System.out.println("前置增强....");}// <aop:after-returning method="afterReturningAdvice" pointcut="execution(void com.mem.service.impl.UserServiceImpl.show*())"/>@AfterReturning("execution(void com.mem.service.impl.UserServiceImpl.show*())")  // 第四步public void afterReturningAdvice(){System.out.println("后置增强....");}
}
- 配置文件或配置类的修改
- 配置文件: 注解@Aspect、@Around需要被Spring解析,所以在Spring核心配置文件中需要配置aspectj的自动代理
<aop:aspectj-autoproxy/>
<!-- aspectj 自动代理-->
<aop:aspectj-autoproxy/>
<!-- 容器包扫描 -->
<context:component-scan base-package="com.mem"/>
- 配置类:需要加上
@EnableAspectJAutoProxy
@Configuration
@ComponentScan("com.mem")
@EnableAspectJAutoProxy
public class ApplicationConfig {
}
- 测试
public class ApplicationContextTest {public static void main(String[] args) {// 配置文件ApplicationContext applicationContext = new ClassPathXmlApplicationContext("applicationContext2.xml");UserService userService = (UserService) applicationContext.getBean("userService");userService.show1();// 配置类
//        ApplicationContext applicationContext = new AnnotationConfigApplicationContext(ApplicationConfig.class);
//        UserService userService = (UserService) applicationContext.getBean("userService");
//        userService.show1();}
}
// 两种方式的打印结果
前置增强....
show1 ...
后置增强....
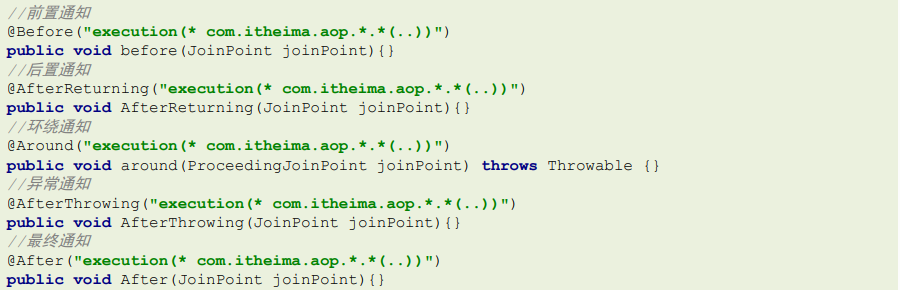
3.2 注解方式AOP配置详解
各种注解方式通知类型
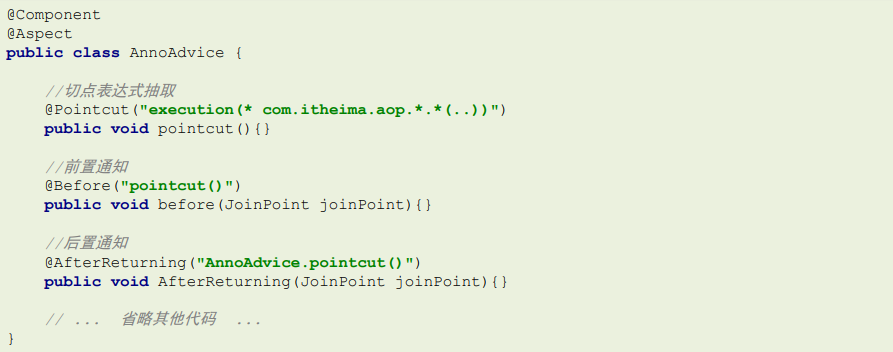
切点表达式的抽取,使用一个空方法,将切点表达式标注在空方法上,其他通知方法引用即可
3.3 注解方式AOP原理刨析
- 半注解方式:使用
aspectj-autoproxy标签
之前在使用xml配置AOP时,是借助的Spring的外部命名空间的加载方式完成的,使用注解配置后,就抛弃了 标签,而该标签最终加载了名为AspectJAwareAdvisorAutoProxyCreator的BeanPostProcessor , 最终,在该BeanPostProcessor中完成了代理对象的生成。

同样,从aspectj-autoproxy标签的解析器(AspectJAutoProxyBeanDefinitionParser)入手
public class AopNamespaceHandler extends NamespaceHandlerSupport {public AopNamespaceHandler() {}public void init() {this.registerBeanDefinitionParser("config", new ConfigBeanDefinitionParser());this.registerBeanDefinitionParser("aspectj-autoproxy", new AspectJAutoProxyBeanDefinitionParser());this.registerBeanDefinitionDecorator("scoped-proxy", new ScopedProxyBeanDefinitionDecorator());this.registerBeanDefinitionParser("spring-configured", new SpringConfiguredBeanDefinitionParser());}
}
而AspectJAutoProxyBeanDefinitionParser代码内部,最终也是执行了和xml方式AOP一样的代码(注册一个AspectJAwareAdvisorAutoProxyCreator 进入到Spring容器)
registerOrEscalateApcAsRequired(AspectJAwareAdvisorAutoProxyCreator.class, registry, source);
- 全注解方式:使用
@EnableAspectJAutoProxy注解
查看@EnableAspectJAutoProxy源码,使用的也是@Import导入相关解析类
@Target({ElementType.TYPE})
@Retention(RetentionPolicy.RUNTIME)
@Documented
@Import({AspectJAutoProxyRegistrar.class})
public @interface EnableAspectJAutoProxy {boolean proxyTargetClass() default false;boolean exposeProxy() default false;
}
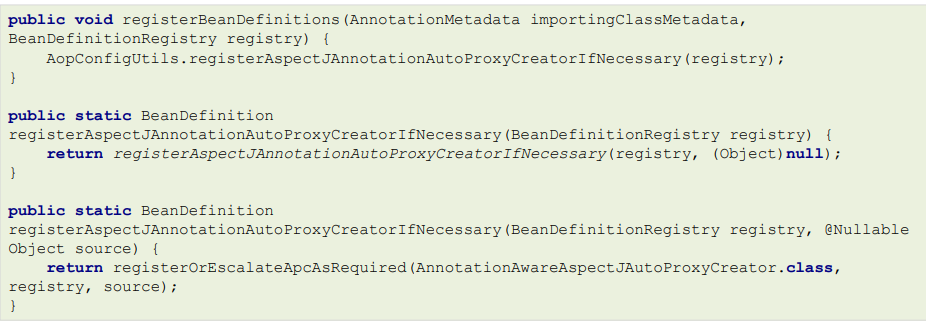
使用@Import导入的AspectJAutoProxyRegistrar源码,一路追踪下去,最终还是注册了 AnnotationAwareAspectJAutoProxyCreator 这个类
三种方式总结:
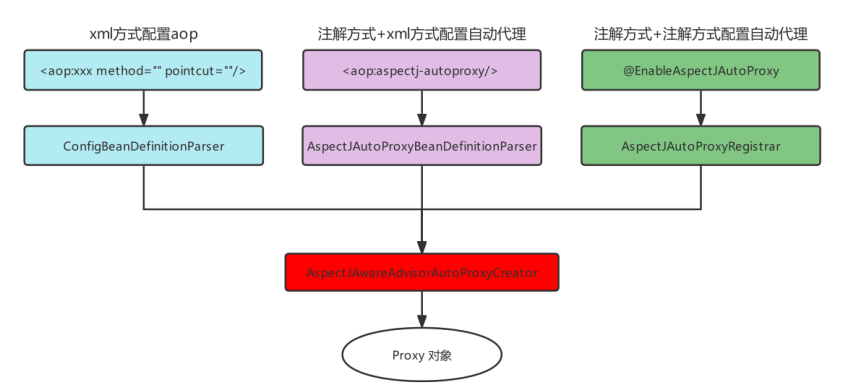
04、基于AOP的声明式事务控制
4.1 Spring事务编程概述
事务是开发中必不可少的东西,使用JDBC开发时,我们使用connnection对事务进行控制,使用MyBatis时,我们使用SqlSession对事务进行控制,缺点显而易见,当我们切换数据库访问技术时,事务控制的方式总会变化, Spring 就将这些技术基础上,提供了统一的控制事务的接口。Spring的事务分为:编程式事务控制 和 声明式事务控制

Spring事务编程相关的类主要有如下三个

虽然编程式事务控制我们不学习,但是编程式事务控制对应的这些类我们需要了解一下,因为我们在通过配置的方式进行声明式事务控制时也会看到这些类的影子
4.2 搭建测试环境
搭建一个转账的环境,dao层一个转出钱的方法,一个转入钱的方法,service层一个转账业务方法,内部分别调 用dao层转出钱和转入钱的方法,准备工作如下:
- 数据库准备一个账户表tb_account;
DROP TABLE IF EXISTS `account`;CREATE TABLE `account` (`id` int NOT NULL AUTO_INCREMENT,`account_name` varchar(20) COLLATE utf8_unicode_ci DEFAULT NULL,`money` int DEFAULT NULL,PRIMARY KEY (`id`)
) ENGINE=InnoDB AUTO_INCREMENT=3 DEFAULT CHARSET=utf8 COLLATE=utf8_unicode_ci;insert  into `account`(`id`,`account_name`,`money`) values (1,'tom',5000),(2,'lucy',5000);
- dao层准备一个AccountMapper,包括incrMoney和decrMoney两个方法;
public interface AccountMapper {// 加钱@Update("update account set money=money+#{money} where account_name=#{accountName}")void incrMoney(@Param("accountName") String accountName, @Param("money") Integer money);// 减钱@Update("update account set money=money-#{money} where account_name=#{accountName}")void decrMoney(@Param("accountName") String accountName, @Param("money") Integer money);
}
- service层准备一个transferMoney方法,分别调用incrMoney和decrMoney方法;
public interface AccountService {void transferMoney(String outAccount,String inAccount,Integer money);
}@Service("accountService")
public class AccountServiceImpl implements AccountService {@Autowiredprivate AccountMapper accountMapper;@Overridepublic void transferMoney(String outAccount, String inAccount, Integer money) {accountMapper.decrMoney(outAccount,money);
//        int i = 1/0;accountMapper.incrMoney(inAccount,money);}
}
- 在applicationContext文件中进行Bean的管理配置;
<!--组件扫描-->
<context:component-scan base-package="com.mem"/>
<!--加载properties文件-->
<context:property-placeholder location="classpath:jdbc.properties"/>
<!-- 配置数据源信息 -->
<bean id="dataSource" class="com.alibaba.druid.pool.DruidDataSource"><property name="driverClassName" value="${jdbc.driver}"></property><property name="url" value="${jdbc.url}"></property><property name="username" value="${jdbc.username}"></property><property name="password" value="${jdbc.password}"></property>
</bean><!-- 配置SqlSessionFactoryBean,作用将SqlSessionFactory存储到Spring容器中-->
<bean class="org.mybatis.spring.SqlSessionFactoryBean"><property name="dataSource" ref="dataSource"/>
</bean><!--MapperScannerConfigurer,作用扫描指定的包,产生Mapper对象,存储到Spring容器中-->
<bean class="org.mybatis.spring.mapper.MapperScannerConfigurer"><property name="basePackage" value="com.mem.mapper"/>
</bean>
jdbc.driver=com.mysql.jdbc.Driver
jdbc.url=jdbc:mysql://192.168.91.135:3306/mybatis?useSSL=false
jdbc.username=root
jdbc.password=123456
- 测试正常转账与异常转账。
public class AccountTest {public static void main(String[] args) {ApplicationContext applicationContext = new ClassPathXmlApplicationContext("applicationContext.xml");AccountService accountService = (AccountService) applicationContext.getBean("accountService");accountService.transferMoney("tom","lucy",500);System.out.println("转账操作成功");}
}
// 打印结果
转账操作成功
打开AccountServiceImpl类中的错误代码,报错:java.lang.ArithmeticException: / by zero
此时数据库,tom用户的余额减了500,而lucy用户的余额却没有增加500
下面通过spring的声明式事务进行控制
4.3 基于xml声明式事务控制
结合上面我们学习的AOP的技术,很容易就可以想到,可以使用AOP对Service的方法进行事务的增强。
- 目标类: 自定义的AccountServiceImpl,内部的方法是切点
- 通知类: Spring提供的,通知方法已经定义好,只需要配置即可
我们分析要进行的操作:
- 通知类是Spring提供的,需要导入Spring事务的相关的坐标;
- 配置目标类AccountServiceImpl;
- 使用advisor标签配置切面。
详情:
- 导入Spring事务的相关的坐标,spring-jdbc坐标已经引入的spring-tx坐标
<dependency><groupId>org.springframework</groupId><artifactId>spring-jdbc</artifactId><version>5.3.12</version>
</dependency>

- 配置目标类AccountServiceImpl (注解方式已完成)
<context:component-scan base-package="com.mem"/>
- 使用advisor标签配置切面
<!-- 事务增强的aop -->
<aop:config><!--配置切点表达式--><aop:pointcut id="myPointcut" expression="execution(void com.mem.service.impl.*.*(..))"/><!--配置织入关系,通知是谁? spring提供好的--><aop:advisor advice-ref="" pointcut-ref="myPointcut"/>
</aop:config>
疑问:Spring提供的通知类是谁?是spring-tx包下的advice标签配置提供的
配置详情:
<!-- 引入tx的命名空间 -->
<beans xmlns:tx="http://www.springframework.org/schema/tx" xsi:schemaLocation="http://www.springframework.org/schema/tx https://www.springframework.org/schema/tx/spring-tx.xsd"
>
<!--配置平台事务管理器 PlatformTransactionManager-->
<bean id="transactionManager" class="org.springframework.jdbc.datasource.DataSourceTransactionManager"><property name="dataSource" ref="dataSource"/>
</bean>
<!--配置Spring提供好的Advice 内部transaction-manager 需要一个平台事务管理器-->
<tx:advice id="txAdvice" transaction-manager="transactionManager"><tx:attributes><tx:method name="*"/></tx:attributes>
</tx:advice>
<!-- 事务增强的aop -->
<aop:config><!--配置切点表达式--><aop:pointcut id="myPointcut" expression="execution(void com.mem.service.impl.*.*(..))"/><!--配置织入关系,通知是谁? spring提供好的--><aop:advisor advice-ref="txAdvice" pointcut-ref="myPointcut"/>
</aop:config>
对上述配置进行详解一下
平台事务管理器:
首先,平台事务管理器PlatformTransactionManager是Spring提供的封装事务具体操作的规范接口,封装了事 务的提交和回滚方法

继承关系图
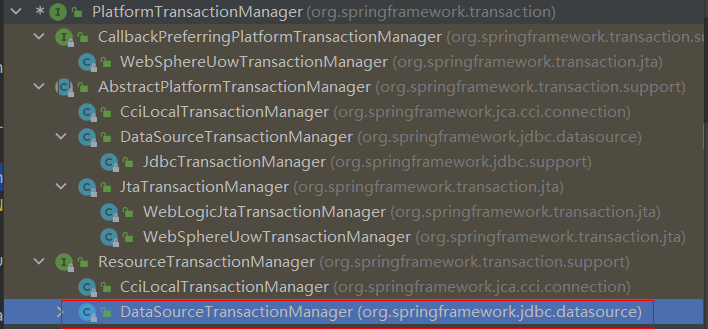
不同的持久层框架事务操作的方式有可能不同,所以不同的持久层框架有可能会有不同的平台事务管理器实现, 例如,
- MyBatis作为持久层框架时,使用的平台事务管理器实现是DataSourceTransactionManager。
- Hibernate作为持久层框架时,使用的平台事务管理器是HibernateTransactionManager。
事务定义信息:
其次,事务定义信息配置,每个事务有很多特性,例如:隔离级别、只读状态、超时时间等,这些信息在开发时 可以通过connection进行指定,而此处要通过配置文件进行配置

- name属性名称指定哪个方法要进行哪些事务的属性配置
方法名在配置时,也可以使用*进行模糊匹配,例如:
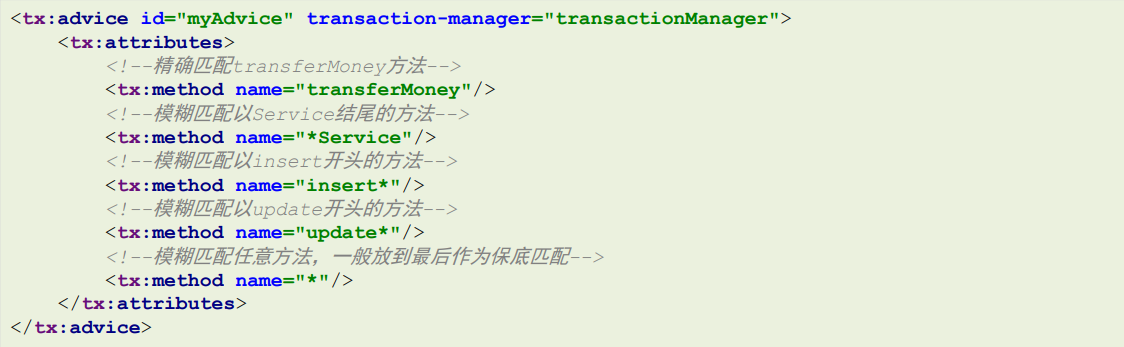
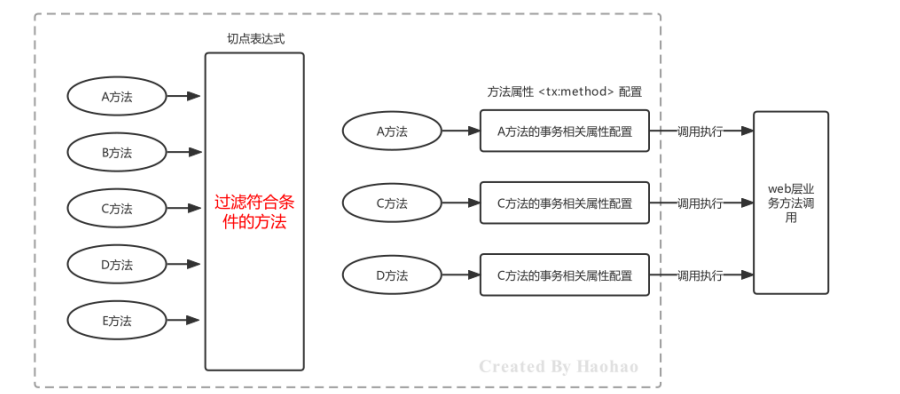
此处需要区分的是切点表达式指定的方法与此处指定的方法的区别?
切点表达式,是过滤哪些方法可以进行事务增强;
事务属性信息的name,是指定哪个方法要进行哪些事务属性的配置
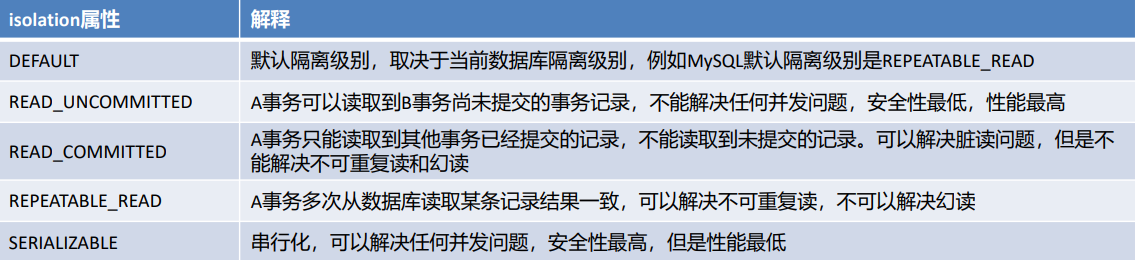
- isolation属性:指定事务的隔离级别
事务并发存在三大问题:脏读、不可重复读、幻读/虚读。可以通过设置事务的隔离级别来保证并发问题的出现,常用的是READ_COMMITTED 和 **REPEATABLE_READ **
- read-only属性:设置当前的只读状态
如果是查询则设置为true,可以提高查询性能,如果是更新(增删改)操作则设置为false

- timeout属性:设置事务执行的超时时间,单位是秒
如果超过该时间限制但事务还没有完成,则自动回滚事务 ,不在继续执行。默认值是-1,即没有超时时间限制

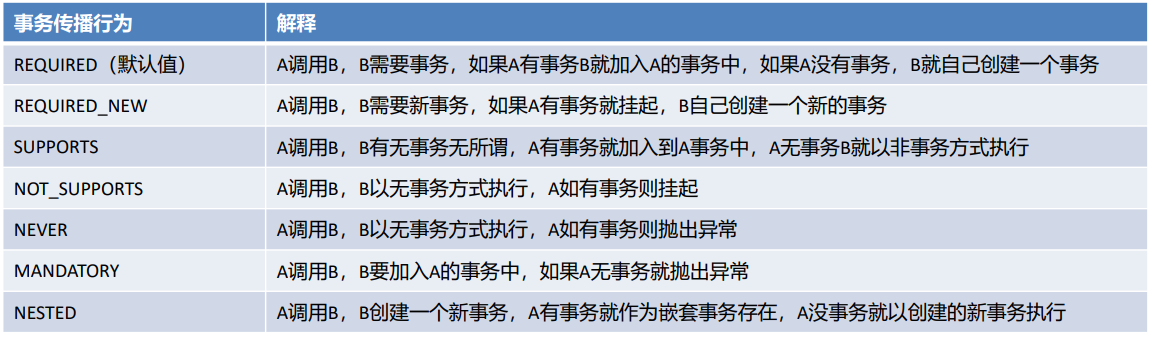
- propagation属性:设置事务的传播行为
主要解决是A方法调用B方法时,事务的传播方式问题的,例如:使用单方的事务,还是A和B都使用自己的事务等。事务的传播行为有如下七种属性值可配置
xml方式声明式事务控制的原理浅析一下
<tx:advice>标签使用的命名空间处理器是TxNamespaceHandler,内部注册的是解析器是 TxAdviceBeanDefinitionParser
public class TxNamespaceHandler extends NamespaceHandlerSupport {static final String TRANSACTION_MANAGER_ATTRIBUTE = "transaction-manager";static final String DEFAULT_TRANSACTION_MANAGER_BEAN_NAME = "transactionManager";public TxNamespaceHandler() {}static String getTransactionManagerName(Element element) {return element.hasAttribute("transaction-manager") ? element.getAttribute("transaction-manager") : "transactionManager";}public void init() {this.registerBeanDefinitionParser("advice", new TxAdviceBeanDefinitionParser());this.registerBeanDefinitionParser("annotation-driven", new AnnotationDrivenBeanDefinitionParser());this.registerBeanDefinitionParser("jta-transaction-manager", new JtaTransactionManagerBeanDefinitionParser());}
}
TxAdviceBeanDefinitionParser中指定了要注册的BeanDefinition

TxAdviceBeanDefinitionParser二级父类AbstractBeanDefinitionParser的parse方法将TransactionInterceptor 以配置的名称注册到了Spring容器中

那么TransactionInterceptor是啥?
public class TransactionInterceptor extends TransactionAspectSupport implements MethodInterceptor, Serializable {
}
从上面的实现来看,他实现了**MethodInterceptor**内部有个invoke方法(相当于环绕通知)
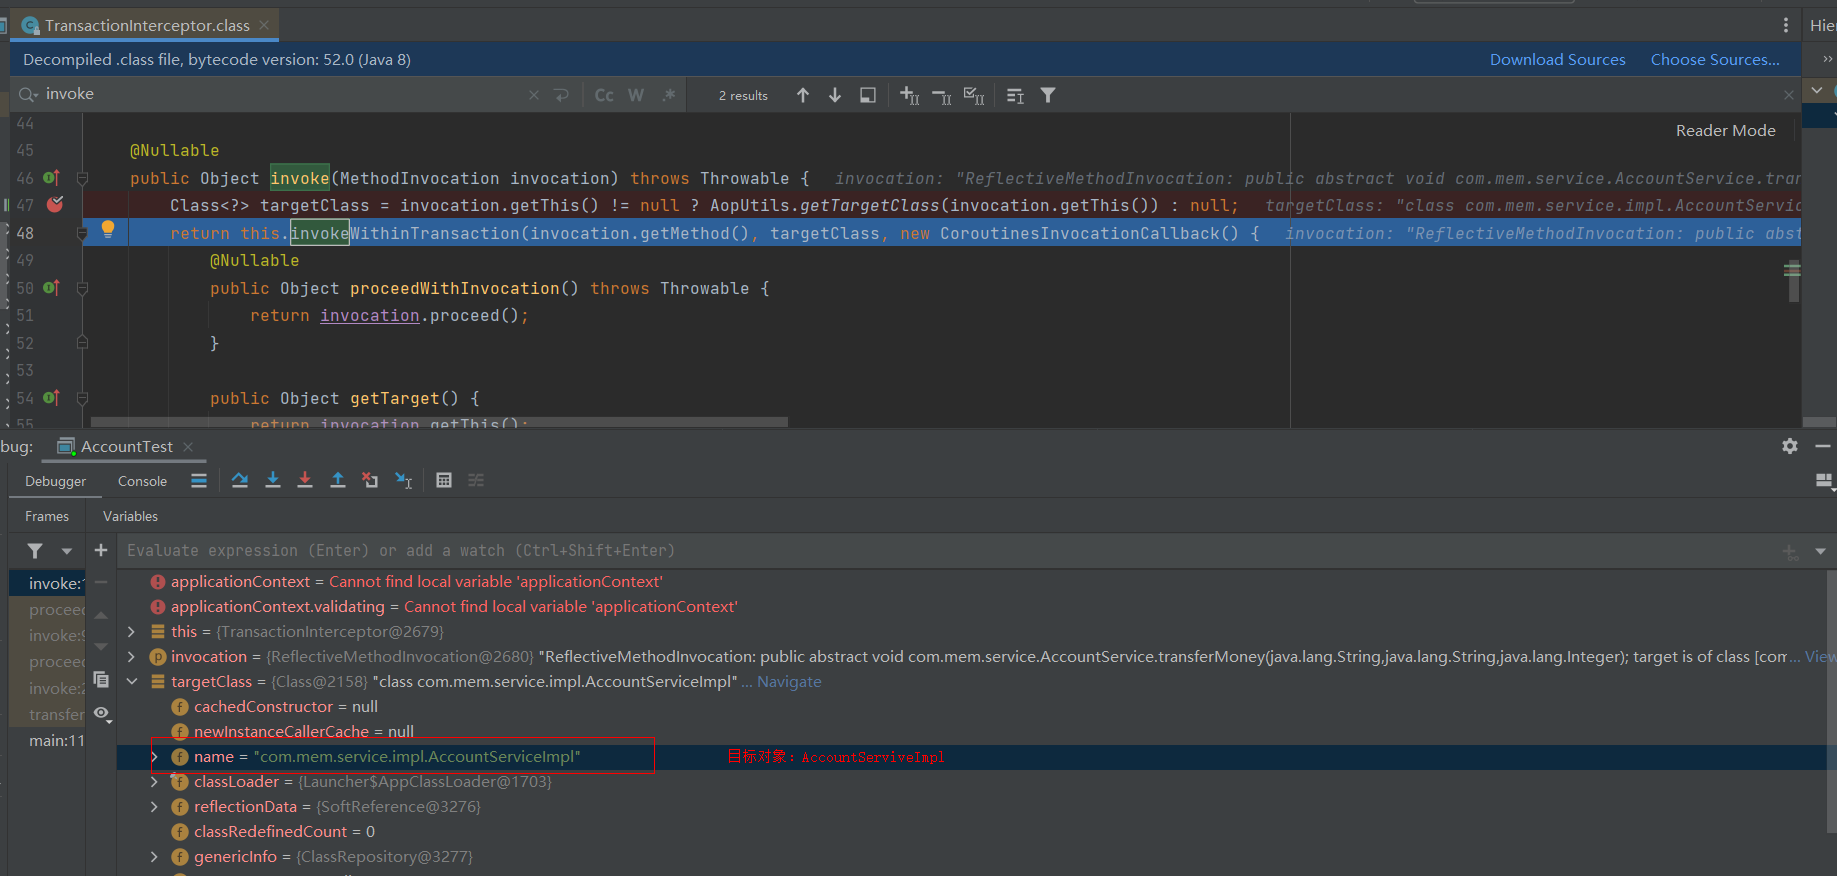
TransactionInterceptor中的invoke方法会被执行,跟踪invoke方法,最终会看到事务的开启和提交
根据targetClass的debug信息:可以证明目标对象是AccountServiceImpl
接着调用this.invokeWithinTransaction(..)方法,在TransactionAspectSupport类中的invokeWithinTransaction方法内完成相应的处理(环绕前,目标方法,环绕后)
public abstract class TransactionAspectSupport implements BeanFactoryAware, InitializingBean {protected Object invokeWithinTransaction(Method method, @Nullable Class<?> targetClass, final TransactionAspectSupport.InvocationCallback invocation) throws Throwable {// 在createTransactionIfNecessary方法内部开启事务TransactionAspectSupport.TransactionInfo txInfo = this.createTransactionIfNecessary(ptm, txAttr, joinpointIdentification);// 执行目标方法retVal = invocation.proceedWithInvocation();// commitTransactionAfterReturning方法 提交事务this.commitTransactionAfterReturning(txInfo);return retVal;}
}
4.4 基于注解声明式事务控制
注解就是对xml的替代
<!--配置Spring提供好的Advice 内部transaction-manager 需要一个平台事务管理器-->
<tx:advice id="txAdvice" transaction-manager="transactionManager"><tx:attributes><tx:method name="*" isolation="REPEATABLE_READ" timeout="3" read-only="false" propagation="REQUIRED"/></tx:attributes>
</tx:advice>
<!-- 事务增强的aop -->
<aop:config><!--配置切点表达式--><aop:pointcut id="myPointcut" expression="execution(void com.mem.service.impl.*.*(..))"/><!--配置织入关系,通知是谁? spring提供好的--><aop:advisor advice-ref="txAdvice" pointcut-ref="myPointcut"/>
</aop:config>
- 用
@Transactional代替上面两个配置
@Service("accountService")
public class AccountServiceImpl implements AccountService {@Autowiredprivate AccountMapper accountMapper;@Override@Transactional(isolation = Isolation.READ_COMMITTED,propagation = Propagation.SUPPORTS,timeout = 3)public void transferMoney(String outAccount, String inAccount, Integer money) {accountMapper.decrMoney(outAccount,money);int i = 1/0;accountMapper.incrMoney(inAccount,money);}
}
- 同样,使用的事务的注解,平台事务管理器仍然需要配置,还需要进行事务注解开关的开启
<!--配置平台事务管理器 PlatformTransactionManager-->
<bean id="transactionManager" class="org.springframework.jdbc.datasource.DataSourceTransactionManager"><property name="dataSource" ref="dataSource"/>
</bean>
<!-- 配置事务的注解驱动 transaction-manager:默认值为transactionManager 可以不设置-->
<tx:annotation-driven transaction-manager="transactionManager"/>
改成全注解的方式需要替换成@Bean和@EnableTransactionManagement
原来的xml(完整版):
<?xml version="1.0" encoding="UTF-8"?>
<beans xmlns="http://www.springframework.org/schema/beans"xmlns:xsi="http://www.w3.org/2001/XMLSchema-instance"xmlns:context="http://www.springframework.org/schema/context"xmlns:aop="http://www.springframework.org/schema/aop"xmlns:tx="http://www.springframework.org/schema/tx"xsi:schemaLocation="http://www.springframework.org/schema/beans http://www.springframework.org/schema/beans/spring-beans.xsdhttp://www.springframework.org/schema/context https://www.springframework.org/schema/context/spring-context.xsdhttp://www.springframework.org/schema/aop https://www.springframework.org/schema/aop/spring-aop.xsdhttp://www.springframework.org/schema/tx https://www.springframework.org/schema/tx/spring-tx.xsd"><!--组件扫描--><context:component-scan base-package="com.mem"/><!--加载properties文件--><context:property-placeholder location="classpath:jdbc.properties"/><!-- 配置数据源信息 --><bean id="dataSource" class="com.alibaba.druid.pool.DruidDataSource"><property name="driverClassName" value="${jdbc.driver}"></property><property name="url" value="${jdbc.url}"></property><property name="username" value="${jdbc.username}"></property><property name="password" value="${jdbc.password}"></property></bean><!-- 配置SqlSessionFactoryBean,作用将SqlSessionFactory存储到Spring容器中--><bean class="org.mybatis.spring.SqlSessionFactoryBean"><property name="dataSource" ref="dataSource"/></bean><!--MapperScannerConfigurer,作用扫描指定的包,产生Mapper对象,存储到Spring容器中--><bean class="org.mybatis.spring.mapper.MapperScannerConfigurer"><property name="basePackage" value="com.mem.mapper"/></bean><!-- 配置事务的注解驱动 transaction-manager:默认值为transactionManager 可以不设置--><tx:annotation-driven transaction-manager="transactionManager"/><!--配置平台事务管理器 PlatformTransactionManager--><bean id="transactionManager" class="org.springframework.jdbc.datasource.DataSourceTransactionManager"><property name="dataSource" ref="dataSource"/></bean><!--配置Spring提供好的Advice 内部transaction-manager 需要一个平台事务管理器--><tx:advice id="txAdvice" transaction-manager="transactionManager"><tx:attributes><tx:method name="*" isolation="REPEATABLE_READ" timeout="3" read-only="false" propagation="REQUIRED"/></tx:attributes></tx:advice><!-- 事务增强的aop --><aop:config><!--配置切点表达式--><aop:pointcut id="myPointcut" expression="execution(void com.mem.service.impl.*.*(..))"/><!--配置织入关系,通知是谁? spring提供好的--><aop:advisor advice-ref="txAdvice" pointcut-ref="myPointcut"/></aop:config>
</beans>
替换成全注解方式,如下:
@Configuration
@ComponentScan("com.mem") // <context:component-scan base-package="com.mem"/>
@PropertySource("classpath:jdbc.properties")  // <context:property-placeholder location="classpath:jdbc.properties"/>
/*** <bean class="org.mybatis.spring.mapper.MapperScannerConfigurer">*     <property name="basePackage" value="com.mem.mapper"/>* </bean>*/
@MapperScan("com.mem.mapper")
@EnableTransactionManagement // <tx:annotation-driven transaction-manager="transactionManager"/>
public class AccountConfig {@Beanpublic DataSource dataSource(@Value("${jdbc.driver}") String driver,@Value("${jdbc.url}") String url,@Value("${jdbc.username}") String username,@Value("${jdbc.password}") String password){DruidDataSource dataSource = new DruidDataSource();dataSource.setDriverClassName(driver);dataSource.setUrl(url);dataSource.setUsername(username);dataSource.setPassword(password);return dataSource;}@Beanpublic SqlSessionFactoryBean sqlSessionFactoryBean(DataSource dataSource){SqlSessionFactoryBean sqlSessionFactoryBean = new SqlSessionFactoryBean();sqlSessionFactoryBean.setDataSource(dataSource);return sqlSessionFactoryBean;}@Beanpublic PlatformTransactionManager transactionManager(DataSource dataSource){DataSourceTransactionManager transactionManager = new DataSourceTransactionManager();transactionManager.setDataSource(dataSource);return transactionManager;}
}
99%的人还看了
相似问题
- Kotlin学习——kt里的集合,Map的各种方法之String篇
- Office文件在线预览大全-Word文档在线预览的实现方法-OFD文档在线预览-WPS文件在线预览
- composer切换全局镜像源的方法
- Python通过selenium调用IE11浏览器报错解决方法
- 测试用例的设计方法(全):正交实验设计方法|功能图分析方法|场景设计方发
- Java8新特性 ----- Lambda表达式和方法引用/构造器引用详解
- C#中抽象类、抽象方法和接口暨内联临时变量的精彩表达
- ChatGLM2 大模型微调过程中遇到的一些坑及解决方法(更新中)
- 类方法,静态方法和实例方法的区别及应用场景
- 【链表的说明、方法---顺序表与链表的区别】
猜你感兴趣
版权申明
本文"Spring笔记(二)(黑马)(AOP面向切面编程)":http://eshow365.cn/6-35964-0.html 内容来自互联网,请自行判断内容的正确性。如有侵权请联系我们,立即删除!
- 上一篇: MFC串口通信(SerialPort)
- 下一篇: linux 7za 编译安装