爬虫进阶-反爬破解8(反爬的实战练习:爬虫文件的解析和数据的抓取+反爬措施的分析和突破+Scrapy接入Cookie池管理系统+分布式爬虫的架设)
最佳答案 问答题库538位专家为你答疑解惑
目录
一、爬虫文件的解析和数据的抓取
(一)项目的知识点
(二)实践操作:新建项目抓取数据
(三)总结
二、反爬措施的分析和突破
(一)项目知识点补充
(二)实践操作:Scrapy破解数据加密操作
(三)总结
三、Scrapy接入Cookie池管理系统
(一)项目知识点补充
(二)环境介绍
(三)实践操作:Scrapy+Cookie池管理系统
(四)总结
四、分布式爬虫的架设
(一)项目知识点补充
(二)环境介绍
(三)实践操作:打造分布式爬虫框架
(四)总结
一、爬虫文件的解析和数据的抓取
(一)项目的知识点
(1)Scrapy项目和爬虫文件
(2)分析目标站和抓取数据
(3)数据存储到本地文件中
(二)实践操作:新建项目抓取数据
1.安装scrapy:pip install scrapy
2.创建项目:scrapy startproject shanzhi
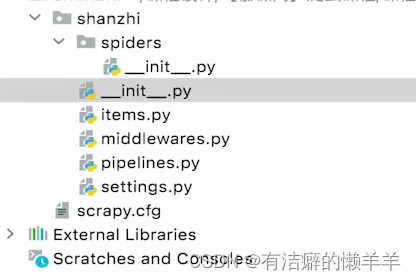
3.爬虫初始文件:scrapy genspider sz http://shanzhi.spbeen.com
4.在sz.py中修改代码:
import scrapyclass SzSpider(scrapy.Spider):name = 'sz'allowed_donains = ['shanzi.spbeen.com']# start_urls = ['http://shanzhi.spbeen.com/']basic_url = 'http://shanzhi.spbeen.com/api/search/?word=&page={}&_=1631533868181'def start_requests(self):for i in range(1,17): //1 2 3 4 5 6 7 8 9 10 11 12 13 14 15 16url = self.basic_url.format(i)yield scrapy.Request(url, callback=self.parse, meta={'number':i})def parse(self,response):# print(response, response.mata)number = response.meta.get('number', False)divcard = response.xpath(".//div[contains(@class,'animate__animated')]")for div in divcard:item = {}item['链接'] = div.xpath('./div/h5/a/@href').extract_first()item['岗位'] = div.xpath('./div/h5/a/text()').extract_first()item['薪资'] = div.xpath('./div/h5/small/text()').extract_first()item['公司'] = div.xpath('./div/p[last()]/small[1]/text()').extract_first()# print(item)yield itemif number and len(divcard) == 10:number += 16url = self.basic_url.format(number)yield scrapy.Request(url, callback=self.parse, meta={'number':number})5.新建python文件:run.py
from scrapy.cmdline import execute
execute("scrapy crawl sz".split())
6.在settings.py中的遵循ROBOTS协议中修改为ROBOTSTXT_OBEY=False,
DEFAULT_REQUESTS_HEADERS注释掉的内容打开并添加user_agent内容
7.在settings.py中的ITEM_PIPLINES注释掉的内容打开,表示可以存储数据
8.修改piplines.py中的代码
import csv
import datetime class ShanzhiPipeline(object):def __init__(self):date = datetime.datetime.now()date_str = date.strftime("%Y-%m-%d-%H-%M")self.file = open("{}_date.csv".format(date_str),'a+')self.writer = csv.writer(self.file)self.writer.writerow(['链接','岗位','薪资','公司'])def process_item(self, item, spider):self.writer.writerow([v for k,v in item.items()])return item
(三)总结
(1)了解Scrapy项目各部分组件的功能
(2)熟悉爬虫文件和管道文件,各司其职
(3)准备数据解密和Cookie的接入
二、反爬措施的分析和突破
(一)项目知识点补充
1.下载器中间件作用
2.Scrapy的Response响应特性
3.Scrapy项目的运行流程
(二)实践操作:Scrapy破解数据加密操作
1.将font.ttf文件导入
2.在middewares.py文件中修改代码内容
from scrapy import signals
from fontTools.ttLib import TTFont# class ShanzhiSpiderMiddleware(object):这段不需要修改class ShanzhiDownloadMiddleware(object):# 只书写需要修改的部分def from_crawler(cls, crawler):s = cls()font = TTFont("font.ttf")result_dict = {}for k,v in font['cmap'].getBestCmap().items():# hex()函数是将十进制转成16进制k = hex(k).replace('0x','&#x')+';'v = int(v[8:10])-1result_dict[k]=str(v)crawler.signals.connect(s.spider_opened,signal=signals.spider_opened)return sdef process_response(self,request,response,spider):#response的网页部分,不能修改,只能替换全部网页#取出response的网页部分,修改网页内容,再将网页内容替换到response上,得到新的new_responsehtml = response.textfor k,v in result_dict.items():html = html.replace(k,v)new_reponse = response.replace(body=html)return new_response
3.将settings.py文件中的DOWNLODER_MIDDLEWARES注释内容打开
(三)总结
(1)下载器中间件负责请求输出和响应
(2)signal信号道是scrapy的重载机制
(3)response的网页内容不可直接修改
三、Scrapy接入Cookie池管理系统
(一)项目知识点补充
(1)下载器中间件的请求头处理函数
(2)Cookie的维护和提取函数
(3)Scrapy中请求头的设置
(二)环境介绍
(1)爬虫项目
(2)Cookie池管理系统
(3)Redis数据库
(三)实践操作:Scrapy+Cookie池管理系统
1.修改sz.py文件中的代码内容
import scrapyclass SzSpider(scrapy.Spider):name = 'sz'allowed_donains = ['shanzi.spbeen.com']# start_urls = ['http://shanzhi.spbeen.com/']basic_url = 'http://shanzhi.spbeen.com/api/search/?word=&page={}&_=1631533868181'def start_requests(self):for i in range(1,17): //1 2 3 4 5 6 7 8 9 10 11 12 13 14 15 16url = self.basic_url.format(i)yield scrapy.Request(url, callback=self.parse, meta={'number':i})def parse(self,response):# print(response, response.mata)number = response.meta.get('number', False)divcard = response.xpath(".//div[contains(@class,'animate__animated')]")for div in divcard:item = {}item['链接'] = div.xpath('./div/h5/a/@href').extract_first()item['岗位'] = div.xpath('./div/h5/a/text()').extract_first()item['薪资'] = div.xpath('./div/h5/small/text()').extract_first()item['公司'] = div.xpath('./div/p[last()]/small[1]/text()').extract_first()# print(item)#yield itemyield scrapy.Request(item['链接'],callback=self.parse_detail, meta={'item':item})if number and len(divcard) == 10:number += 16url = self.basic_url.format(number)yield scrapy.Request(url, callback=self.parse, meta={'number':number})def parse_detail(self, response):item = response.meta.get('item',{})item['编号'] = response.xpath('.//h4[@class="display-5"]/text()').extract_first()item['编号'] = item['编号'].split(']')[0].split(':')[-1]item['薪资'] = response.xpath('.//h4[@class="display-5"]/span/text()').extract_first()item['经验'] = response.xpath('.//p[@class="lead"]/span[1]/text()').extract_first()item['公司地址'] = response.xpath('.//div[@class="col-4"]//text()').extract()item['公司地址'] = "".join([address for address in item['公司地址'] if "地址:" in address]).replace(" ","").replace("\n","")item['福利待遇工作职责描述'] = "".join(response.xpath('.//div[@class="col-8"]//text()').extract())item['招聘人数'] = response.xpath('.//p[@class="lead"]/span[last()]/text()').extract_first()item['简历邮箱'] = response.xpath('.//div[@class="jumbotron bg-white"]/p[last()]/span[2]/text()').extract_first()yield item2.在settings.py文件中的DEFAULT_REQUEST_HEADERS中添加cookie,COOKIES_ENABLED=False注释内容打开
3.在middlewares.py中修改代码内容
import requests
import json# 只显示修改部分内容
def process_request(self, request, spider):url = 'http://127.0.0.1:8000/api/extract_cookie/?website=shanzhi&number=1'response = requests.get(url)cookie_dict = json.loads(response.text)request.cookies = cookie_dict['cookie']# return None
4.若用middlewares.py设置了cookie,需要将2中的settings.py文件中的DEFAULT_REQUEST_HEADERS中的cookie和COOKIES_ENABLED=False打开的内容注释掉(还原回去)
(四)总结
(1)注意账号的活性,尽量多的使用账号
(2)Cookie的设置有多种方法,挑选适合爬虫的方法
(3)注意Cookie池环境的搭建
四、分布式爬虫的架设
(一)项目知识点补充
1.Redis的任务存储
2.爬虫分为任务爬虫和工作者爬虫
3.数据存储改成Mongo
(二)环境介绍
1.爬虫项目
2.Cookie池管理系统
3.Redis数据库和Mongo数据库
(三)实践操作:打造分布式爬虫框架
1.在终端窗口输入命令:pip install gerapy scrapyd
2.新建两个终端,其中一个终端输入命令:
(1)cd Desktop
(2)mkdir scrapyd_dir
(3)cd scrapyd_dir
(4)scrapyd
另一个终端输入命令:
(1)cd Desktop
(2)gerapy init
(3)cd gerapy
(4)gerapy migrate
(5)gerapy runserver 0.0.0.0:8001
3.删除font.ttf文件,修改middlewares.py文件代码内容
import io class ShanzhiDownloadMiddleware(object):# 只显示修改内容def from_crawler(cls, crawler):s = cls()# 将本地硬盘上的文件换成在线文件fonturl = 'http://shanzhi.spbeen.com/static/fonts/szec.ttf'fontresp = requests.get(fonturl)font = TTFont(io.BytesIO(fontresp.content))result_dict = {}for k,v in font['cmap'].getBestCmap().items():# hex()函数是将十进制转成16进制k = hex(k).replace('0x','&#x')+';'v = int(v[8:10])-1result_dict[k]=str(v)crawler.signals.connect(s.spider_opened,signal=signals.spider_opened)return s4.修改piplines.py文件代码内容
import csv
import datetime
import pymongoclass ShanzhiPipeline(object):def __init__(self):self.client = pymongo.MongoClient(host='192.168.2.38', port=27017)self.db = self.client['shanzhi']self.collect = self.db['sz']def process_item(self, item, spider):self.collect.insert(item)return item
5.复制sz.py分别为sz-1.py和sz-2.py,并对两个文件进行改造
sz-1.py代码如下:需要将settings.py中的ITEM_PIPLINES注释掉(还原)
import scrapyclass SzSpider(scrapy.Spider):name = 'sz1'allowed_donains = ['shanzi.spbeen.com']# start_urls = ['http://shanzhi.spbeen.com/']basic_url = 'http://shanzhi.spbeen.com/api/search/?word=&page={}&_=1631533868181'custom_settings = {'ITEM_PIPELINES' : {'shanzhi.pipelines.RedisPipeline':300,}}def start_requests(self):for i in range(1,17): //1 2 3 4 5 6 7 8 9 10 11 12 13 14 15 16url = self.basic_url.format(i)yield scrapy.Request(url, callback=self.parse, meta={'number':i})def parse(self,response):# print(response, response.mata)number = response.meta.get('number', False)divcard = response.xpath(".//div[contains(@class,'animate__animated')]")for div in divcard:item = {}item['链接'] = div.xpath('./div/h5/a/@href').extract_first()item['岗位'] = div.xpath('./div/h5/a/text()').extract_first()item['薪资'] = div.xpath('./div/h5/small/text()').extract_first()item['公司'] = div.xpath('./div/p[last()]/small[1]/text()').extract_first()# print(item)yield itemif number and len(divcard) == 10:number += 16url = self.basic_url.format(number)yield scrapy.Request(url, callback=self.parse, meta={'number':number})修改添加piplines.py文件内容,添加class,代码如下:
import pymongo
import redis
import jsonclass RedisPipeline(object):def __init__(self):self.redis = redis.StrictRedis(host='192.168.2.38', port=6666, db=0)def process_item(self, item, spider):self.redis.rpush('sz:item',json.dumps(item))return item  class ShanzhiPipeline(object):def __init__(self):self.client = pymongo.MongoClient(host='192.168.2.38', port=27017)self.db = self.client['shanzhi']self.collect = self.db['sz']def process_item(self, item, spider):self.collect.insert(item)return item
新建run-sz1.py和run-sz2.py,代码如下类比:
from scrapy.cmdline import execute
execute("scrapy crawl sz".split())
sz-2.py代码如下:
import scrapy
from scrapy_redis.spiders import RedisSpider
import jsonclass SzSpider(RedisSpider):name = 'sz2'allowed_donains = ['shanzi.spbeen.com']redis_key = 'sz:item'custom_settings = {'REDIS_HOST': '192.168.2.38','REDIS_PORT': 6666,'SCHEDULER': 'scrapy_redis_scheduler.Scheduler','DUPEFILTER_CLASS': 'scrapy_redis.dupefilter.RFPDupeFilter','SCHEDULER_PERSIST': 'True','SCHEDULER_QUEUE_CLASS': 'scrapy_redis.queue.PriorityQueue','ITEM_PIPELINES': {'shanzhi.pipelines.ShanzhiPipeline':300,},}def make_request_from_data(self, data):item = json.loads(data)return self.make_requests_from_url(item['链接'], item)def make_requests_from_url(self, url, item):return scrapy.Request(url, dont_filter=True, meta={'item': item}, callback=self.parse_detail)def parse_detail(self, response):item = response.meta.get('item',{})item['编号'] = response.xpath('.//h4[@class="display-5"]/text()').extract_first()item['编号'] = item['编号'].split(']')[0].split(':')[-1]item['薪资'] = response.xpath('.//h4[@class="display-5"]/span/text()').extract_first()item['经验'] = response.xpath('.//p[@class="lead"]/span[1]/text()').extract_first()item['公司地址'] = response.xpath('.//div[@class="col-4"]//text()').extract()item['公司地址'] = "".join([address for address in item['公司地址'] if "地址:" in address]).replace(" ","").replace("\n","")item['福利待遇工作职责描述'] = "".join(response.xpath('.//div[@class="col-8"]//text()').extract())item['招聘人数'] = response.xpath('.//p[@class="lead"]/span[last()]/text()').extract_first()item['简历邮箱'] = response.xpath('.//div[@class="jumbotron bg-white"]/p[last()]/span[2]/text()').extract_first()yield item
可以在127.0.0.1:8001/#/project链接下进行管理部署
(四)总结
1.分布式爬虫,注意数据的存放位置,爬虫必须能读取到
2.Redis是任务临时存放的位置,可以放url或数据结构
3.分布式爬虫分任务发布和任务处理
99%的人还看了
相似问题
猜你感兴趣
版权申明
本文"爬虫进阶-反爬破解8(反爬的实战练习:爬虫文件的解析和数据的抓取+反爬措施的分析和突破+Scrapy接入Cookie池管理系统+分布式爬虫的架设)":http://eshow365.cn/6-24856-0.html 内容来自互联网,请自行判断内容的正确性。如有侵权请联系我们,立即删除!
- 上一篇: 人工智能(AI)进行对话交流
- 下一篇: python造测试数据存到excel