已解决
语义分割——灰度图像转伪彩色图像
来自网友在路上 159859提问 提问时间:2023-09-21 08:38:06阅读次数: 59
最佳答案 问答题库598位专家为你答疑解惑
目录
- 检验灰度图
- 检验代码
- 灰度图转伪彩色图代码
- 转换代码使用细则
- 示例转换结果
- 总结
检验灰度图
制作语义分割数据集或用训练好模型测试图像时,得到的结果是灰度图像,如下:

检验代码
上面图像灰度值不是全是全为0,灰度范围在[0,1]之间,使用下面脚本测试灰度图像的灰度值是否全为0:
import cv2img = cv2.imread("output/result/Result_2023.9.18_Int8/Val_Predict/BlockImage/1.png")min_val = img.min()
max_val= img.max()print("min_val",min_val)
print("max_val",max_val)
print("dtype",img.dtype)
print("shape",img.shape)
print("img = ",img)cv2.imshow("1",img)
cv2.waitKey()
cv2.destroyWindow()
通过上面脚本检测结果如下:

灰度图转伪彩色图代码
上面的灰度图直观的看不了测试结果怎样,得将[0,1]区间的灰度值映射到[0,255],详解代码见下:
from __future__ import print_functionimport argparse
import os
import os.path as osp
import sys
import numpy as np
from PIL import Imagedef parse_args():parser = argparse.ArgumentParser(formatter_class=argparse.ArgumentDefaultsHelpFormatter)parser.add_argument('dir_or_file', help='input gray label directory or file list path')parser.add_argument('output_dir', help='output colorful label directory')parser.add_argument('--dataset_dir', help='dataset directory')parser.add_argument('--file_separator', help='file list separator')return parser.parse_args()def get_color_map_list(num_classes):"""Returns the color map for visualizing the segmentation mask,which can support arbitrary number of classes.Args:num_classes (int): Number of classes.Returns:(list). The color map."""num_classes += 1color_map = num_classes * [0, 0, 0]for i in range(0, num_classes):j = 0lab = iwhile lab:color_map[i * 3] |= (((lab >> 0) & 1) << (7 - j))color_map[i * 3 + 1] |= (((lab >> 1) & 1) << (7 - j))color_map[i * 3 + 2] |= (((lab >> 2) & 1) << (7 - j))j += 1lab >>= 3color_map = color_map[3:]return color_mapdef gray2pseudo_color(args):"""将灰度标注图片转换为伪彩色图片"""input = args.dir_or_fileoutput_dir = args.output_dirif not osp.exists(output_dir):os.makedirs(output_dir)print('Creating colorful label directory:', output_dir)color_map = get_color_map_list(256)if os.path.isdir(input):for fpath, dirs, fs in os.walk(input):for f in fs:try:grt_path = osp.join(fpath, f)_output_dir = fpath.replace(input, '')_output_dir = _output_dir.lstrip(os.path.sep)im = Image.open(grt_path)lbl = np.asarray(im)lbl_pil = Image.fromarray(lbl.astype(np.uint8), mode='P')lbl_pil.putpalette(color_map)real_dir = osp.join(output_dir, _output_dir)if not osp.exists(real_dir):os.makedirs(real_dir)new_grt_path = osp.join(real_dir, f)lbl_pil.save(new_grt_path)print('New label path:', new_grt_path)except:continueelif os.path.isfile(input):if args.dataset_dir is None or args.file_separator is None:print('No dataset_dir or file_separator input!')sys.exit()with open(input) as f:for line in f:parts = line.strip().split(args.file_separator)grt_name = parts[1]grt_path = os.path.join(args.dataset_dir, grt_name)im = Image.open(grt_path)lbl = np.asarray(im)lbl_pil = Image.fromarray(lbl.astype(np.uint8), mode='P')lbl_pil.putpalette(color_map)grt_dir, _ = osp.split(grt_name)new_dir = osp.join(output_dir, grt_dir)if not osp.exists(new_dir):os.makedirs(new_dir)new_grt_path = osp.join(output_dir, grt_name)lbl_pil.save(new_grt_path)print('New label path:', new_grt_path)else:print('It\'s neither a dir nor a file')if __name__ == '__main__':args = parse_args()gray2pseudo_color(args)
转换代码使用细则
使用该代码,只需要在终端去到该文件所在路径下,添加灰度图像文件夹路径和转换后的保存路径即可。
终端中输入的命令为:
python gray2pseudo_color.py <dir_or_file> <output_dir>
上面命令中:
dir_or_file为灰度图所在的路径
output_dir为转换后伪彩色图像的保存路径
具体的使用方法见下图:

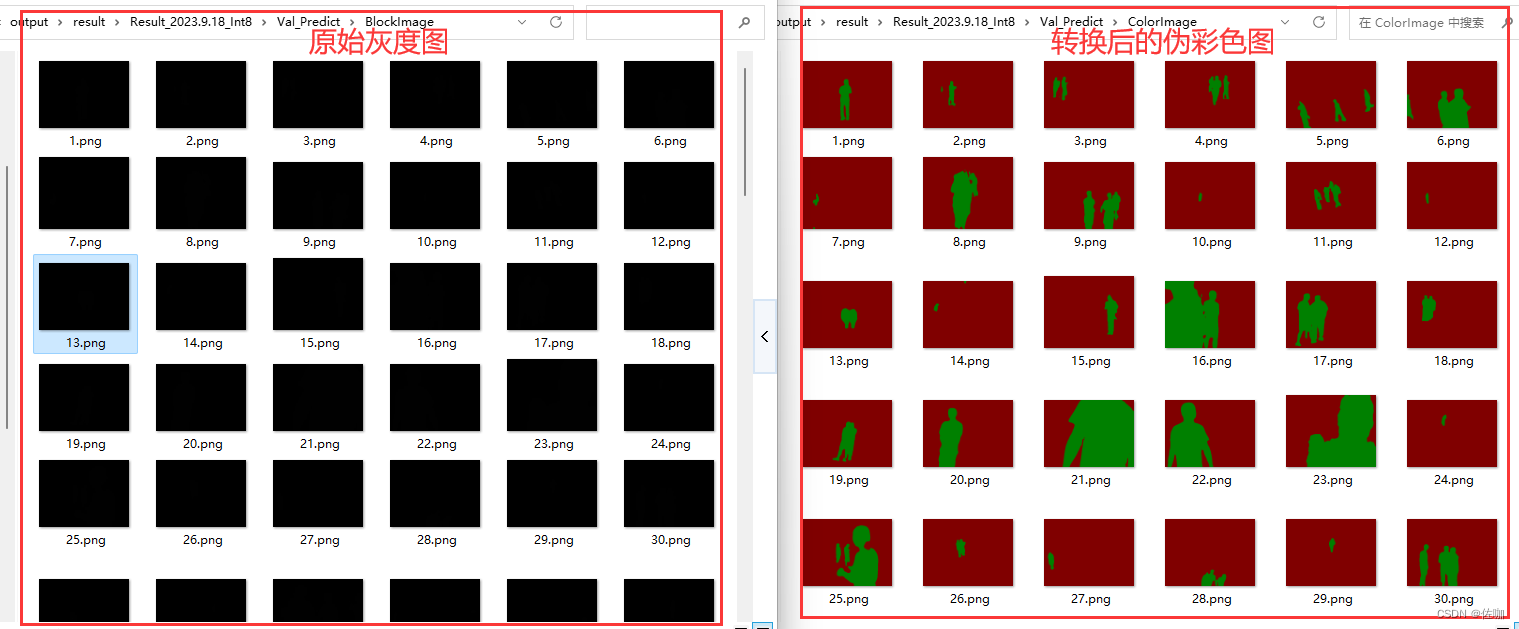
示例转换结果
转换后的对比结果如下图:
总结
以上就是语义分割中灰度图像转伪彩色图像的方法,希望能帮到你,多多支持,谢谢!
查看全文
99%的人还看了
相似问题
- OpenCV-Python小应用(九):通过灰度直方图检测图像异常点
- 【c++|opencv】二、灰度变换和空间滤波---4.高斯滤波
- 【c++|opencv】二、灰度变换和空间滤波---3.均值滤波
- 【c++|opencv】二、灰度变换和空间滤波---5.中值滤波
- 【c++|opencv】二、灰度变换和空间滤波---2.直方图和均衡化
- 【c++|opencv】二、灰度变换和空间滤波---1.灰度变换、对数变换、伽马变换
- OpenCV常用功能——灰度处理和图像二值化处理
- 【视频处理】通过调用图像来重建新影片及计算颜色通道的平均灰度值,并检测帧与前一帧之间的差异(Matlab代码实现)
- 【将文本编码为图像灰度级别】以 ASCII 编码并与灰度级别位混合将文本字符串隐藏到图像像素的最低位中,使其不明显研究(Matlab代码实现)
- 基于 Nginx 实现一个灰度发布系统
猜你感兴趣
版权申明
本文"语义分割——灰度图像转伪彩色图像":http://eshow365.cn/6-10569-0.html 内容来自互联网,请自行判断内容的正确性。如有侵权请联系我们,立即删除!